Sunday, July 29, 2012

Baseball is Life LO

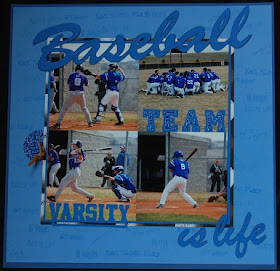
I created this monochromatic layout for a challenge a while back (before I broke my wrist).  We were to use 90% of the color of choice and no more than 10% complementary colors.  I picked blue as baseball layouts are easy for me :)

I used Versimark ink and Got Game stamps from Pink by Design to create a subtle background on my blue cardstock.  I cut a circle out of PLS paper (Papillion LaVista South is Tyler's High School) and tucked it behind the baseball paper photo mat.  I tied a knot out of leather cording.

I added TEAM and VARSITY from Varsity Letter to two of the photos.  I added Baseball is life from Baseball as my title.  In my house (especially this time of year) Baseball really is life.  We are getting ready to go to the State Tournament in Kearney, NE.  

Tyler catches and has played a little bit at 2nd Base and pitcher.  This summer has been a great season for our boys!!!  I really don't want it to end.....

Friday, July 27, 2012

Zooin' ~ Frosted Designs One Word Challenge

This week's Fabulous Friday Challenge is to use ONE WORD in your project title.  

I made up my own word for Tanner's Zoo field trip page.

I used these animals from Zoo Day (shadow feature) along the bottom of my Gypsy Screen.

I used my Amy Chomas pen holder and ball point pen to draw the animals on my brown cardstock.

Here is the border drawn on.

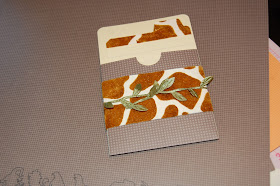
I used this fun giraffe textured paper to enhance the top of my tag.  I ran it through my Xyron.

I stuck the giraffe paper on the top of my tag.

I trimmed the top of the tag and now I have a Giraffe Tag!

I wrapped some of the giraffe paper around the pocket and tied it with some vine.

I used the font from Zoo Day to weld and create my title.  After I welded the title, I sized it to 5 inches wide to fit the space on my layout.

I cut out my title with school paper cardstock.

I put the smaller photo on the tag.  I journaled on the back of the tag and put it back in the pocket.

I added some flags and a bit of twine to the side of the pocket.

I cut out another layer of Zooin' in brown to put behind the title.  I made a little banner with scraps of paper and Smash tape.

I added a crocodile from Animal Kingdom sized to 1 inch.  

The kids got to touch a stuffed crocodile - it was really cool!

Thanks for stopping by!!


Monday, July 23, 2012

One Last Visit to Rosenblatt LO (CCR + Imagine)

Here is a simple layout combining Cricut Imagine with CCR.

I built the layout in CCR using the Snapshot Nature cartridge to open up a 12x12 square and filling it with grass.  Next, I opened up a 11.5x2 rectangle and filled it with baseballs from Snapshot Everyday.  Last, I opened up a 10.25x8.25 rectangle to use as a photo mat and filled it with yellow.

I printed this out on my Imagine.

I used Gypsy and Expression to cut out the words with Hello Kitty Font.  These were sized to 1 inch.

I added the photos and a beer bracelet that they were handing out.  We were also allowed to take dirt.

I made a second page (forgot to save the file) and it was very similar.

I had the option to order this collage when I ordered my photos.  I usually don't get one, but really liked this one.  I sized the yellow rectangle to frame my collage (8.25x10.25).

I trimmed both pages and centered them on a piece of Kraft cardstock.

Rosenblatt has been the home of the College World Series since forever!!!  This was the second season at the brand new stadium in downtown Omaha.  The few days before the CWS started this year, they opened up the field and encouraged people to come down and get one last look, run the bases, take photos and take dirt.  

The Omaha Zoo will take over this land.    It was very somber down at the Blatt.   It is truly the end of an era!!!

Saturday, July 21, 2012

Cricut Imagine + CCR = Layout!

I decided to give CCR another try after I saw a YouTube video combining the Imagine with CCR.   Now I can't find the exact video that I followed.  I found another one HERE in case you want to see how to combine the two to create a print out a layout.  This video was made when CCR was in the Beta stage so some of the specifics have changed.  The biggie is when you add elements to your patterned  page, instead of clicking on Don't Weld (like this video shows) CCR will ask you if you want to make an additional layer - click yes and you can fill your shape/image with a different color.

I put a 12x12 square shape on my mat and selected the paper I wanted from Industrial Glow.  Next I added two photo mats.  I sized a square 4.25 x 4.25, put it on my mat and colored it orange from the color options.  I repeated this with a rectangle 4.25 x 6.25 in the same color.

I grabbed this title from 3 Birds on Parade and colored the shadow layer cream and the title in orange.  I layered them one on top of the other.

Since I have a Gypsy, I had to dig out my carts and plug them into the Imagine to print out.

I felt this layout was a little flat, so I got to work!!

I added orange stickles to the title.

I pop-dotted the photos on the mats.  I created a string of orange butterflies (inked in brown) to connect the photos.  I added green gems.

On Tanner's class field trip to the zoo, the guy in the Butterfly House put a butterfly on each of the kid's hands.  It was so cool!!

I added some twine and a little green butterfly to the photo and then trimmed of 1/8" from each side and mounted the layout to a lime green cardstock- and this layout is done.

Now, I am a 2-page scrapper and I have a lot of photos of this trip.  Here is how I created page 2:
I cut the remaining photos to 4x4 and adhered them around the page (lime green cardstock) leaving the center open.   I went back to CCR and grabbed a 3.75 x 3.75 square and used the same background paper from Industrial Glow.  I manipulated the pattern to make it smaller so it matched the 12x12 page.

I grabbed these butterflies from Wall Decor and More (banner function) and added them to the square.

I also cut out the same butterflies (on my E) in orange cardstock so I could layer them on top.  I pop-dotted the butterflies on and added green gems.

I tied a bit of twine around the bottom of the square and added a journaling stamp from Pink by Design.


I think it turned out pretty good for my first time :)

Here are my two layouts together.  Maybe there is hope for me and CCR after all!!
Thursday, July 19, 2012

Thanks Window Card


If you are looking for Keira's Birthday Blog  Hop, please go HERE.

Many of you know that I broke my right wrist in May.  Since my cast came off, I have been going to physical therapy three times a week.  My time is almost done and I wanted to make a thank you card for the therapists who have helped me get my strength and mobility back.
I found this window card base from Wild Card and sized it to 4.05w x 8.23h.  I rotated it 90 degrees.

I grabbed this "Thanks" from Gypsy Wandering and sized it to 3.80w x 1.71h.  I welded it inside the window.  I copied the "Thanks" to another Layer.

I set up my file to cut two cards at the same time.

I selected a double sided cardstock to cut out the card base.  The inside is a light blue.

Here is Layer 2 on my Gypsy.

I cut out the "Thanks" in maroon cardstock.

I used Martha Stewart Lace Edge punch to create a border on the top of the card.  I used some flower pieces I cut out earlier with my Sizzix die.  I cut out pages from a book and inked the flower layers with Vintage Photo distress ink and fastened the flower together with a brad.

I wanted a semi-manly card as one of the therapists is a man.

I am linking this up at Sheila's BLOG for her Window Card Challenge!

Lake Fun (Sweet Sassy Diva)

If you are looking for Keira's Double Digit Birthday Hop, please go HERE.

This week at Sweet Sassy Diva's Blog our theme is Vacation Anyone?  I took these pictures at my brother's cabin in May.  The kids were fishing and riding in the paddle boat and having a great time!!

I started out with my Gypsy:

I saw a layout on Pinterest that had some paper waves and wanted to make some.  I found this border from Martha Stewart Elegant Cake Art and sized it to 4.8w x 1.58h and welded two together.  I hid the inside cuts with Hide Contour.

I cut out LAKE FUN from Martha Stewart Birthday Cake Art sized to .88 inches.  

I cut out three waves and trimmed 1/4" off of one and 1/2" of a second wave in order to stack them.

I used this bright paper from Quick Quotes to layer my photos with!

I inked the waves with Opaque ink.

Next, I added some fish and fishing poles from the accessories on Everyday Paper Dolls.  I sized the fish to 2.41 inches and 2.18 inches.  I sized the fishing poles to 2.06 inches.

I added the sun and chair from Life is a Beach.  The sun is sized to 1.82 inches.  I copied another sun and hid all of the cuts except for the circle pieces to create a circle layer.  The chair is sized to 1.82.

I cut out the pieces from my cardstock scrap stash.

I inked the fish with a little pink and put them in between the waves.  I tied a knot in orange and blue twine and tucked it behind the waves.

I added the title on the water and put the chair in the corner.  The fishing pole is just above the fish.  I adhered one to the layout and pop-dotted the second one on top.

I changed the background paper to something more subdued and added a touch of orange twine.

I hope you enjoyed my layout from our mini vacation.  We usually all go to the Ozarks together every August, but this year (after 13 years) we are not able to all go.  It makes me a little sad, but I look forward to future family vacations!!!

Thanks Bobbi Jo for having me over today!!!

Tuesday, July 17, 2012

Keira's Double Digit Crafting Birthday Bash Blog Hop

Welcome to Keira's Double Digit Crafting Birthday Bash!!!

Welcome To Keira’s Double-Digit Birthday Crafting Bash!

Oh, the dilemma of it all, what to get a talented gal such as Keira who is going to be 10 for her birthday!!!!! I know what, let's have a blog hop for her .....

Keira has sooo many talents and likes such as:
she will be going in the 5th grade, loves dogs and cats, loves to garden, is a competitive gymnast, but more importantly, she is the best crafting partner Lisa Woodward could have!  At 9, she can use a cricut independently, and with SCAL and CCR. She likes to paper piece and scrapbook and loves making cards for everyone~and everything!!!!  Hallmark may not have a card for “Sorry my Golden Retriever ate your shoe at my sleepover” but Keira sure does!  Keira crafts along side Lisa, working on her own projects, and with helping Lisa with hers.  Now, bear in mind that Keira is not a "kid" crafter so to speak but her skills go way beyond pipe cleaners and pom poms!

We have a talented group of crafters to help Keira celebrate her birthday and know she will be hopping along as part of her "surprise" .....

Our complete line-up is:


Day 1
Day 2
16. Sarah - http://simplyshaddock.blogspot.com ****NEXT


If you're just visiting me today, I'm thrilled but wouldn't want you to miss a single birthday wish to this special 10 year old!!!! The hop begins with Lisa. If you have arrived from JAMIE then you are most definitely following the cake crumbs and the birthday banners and streamers!!!

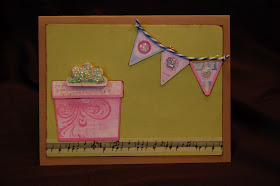
For my project, I started out with my Cricut Imagine and the Yummy cartridge:


 I printed and cut out these fun images.

I made a card out of kraft cardstock with a green cardstock background.  I inked and adhered the present and banner on. 
On the inside, I inked and layered pink and green cardstock and added the Celebrate cut.

I added some musical tape from Recollections (I hear the Happy Birthday song in my head - don't you??).  I also added some twine with a little Glossy Accents to the banner and some stickles to the bow on the present.


I included the extra cuts and a mini stamp set as my gift to Keira!

Time to cut the cake…..WAIT….this is a blog hop party, there’s no cake….there’s CANDY!  We have some awesome sponsors for this blog hop who are offering some great prizes!


have as an awesome sponsor Scrapping with Lisa Designs (http://scrappingwithlisadesigns.com)!  Lisa Peters has donated $20 worth of her original files as a prize for another lucky winner!  To be eligible for this prize, please follow and comment on each blog in our hop and also follow Scrapping with Lisa Designs Design Team blog page at http://scrappingwithlisadesignsdt.blogspot.com/, and “Like” the Scrapping with Lisa’s Designs Fan Page so you get updates and inspiration for Lisa’s great files.


Our next fantastical Sponsor is Kristy with Scraptastical Kreations.  Kristy has donated a $15 gift certificate to her online store at http://www.scraptasticalkreations.com/.  To be eligible for this prize drawing, please like Scraptasitical Kreations’ Fan Page on Facebook, and become a follower of her blog at http://scraptasticalkreations.blogspot.com and comment on each blog posting in our hop.


The amazingly talented Daisy Collins of “I Love Sketches by Tsunami Rose” has donated a $10 gift certificate to her store (http://www.zibbet.com/tsunamirose) and a copy of “I Love Sketches By Tsunami Rose” sketches from the month of July!  In addition to leaving blog love for all of our participants and following their blogs, please follow http://tsunamirosedesigns.blogspot.com for updates and inspiration for Daisy’s sketches and visit and like her fan page at https://www.facebook.com/groups/106370486155916/.


The creatively diverse Christine Jones of Custom Creative Expressions (http://www.customcreativeexpressions.com/Shop-Online.html) will be creating a personalized tumbler for another lucky winner!  Perfect for a gift, or those crafting happy hours!   To qualify for this great prize, please leave comments and follow our participating bloggers!


After a long afternoon of crafting, deadline rushes for orders and posts, what would be better than a prize package from SimplySilverton-a soap and paperworks company?  This prize pack will include 2-4oz. handmade luxury soap, a 5 oz. body souffle’, 8 oz of scented massage oil, and a pound of bath salt soak.  To be eligible, please show your blog love to our participants by leaving comments and following their blogs, and also visiting and liking their page at https://www.facebook.com/pages/SimplySilverton-a-soap-and-paperworks-company-llc/218576901486847.

And…..

Our Blog Hostess, Lisa Woodward would like to say “Thank You” for celebrating this wonderful event with us!.  She is offering one lucky winner a $50 prize pack of crafting supplies, embellishments, goodies and bling.  In order to be eligible for this prize, please follow and comment on each blog post in our hop. 

(All winners will be chosen from eligible entries at random. I will post the winners NLT Sunday, July 22nd, 12 midnight, EST. All entries through Saturday at midnight will be considered eligible.)


Well, we hope you enjoyed the birthday wishes we have prepared and now that you won't want to miss SARAH as she too wishes Keira a wonderful double digit birthday!!! You can just imagine how thrilled she is as she is grinning "ear-to-ear" with all of her birthday wishes!

If you too would like to send a special card the address to mail to is:

Keira Woodward
3448 Valley Creek Drive
Tallahassee, FL  32312