Sunday, October 31, 2010

Fall Window Card

Here is my Sassy-Inspired Window card.  Every Saturday, Sassy has a Gypsy Made Simple project on her BLOG.


One of Sassy's specialties is creating window cards.  Here is how I laid out my card on my Gypsy.  I found the card with the six windows in it on French Manor.  The leaves are from Designer's Calendar.  The font is from Hannah Montanna.

This is the paper I used.  I originally wanted to use the orange for the leaves but it was too busy.  I mixed it up just a bit for the final card below.

Thanks for looking and be sure to give Sassy's challenge a try!!

Friday, October 29, 2010

Halloween Cupcakes

My friend Karyn helped me decorate cup cakes for my daycare kids.  We are having the party in about an hour!!!!  We had so much fun making these!


And here is the creative process right here!!!  I can't work without making a mess!!!

Have a great Halloween Weekend!!!

Thursday, October 28, 2010

Two Special Ladies

Monique Griffin is a talented scrapbooker from the Cricut Message Board.  I have been following Monique's battle with breast cancer on Caring Bridge.  She is having surgery today to remove both breasts.  She asked us to spread the word about IBC, the rare type of Breast Cancer that she has.

This is quoted from her Caring Bridge journal:

Ya know, I've mentioned several times how important it is for us women to do self-checks and get mammograms. And I know that many of you have done this, which is SO great!!! But now I want to mention one more thing. I only realized about a month ago that the type of breast cancer I have is Inflammatory Breast Cancer. This is a more rare type of breast cancer (1-5% of breast cancers are IBC), where the cancer cells actually enter the lymphatic system in the skin of the breast. Usually you don't even get a lump with IBC, although I did since mine was pretty advanced. So since the cancer is in the lymphatic system, the fluid backs up in the breast and causes symptoms such as redness, a rash (small or large), swelling of the breast, flattened or retracted nipple, itching and pain. Sometimes the symptoms can even occur overnight. If you ever notice any of these changes, it's extremely important to be seen right away. Many primary doctors have never seen a case, so it often gets misdiagnosed as an infection. But if you don't have a fever, it's probably not an infection, and you need to see a breast specialist and get a skin biopsy ASAP. It's the most aggressive breast cancer there is, and it spreads quickly, so time if of the essence. Since so many people don't know anything about this, I want to spread the word, and hope that you all will help me spread the word. I personally didn't know much about this, and that's a big reason I didn't go to the doctor sooner - because my symptoms were so different than standard breast cancer. Please tell all of the women in your life about this and to be aware of any changes to the skin. You can learn more on this IBC website: http://www.eraseibc.com/index.html. My doctor in Philadelphia, Dr. Cristofanilli, assists with the website, and it's their mission to educate women AND doctors about this disease.


Me again here.  I had my annual mamogram this month (normal results thank goodness) and I have to say it is not the most comfortable thing.  I would rather have a mamogram every day than chemo, radiation and/or surgery to remove my breasts!  Ladies...please take care of your breasts!!!
I also want to mention that another message board friend Brenda from BrensDesigns is having surgery Friday to remove her breasts and some lymph nodes.  I will be thinking about both of you ladies!!!

Wednesday, October 27, 2010

So Excited to be a Designer for Frosted Designs!!!

It is hard for me to keep quiet and this was killing me!!!!  I was selected along with 7 talented ladies to be on the Design Team at Frosted Designs.  I debut on November 5th so be sure to check it out!!!

Monday, October 25, 2010

Halloween Treat Bags


I made some treat bags for Tanner's preschool class.  I started with some lime green bags from Michaels.  I turned on my Gypsy and opened up Pumpkin Carving and welded these shapes together for the topper.


I used some Halloween paper and computer labels for the back.  The bag looked a little plain, so I cut out some pumpkins (again with Pumpkin Carving).


I used stickles to fill in the faces.  Inside the bag will go small play doh containers, spider rings, vampire teeth, stickers and a piece of candy. 


For the teachers, I used my DCWV Autumn Splendor paper and my Bind-It-All to make note pads.  With this paper, I don't need to add anything to the cover of the note pad ~ it is perfect already!  Now I just need to remember to take them to school Friday.......

Thursday, October 21, 2010

The Boo Crew ~ Debut on Tuesday Treats

I am excited to debut today on Tuesday Treats!  My Gypsy Girl is celebrating her first birthday this month and we have been busy designing!!  Instead of getting to go to Utah for the Swarm two weeks ago, I got to go to Kansas City for the CKC Scrapbook Convention.  I was amazed at all the products and designs I saw.  My head was spinning with ideas.

I filled up an entire notebook with notes and sketches!  This one here is one of the projects I sketched.  There were several laser cut designs, some I could make on my Gypsy and others I couldn't.  So, yes, I bought plenty!!!

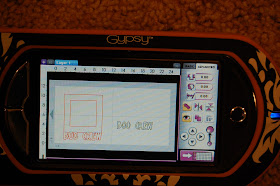
I started with the frame from Wild Card.  I sized it at 8.56w x 15.02h.  This leaves the center opening at 5.5 x 5.5.

I centered it on a 12x12 mat.   I changed my mat size to 12x24 to put my extra pieces on.  To do this, press the silver round button to get to the Main Menu, select Change Mat Size and select 12x24.

I used Opposites Attract for the font.  I started out with the Opposite Shadow feature and the Shift/Lock option for the capital letters.

Then I used the Opposite Feature with the Shift/Lock option for the capital letters.

Before I size the letters, I need to put the shadow letters on the bottom of my frame.

I sized the letters 1.89h.  I moved the Shadow letters in place....

then I group the letters with the frame and weld them.

I grabbed a ghost from Mini Monsters (love this guy) and go to the Hide Contour Feature on the Advanced Menu.  I hid the eye and mouth cuts.

I duplicated the ghost three times and size them to 2.18h.  I flipped the center ghost so he is the opposite of the outside ghosts.  Before I welded the ghosts on, I duplicated two of the original ghosts and one flipped ghost.

I grouped and welded the ghosts to the frame.

I want to change back to a 12x12 mat.  First I need to open another Layer.  Then I highlight the three ghosts and the letters and copy them onto Layer 2.


Next, I move them over to the left half of the 12x24 mat and then change back to a 12x12 mat.


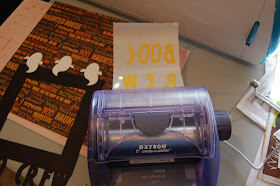
Here is the mat cut with black cardstock.

I cut out the ghosts in white cardstock and the letters in yellow cardstock.

I want to glitter the ghosts and letters, so I ran them through my Xyron upside down.  This puts the stick on the top of the images.

I grabbed my Martha Steward Lemon Drop glitter for the letters.

One of my little helpers (Max ~ 2 years old) helped me dump the glitter.

To seal the glitter and give some dimension, I put Glossy Accents on top of the letters.

For the Ghosts, I ran them through the Xyron and first put the gem eyes on.  They will not stick very well to glitter.

Then I sprinkled Sugar Cube glitter on top.

I found that if I use my fingers to move the pieces, the glitter will fall off where I touched it.  I used my tweezers instead to shake off the excess glitter.

Here are my ghosts all glossed up!

They dried in a couple of hours (I poured it on thick).

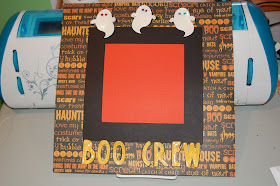
I glued the ghosts down first.  You could leave the letters on the bottom black if you want.  Because my background paper was very dark, I wanted yellow letters.

Once I glued the letters down, I realized that I did not really like the orange background with the photo I chose ~ so I changed it!!

You can see here how my ghost curled.  This was because I used so much Glossy Accent.  I kind of like how the ghost appears to be moving his hands and tail!

And here is my very own little Boo Crew!!

I had fun creating this Halloween project for Tuesday Treats!!  If you have been following me then you know my favorite holiday is Halloween!!!  I hope you have your very own Boo Crew to share Halloween with!!

Monday, October 18, 2010

Create!

This is my entry for the Cricut Circle Monthly challenge to create a layout or wall hanging describing what Create means to you, using shadows, patterned paper and bling.  I did not take many photos while I created this which was probably a good thing.  This turned out so different than I imagined it would and changed my mind a dozen times!!!

The first thing I came up with was my saying.  I used Songbird for the "share a piece of yourself" and welded the letters together.  I used Nursery Rhymes for the font and shadow for the word Create.

I used my search feature to find just the right butterfly.  I ended up using Wall Decor and More.  I made a border with six butterflies.  First I used Hide Contour to hide all of the inner cuts.  I copied five more, rotated them back and forth and welded them together.  I copied the border.

I put another butterfly on the mat (without the inner cuts hidden) and sized it to match the butterflies in the border.  I copied eleven more.

It was after I did all of this work that I noticed there is a border feature on this cart....but I liked mine better for what I had in mind. 

I put the letters "CREATE" on their own Layer to help me organize my cuts.  I opened another Layer and  hid the first Layer so I could see the word CREATE behind my layer.  I put another butterfly on my mat and sized it to fit inside the R.  I copied two more butterflies (because I try to do things in 3s) and cut them out the same color as the other butterflies.


The yellow paper I had did not really go with the color scheme, so I inked it with Tim Holtz's Vintage Photo distress ink and a sponge.

I bent the wings out and glued just the center of the butterflies down.  I put some bling on the butterfly bodies. 

I added some ribbon behind the word Create and here it is!!  Now I need to find the perfect place to hang it!

Saturday, October 16, 2010

Fall Into Fall Layout

This is my sample layout for my Gypsy class.  My goal is to have 2 classes a month, one a layout and the other a card.  This month's theme is Fall.

I used this leaf from A Child's Year.  I used Hide Contour (see below) to hide all of the veins.  Note:  if you hide the veins on the first leaf, every leaf you copy will have the veins hidden.  Otherwise, you waste a lot of time hiding contour!!!

  I wanted the leaves to point down as though they were falling, so I used the Flip button to flip the leaf.  Note:  you can just cut it out right side up and glue it down upside down.

I wanted 5 leaves, so I used the Copy & Paste button to make 4 copies.  I wanted a top layer of leaves the same size, so I copied one more leaf and put it on Layer 2.  Back to Layer 1, I lined up 5 leaves down the mat by making the x coordinates all the same value.  Then I rotated the leaves alternating -.30 and .30.  I overlapped the leaves a bit and welded them together.

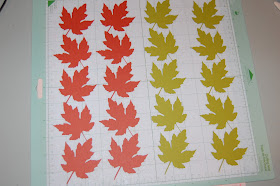
On Layer 2, copy more leaves and arrange them on the mat so you can easily cut out 4 colors of leaves.

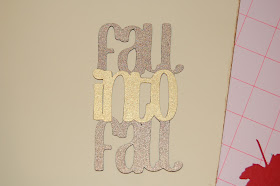
I opened Layer 3 and used Don Juan for the title.  This is a great font to use for welding.  I wanted my title to be vertical, so I stacked the words on top of one another and overlapped just a bit.  I copied the word "into" because I wanted to make a second layer in a different color.  Then I welded the title together.


Hide Contour button on the Advanced Menu allows you to hide cuts from your image.  I used this to hide the veins on the leaf.

Flip upside down button.  I used this to flip my leaves.

Rotate Button is used to turn images.  I turned the leaves for my border .30 and -.30, alternating the leaves.  Once you press the rotate button, you can use the arrows or the keypad to change the value.

I inked the edges of the background paper, photo mats and the leaves with Vintage Photo Distressing Ink and my fantastyx.

Here are the leaf borders.  I used two different colors of leaves for interest.

Here are the leaves to layer on top of the border.

Here is the title assembled.

I typically make a 2-page layout and thought it looked the best with the darker borders on the outside of the two pages.

Once I inked everything, I glued it down.  I left some of the border leaves showing (I did not cover all of them up).  I folded the leaves in half before I glued them down to give them dimension.  I also inked the main vein lines.

Here is the second page.  I used the extra leaves to frame the picture.  The yellow rectangle is for journaling.  I recently cleaned out my ribbon stash and found this gold sheer ribbon and decided it NEEDED to go on this page somewhere!!!

Once again, here is my finished 2-page layout for fall.  I can't wait to take some photos to add to this layout....I just love fall colors!