Happy Valentine's Day!!!
Today I am pulling double duty - my layout is part of the challenge at Frosted Designs and I am including a tutorial for Let's Scrap. I am on the Design Team for both groups and happy that I could make this work for both!!
The Challenge is "Love Is..." using the following colors for inspiration:
I used yellow, blue and pink in my layout - very different from most of my Disney Layouts!!
I also followed this Let's Scrap sketch:
For my Let's Scrap Tutorial, I am going to show two techniques for putting titles/words on your project. It is easy to pick the words you want to use, but not always easy to get them on your project straight and centered. Before my first Cricut machine, I purposely would put my letters on my layout slanted back and forth because I knew I could not get them on perfectly straight!!
For my first example, I used my Cameo. I lined up my letters and words on my screen so they cut out the way I want them to appear on my project.
I cut the words at the bottom out of yellow cardstock.
After I pull the paper up....
I have a ready-made template!
I simply lay my template on my page right where I want it.
I use painters tape to hold it in place. I run my letters through my 1" Xyron to turn them into stickers. Sometimes I use my fine tip glue pen.
Then I put the letters right in their cut out spots.
Once the first letter or two are in, your template will stay in place. When the letters are all in, gently pull up the template.
Here is the first line - looks just like I wanted!
Normally, I continue on but I realize that not everyone uses an electronic die cutter with software, so I will move onto technique #2.
I have a centering ruler that works well with stickers or cut letters that are not nicely arranged on the paper. Once you know your designated space for a title (or sub-title) you can start at the center and work your way out.
Once you find the center of the space you are putting your words, start in the middle of the title/sentence and put the bottom of the stickers right on the ruler. I will say that the larger the letters you have, the easier it is to do this!!
Since I am adding the second line, I find the center point of the first line to determine my center.
Gently bend the ruler so the top of the stickers touch the page. With one hand on the ruler, the other hand holds the letters in place as you gently pull the ruler away (my other hand was on the camera in this shot!!).
This way is a little awkward for me and does take practice but it does help line up the letters straight - something I can not do on my own!!
Here I am using the centering ruler to determine the center of my space. Then I can adhere the "Love is" in place.
Once I got my words on my layout, I added the rest of my pieces.
I inked some doilies with Dylusions Ink (Bubble Gum) and Heidi Swapp mist (teal). I added some ribbon behind the heart.
I take so many photos at Disney that I had to include this camera paper clip. I glittered inside the heart using glossy accents and picked raspberry distressed glitter .
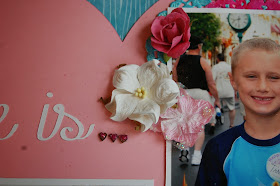
I added these flowers and wood hearts with some picked raspberry distressed glitter adhered on top.
Happiness to me is spending time at Disney with my family. We are currently planning a trip next December and I am super excited!!! We have never been to Disney at Christmastime!
I hope this tutorial helps!


Fabulous LO and I love the tutorial on getting the wording straight! TFS
ReplyDeleteAwesome LO!!!
ReplyDelete