Welcome to the Memories in Tyme blog hops - where you will find some seriously talented people who love to share their ideas with you! Our hop today is anything relating to Weddings or Anniversaries - doesn’t matter if it is a layout, card, mini album, or decorating item, if it’s about getting married…it’ll be here!!! June is one of the busiest times to get married - why not get started a bit earlier this year with all the ideas you will find from our blog hop!
Now, if you just happened upon my blog, then please go back to the beginning which is at Lynda’s blog (http://memoriesintyme.blogspot.com/). Besides, the beginning is always the best anyway!!!
Here is a complete line up in case you get lost along the way!
Here is a complete line up in case you get lost along the way!
1. Lynda J - http://memoriesintyme.blogspot.com
2. Gill - http://creationsbygillm.blogspot.com
3. Claire - http://www.scrapmyway.blogspot.com/
4. Lori - http://scrappinmystressaway.blogspot.com/***HERE
5. Anita - http://www.anitaandbugs.blogspot.com/2012/05/bridalwedding-or-anniversary-519.html****NEXT
7. Vicki - http://mawmawsthoughts.blogspot.com
Let’s get started with the ideas:
My cousin is getting married. I was 19 when she was born and she is only a couple of years older than my oldest son. We don't have a ton of things in common, but I am super excited for her!!!
I got my project idea from a local craft store called Mangelsen's. The sample had vinyl instead of paper but I could not find vinyl to match her blue color so I used paper instead.
I started with my Gypsy, Elegant Cake Art and Wedding.
The coaster set is wooden and sized at 4x4. I sized my pieces to fit within a 4x4 square.
I selected:
toasting glasses sized to 3.31
double hearts (with the date to fit across the solid heart) sized to 2.86 and numbers sized to .54
A & C sized to 1.39, 1.00 and 1.51
double rings sized to 3.00
I rotated the date -10.00 in order to size it to fit inside the heart.
I used blue and black card stock. The wedding invitation is on the bottom right ~ you can see the blue in the flower.
I scrunched all of the pieces I wanted in blue to the top half of the mat. I scrunched the date and toasting glasses to the bottom left quarter of the mat to cut them out in black.
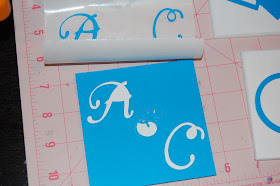
Here are the cuts once I took off the extra paper. I was not sure if I wanted the toasting glasses in blue or black so I cut out both!
Here is the coaster set I bought and the wide black ribbon I used. I got the ribbon at Michaels.
I trimmed the negative piece from the initials to 4x4 and placed it over the tile. I ran the letters through my Xyron to make them into stickers and placed the letters on the tile using the negative piece as a stencil.
I carefully peeled the template off and my letters are spaced perfectly!
I adhered the tiles to the ribbon using my ATG gun.
This will make a nice keepsake for Amy and Cameron. If they want to use these as coasters, they can remove the ribbon and seal the coasters with Mod Podge or a spray sealer.
Thanks for stopping by, but don't leave without hearing about some Blog Candy.....
Blog candy from Memories in Tyme…One lucky winner for June will receive a goodie pack for scrapbooking - in order to get in on the drawing, make sure to:
1. Be a follower of my blog!
2. For extra entries...follow me on Twitter and Facebook Fanpage - information is on my blog!
3. Please check out everyone's blogs and leave a comment on theirs...the more you do the more entries you will get!
Thank you for checking out my project, now follow the links below and remember to visit all the stops for MAXIMUM ideas and LOTS OF FUN!!! Next up on the hop is the Amazing ANITA, make sure you check out her fun project!!!


Such a cute idea!!
ReplyDeletetransport7800@aol.com
http://mawmawsthoughts.com
follower
What a darling idea - I am going to have to play for sure!
ReplyDeleteDon't know how I missed this post. Awesome gift idea. TFS
ReplyDeleteWhat a fabby project. love it, great being part of this hop with you
ReplyDeleteOh boy, she has to be IMPRESSED with such a unique gift ! Love the way you strung them all together.
ReplyDeleteCreative Wishes,
Claire S.
Very clever! I love how there are so many different things in this project, but they all go perfectly together! Wonderful!!!
ReplyDelete