Friday, May 30, 2014

Wedding Decor (Blog Hop)


Happy Saturday
and
Welcome to this month's blog hop
with
The Creating Blog Hops Café

This month's theme is... Wedding or Anniversary. We have made some wonderful projects to share with you and to give some inspiration for those upcoming summer weddings.

Our Hostess for this hop is...

Our wonderful Sponsor for this month's hop is...

Alicia is giving one lucky person a wonderful
wedding themed page kit from Mambi.


So, sit back and grab yourself a Latte' as we dare to amaze you with our projects.

My friend's son is getting married next weekend and I was honored to make a banner and some gift bags for her:

I cut out 6" triangles from burlap.  I created letter stencils using my cameo: 
I cut the stencils out of vinyl and stuck the pieces to the burlap.  
I painted the letters on with black paint.  When the paint was dry, I removed the vinyl.

I used mod podge to stick the burlap pieces to brown kraft paper to give it a nice backing.  I used my Crop-A-Dile to punch the holes and twine to string the banner together.

She wanted some gift bags for the men who stood up with her son. 
She found this saying on Pinterest.  I made this on my cameo with fonts from my computer.  I sent it to my printer and trimmed the paper to fit the bag. 
The rehearsal dinner is at a baseball themed bar as they are huge baseball fans.  They wanted simple bags for the guests to take home the leftover popcorn bar, Big League Chew, Cracker Jacks and sunflower seeds.  As a baseball mom, I frantically took notes!!!

I made a simple circle monogram and cut it out of crimson vinyl for the bags.

I also made food labels for her for the shower and rehearsal dinner but forgot to photograph them.  I was happy to make these for her - she was my middle son's 5th grade teacher!!! 
Your next stop will be with...

Nanné
If  you get lost along the way here is the entire line-up for todays hop for you to get back on track and not miss a single project.
5. Miranda with... http://www.nanasscrapspot.com/
Thank you for hoping along with us today and I hope that we have inspired you to get your craft on. 

Tuesday, May 27, 2014

Blinged Up Visor and Can Hug

I am so excited to be featured at The Buckle Boutique today with some summer bling!!!

After a very cold winter and wet spring I am ready for sunshine!!!  I blinged up a visor and can hug for the occasion!
I used the Hot Pink Zebra Stripe Buckle Boutique Rhinestone Sticker Sheet to cover the visor and can hug. 
I took the spring off the visor and traced it onto the back of the sticker sheet.  I cut it out with my coated cutter bee scissors and stuck it down. 
I measured and cut the sticker sheet for the can hug and left a border at the top and bottom.  I trimmed a strip of black rhinestone sticker sheet to put on the top and bottom to give it a finished look.
Now I am ready for summer!!!

Thanks for stopping by.  What would you put rhinestone sticker sheets on??

The Buckle Boutique's Link Listing
The Buckle Boutique's Website . . . click HERE
The Buckle Boutique Blog . . . . clickHERE
Facebook Page . . . click HERE
Twitter Page . . . click HERE
Pinterest Page . . . clickHERE


Monday, May 26, 2014

Class Reunion Wine Glasses

My Aunt Chris is hosting a brunch for her classmates.  They are celebrating their 50th Reunion from High School.  She asked me to design her some wine glasses - I was so honored!!!

I designed some simple wine glasses for the ladies in my family at Christmas time similar to this one:
 When Aunt Chris asked me to design something special - I was excited and overwhelmed!!

She wanted gold vinyl (hard to see how pretty this vinyl is in a photo) with the years and a rose.  She later wanted two roses, one a rose bud and the other a full rose to represent the passing of time.  I searched out roses until I found the perfect ones!

This is what I came up with!  The roses are from the Silhouette Store and the font is from my computer.


Friday, May 23, 2014

Got Baseball? (Frosted Designs)

This week, the challenge at the Frosted Designs blog is Stars and Stripes.  When I think of Stars and Stripes, I think of two things - 4th of July and baseball!

Here is my layout - Tanner playing baseball.  He loves to play catcher just like his big brother!! 

I love this wood grain paper from 7 Dots Studio - it had white paint splats on it already.  I added some misting from Dylusions Cherry Pie ink to the background.  I also used Cherry Pie ink on the wood veneer "2" from Dear Lizzy, and the star watercolor tag from Heidi Swapp.  You can find these items at the Frosted Designs online store.  All of these items were part of a kit, but most items are sold individually in the store.
I added some washi tape "stripes" under my picture.  I love the word on this star - I think Tanner is a super star!! 
I added a number "2" since that is Tanner's jersey number.  I also tucked in a metal star paperclip to the top of the picture. 
I cut out "Got Baseball?" with my cameo.  Tanner lives and breathes baseball right now!!
I love the monthly kits from Frosted Deisgns!!  I have never tried kits before because I have all boys.  I am also super practical so I was sure I would not use everything that comes in a kit.  I have been very happy with Frosted Designs kits!  They offer a basic kit, messy kit and extra papers.  I have tried all three depending on the theme - and loved them all!!

If you would like to try a kit for a special price, please leave me a comment saying you are interested plus a way to contact you.  I will draw one person to receive a $15 off coupon code off of a $40 kit - that makes it only $25!!!!  Winner will be drawn on Tuesday, May 27, 2014.

A bonus for everyone through Sunday May 25, 2014:

Use the Code: SPRINGSHOP at check out for 20% off your total order (including pre-order items) at Frosted Designs.  This sale ends May 25 so hurry!!!


Thursday, May 22, 2014

Decorated Water Bottles

I have a very special set of twins that have been in my daycare for the past 5 years.  They are going off to kindergarten in the fall.  Their mommy is a teacher, so today is there last day with me (sniff sniff).  

I wanted to make them something special to take to school.  I bought two blue water bottles.  Mallory and William both love blue and red, but blue the most!!!  I added some vinyl to the bottles.
This is just before they started with me - they were soooo small and soooo cute!!! 
This is Christmas 2012 at our annual Daycare Christmas Party. 
This is Christmas 2013.
 They took Tanner with them to the Pumpkin Patch - I just love these pics!!!

These were taken at our Easter Egg Hunt this year.  I can not believe they will not be here next year!!!  Where did the time go?!!?

Good luck to Mallory and William (and Mom too) as they start a new chapter!!  Love you guys!!


Wednesday, May 21, 2014

Leaf Slide (Let's Scrap)

Hello and Happy Wednesday!!  Today starts a new weekly sketch challenge at Let's Scrap!  This week we have a card sketch, but I turned it into a layout.  That is the beauty of Let's Scrap - you can use the sketches as a guide to create what you want on paper!!

I have been on the Design Team at Let's Scrap for 8 months and have been able to get about 50 layouts done thanks to the weekly challenges and other fun challenges!  If you are looking for inspiration - come check us out!!  Oh yeah, we also have awesome sponsors and prizes!!
Here is the card sketch.  I used a title instead of the sentiment and leaves instead of stars.  Last fall, I raked all of the leaves in a pile at the bottom of my slide and let my daycare kids slide into them!  It was safer than jumping in the pile!  I got some great pics - this one is my Tanner.
I have these awesome wood veneer leaves and took some Glossy Accents and Lindy's Stamp Gang Miracles in Mission Bells Brown and created a paste.  I painted the wood pieces and got a wonderful shiny dimensional finish! 
I cut this polaroid frame from the Silhouette store and trimmed my photo to fit.  I tied some twine around the bottom of the frame and glued a leaf on the knot with Glossy Accents.  The rest of the leaves are cascading down the page. 
I inked the edges of my paper strips and adhered my title at the bottom of the page. 
I have been waiting for the perfect sketch for this photo and now I have the perfect layout for it!!

Thanks for stopping by!!

If you are looking for Lindy's Stamp Gang Miracles, I found mine HERE.

Tuesday, May 13, 2014

The Buckle Boutique meets Gift Bags

I am excited to be featured on The Buckle Boutique BLOG today!!

I decorated tiny gift bags with Rhinestone Sticker Sheets today - these bags are perfect for gift cards!!

I ran some rhinestone sticker sheets through my Cuttle Bug machine using two different Tim Holtz dies.  I had these tiny gift bags for a while now and thought it would be fun to glam them up! 
I cut the bird and bird cage out of a clear rhinestone sticker sheet.  I used some ink to color the bird, branch and beak. 
These flower pieces are cut out in pink and gold rhinestone sticker sheets.  I layered them together and adhered them to the bag.

I cut the rhinestone sticker sheets out the same way I cut cardstock out.  I sandwiched the sticker sheet and die between two "B" plates and cranked the handle.  The sticker sheets just popped out!!

These are darling and will work out well for some upcoming birthday gift cards this month!!
You can find the sticker sheets HERE.


The Buckle Boutique's Link Listing
The Buckle Boutique's Website . . . click HERE
The Buckle Boutique Blog . . . . clickHERE
Facebook Page . . . click HERE
Twitter Page . . . click HERE
Pinterest Page . . . clickHERE


Monday, May 12, 2014

Focus - Frosted Designs and Let's Scrap (3D Challenge)

Today I am pulling double duty at two of my favorite places - Frosted Designs and Let's Scrap!!

For Let's Scrap - we are celebrating National Scrapbook Day all month.  Today is my challenge - 3D!  I pop dotted my pictures to my layout and added wood pieces.

For Frosted Designs, I am showing how to FOCUS in order to create a great scrapbook layout.
It is important that we FOCUS on a few things when scrapbooking!

First of all, make sure your photos are in focus and are the best photos of the bunch to tell your story.  Just because we take 15 pictures of each event doesn't mean we need to scrapbook (or even print) all of them!!  This took me several years to learn this!!

Also, make sure your page has a focus.  If you don't have a clear focus - the page is confusing to others and they will quickly look at it and move on.   If you don't have a theme - make one!!

The eye naturally travels over a scrapbook page in a Z pattern.  Try to place your photos and embellishments in the same pattern. 

For this layout, I used a sketch:
I used the left page as my guide.  Sometimes a sketch helps me keep my focus!!
My focus for this page is the random single photos that recap some of Tanner's highlights of 2nd Grade - the book fair, the Pancake Man and the marble run the class made.  

I had only one photo of each event and did not want three separate layouts.  The colors in each photo were close enough that they did not clash when all put together.

I used this yummy paper and tag from the Simply Sweet Kit!

I used my tag for my title and hand wrote the highlights with my white gelly roll pen. 
I added some wood veneer school themed pieces on my paged on the corners of two pictures and the bottom left hand corner.  I added white numbers at the top bottom opposite corners. 

I tucked a burlap weave ribbon behind the photos to ground them.  Without it - they would be floating on my page (or out of focus).

I sure hope this helps you with your layouts - I know it has helped me!!


 photo Lori_zpsea64f050.jpg

Sunday, May 11, 2014

Baseball Visor - KCC Blog Hop


Happy Mother's Day to all of the Mothers out there!!!
Welcome to our Mod Podge Blog Hop brought to you by our Krazy Crafting Crew.

We are an independent hop team that enjoys 
sharing our work with everyone and hope to inspire you with new ideas for you own 
creativity. We are a team who loves to do all different themes, such as cards, layouts, 3D 
projects and so much more. We do all the paper crafting from traditional to digital. Mostly 
traditional, every now and then there may be a little mixed media too! 

This month's hostess is Jearise at Lorby's World and please make sure you stop by her blog and take a peek, she has a neat little give away going on and you can find out all the details on how to sign up for it

Now on to some fun (drum roll here)....................

Not only is this the very last KCC Blog Hop  and Mother's Day- this is also my Birthday!!!  I am a baseball mom and will be watching my son play baseball today (hopefully for the tournament championship)!!!
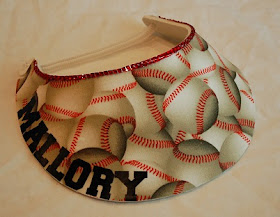
I made this baseball visor for a sweet little girl who loves baseball as much as I do!!
I purchased a foam visor at Michaels.  I took the plastic spring out and traced the visor onto cardstock.  I used the cardstock template to trace the shape on the back of this baseball fabric.  I cut it out and mod podged it onto the front of the visor.  I painted mod podge on the visor first, then put the fabric down and mod podged on top of the fabric.

I trimmed around the foam circle that reinforces the spring.  I did trim the excess fabric once the mod podge was dry. 
I cut out the word MALLORY out of Freshman font on my cameo in black vinyl.  I cut MALLORY on a slight curve - which was perfect for MALL and I eye-balled the O R Y. 
I added a strip of red rhinestone sticker sheet that I cut with my cutter bee coated scissors.  I got this sticker sheet from The Buckle Boutique HERE.
I love how this turned out!!  Mallory is 5 and is leaving my daycare and heading off to kindergarten next fall (sniff, sniff).  She is a tomboy who likes a little flash of bling - just like this visor!!

Your next stop in the hop is PAULA.

Here is a complete line up in case you get lost along the way!