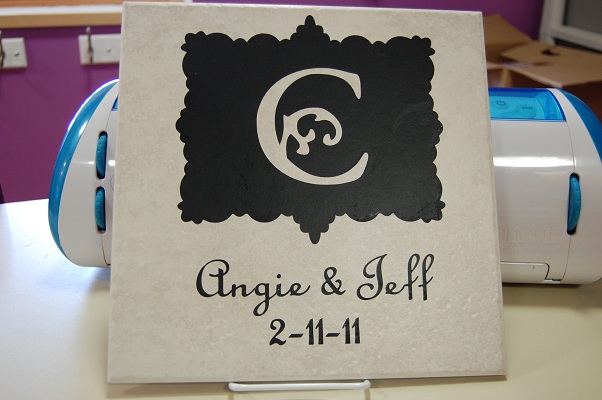
I made this tile for a friend's wedding gift. I am debuting my tutorial today at Frosted Designs! This is an elegent, yet expensive gift. I have been know to spend more on the easel than the rest of the supplies!

Here is what I used for my project: My Gypsy, Cricut, a 12x12 mat, a 12x12 piece of vinyl, a 12x12 tile, a piece of clear contact paper, a dental tool, spatula & scraper from my cricut tool box.

I created my design on my gypsy. It is not required that you have a gypsy (or design studio) but when I use my gyspy, the project is placed perfectly in the 12x12 space. I used Gypsy Font for the fancy C, and Songbird for the names and date.

In order to get a "kiss cut" you want to set your speed and pressure to 3. A "kiss cut" is when the blade cuts the vinyl only, not the paper backing.

You also need to set your blade dial to 3. Just remember 3, 3 & 3 for vinyl!!

You place the vinyl still on the backing to the mat.

Hook up your Gypsy to the Cricut and cut.

You can see the vinyl is cut here...now comes the fun part!

I use the dental tool to poke the vinyl in the corner and peel slowly away.

I roll the vinyl as I peel so it doesn't stick to my project (learned that one the hard way).

Keep peeling....

I use the dental tool to weed out the little pieces I don't need.

Here is the vinyl. Note that it is still attached to the mat.

Trim a piece of clear contact paper to 12x12. Note: you can use transfer film but it is more expensive! Contact paper is super sticky, so be sure to unstick it a bit on your jeans or pants a bit.

Place the contact paper over your mat...

and use the scraper to smooth (or burnish) the design.

I start in the corner and slowly peel the contact paper away from the paper backing. It is not unusual to have to continue to burnish as you go. On one of the 1's the paper backing stuck so I used the razor blade tool to peel it off.

Still slowly peeling.

Almost done!

In order to center my design on the tile, I put the mat next to the tile so I could use the arrow on the mat as my center point.

Smooth it on with your hands first...

then burnish it with the scraper.

Then you repeat the process of weeding by peeling slowly from the corner and rolling the contact paper.

I was having some issues with this part....one issue was I did not unstick enough of the contact paper and my contact paper was too sticky. Another issue is my 5 year old was yelling at me to hurry up so I could join him upstairs. And finally, I realized when I was at this stage that my letters were not welded together like I thought they were. I was trying to be super careful!
Vinyl is very forgiving. If you work slowly and are patient your mistakes will be easily hidden.
Here is the completed tile. I will pick up a fancy easel and wrap it up. You can put vinyl on tile, glass, walls, paper, plastic.....they sky is the limit!!


4 comments:
What a great gift this is! Thanks for the tutorial.
I'm sooo loving this project. Great gift idea. :)
Nice tutorial! I love working with Vinyl. Sometimes I use it on cards for tiny words.
What a great project... they are going to love this! I have some vinyl... after this tutorial I think I might give it a chance! Thanks for sharing ... great ideas and tutorials!
Post a Comment