Copyright Information

Thank you for stopping by my blog! I hope you enjoy the things that I create and share! I do have a copyright on my original creations (see logo on my sidebar below).
If you create and post a creations based off of mine, please refer (with a link) back to my blog. Please do not use my ideas for files, profit or for contests. Thank you!


My Craft Goals for 2015

My Goals for 2015:

1. Update my goals for 2016 in January of 2016 :)
2. Maximize my crafting time!
3. Keep plugging away at scrapbooking photos!!
4. Learn how to Heat Press!!
5. Have fun!


Monday, April 29, 2013

Yummy Note Card Set


Hi!!  I am super excited to share this Yummy note card set today at CricutDiva!!

I am also sharing this card set with my dear friend Sheila at She's A Sassy Lady today!

I made a set of 3x3 cards with truffles on them from the Cricut Imagine Yummy Cartridge.


I printed out the light pink distressed-look pattern on white cardstock to use as background paper for my cards.  I cut them to 2 7/8" squares and adhered them to my note card (3x6 folded in half).


I printed and cut out the three truffles and mini cake at 2" each.  I inked the edges in Vintage Photo ink, and added a little stickles to each piece and let dry.

Before I adhered the patterned paper to the card, I wrapped a piece of 3Girl Jam 1/3 the way up the paper.  I chose the blue to bring out the bit of blue in each card.

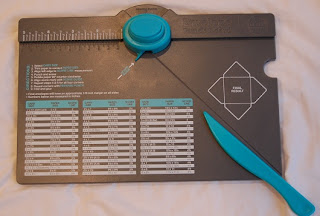
I got the We R Memory Keepers Envelope Punch - super cool new toy!!!  I wanted to make envelopes for my little note cards.

Making the envelopes were fun, once I watched a YubeVideo on how!!


I found this Enveolope Gum at Archivers to seal the envelopes.  I just painted the glue on and let it dry.  It just needs a little water to seal.


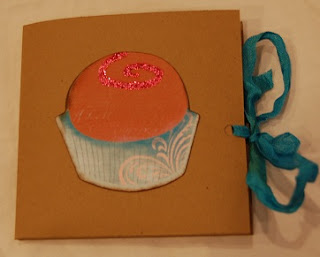
I made a little folder to keep the card set in - this makes a great gift idea!!


I started with a piece of Kraft cardstock and cut it to 8 1/2" x 6".  Placing the paper horizontally on my Score Board, I scored 2" up from the bottom to create the pocket.


I turned the paper to score the fold lines.  I scored at 4 1/8" and 4 3/8".

I used my ATG gun to adhere the center of the bottom flap (pocket) to the spine of the folder.

I punched a hole on each side of the pocket.  I ran a piece of 3Girl Jam ribbon across the inside of the folder and used a glue dot in the spine to hold the ribbon down. 


When you close the folder, simply tie a pretty bow.


What a Yummy Gift card set!  These are great for teachers, friends or even secret pals.  I included this set in an Easter Swap gift with another paper crafter!

I also linked up my card set at Sarah Hamer Designs!!

Saturday, April 27, 2013

Beautiful Bling Blog Hop Baby Girl Mini


Hello and Welcome to the Beautiful Bling Blog Hop!!

If you are looking for the Felicity's Be A Blessing Blog Hop, please go HERE.


Welcome to the Beautiful Bling Blog Hop!!  April's birthstone is a diamond, so we added some bling to our projects!  In this hop, you will see some BLINGY projects with rhinestones, stickles, glitter and more!!!

You should have arrived from Tricia's blog.  If you found me first, hop over to the beginning and see Melanie so you don't miss anything!!

Here is the complete line up in case you get lost!


And now on to my project:


I used Nursery Tails and my Cricut Imagine to print and cut out the baby girl pieces.

I bought this chipboard album at Michaels.  One side of each page is covered in canvas, the other side is blank chipboard.  I flipped every other page so the canvas was next to canvas.


The blank pages were covered with a pink cardstock.  I used some patterned paper to create photo mats and a pocket.

The bib and bottle are pop-dotted on the corners of the 4.25 x 4.25 inch square.  I did not stick down the pieces that overlap the mat so a photo can go under them.


You can see that I inked the edges of the pages in bright blue. 


I added a butterfly from my stash on the back.  The Baby is from Cricut Alphabet.


I added my bling to the cover.  I put gems on the bodies of the butterfly and dragonfly as well as BABY.


Thank you for stopping by!!

Your next stop is Pamela!


Friday, April 26, 2013

Felicity's Be A Blessing Blog Hop


Welcome to Felicity's Be A Blessing Blog Hop!!!

If you are looking for Beautiful Bling Blog Hop, please go HERE.

You should have arrived from RACHELLE.  If you found me first, please go to the BEGINNING so you don't miss anything!!!

Here is a complete lineup in case you get lost along the way:


Welcome to Felicity's Be A Blessing Blog Hop!!

Today we are celebrating a very special little girl's first birthday. She has had a difficult fight this past year and we felt what better way to celebrate her life than have a blog hop!
Felicity has touched many lives even though she is not even one yet. Every day she makes therapists, doctors, and even her family smile.
The purpose of this hop is to be a blessing. So the way to win our blog candy will be for you to be a blessing to someone around you. Then photograph how you have been a blessing with either a craft project or taking a meal to someone, etc. Share it with us and that gives you an extra entry besides leaving comments on all the hop stops. 

Blog candy for this hop is one paper pack and April Showers Cricut Cartridge. 

There are two ways to earn blog candy
1. Leave a comment on each blog
2. Come back and post how you blessed someone else with a link. 
3. Tweet/Facebook about the blog hop

For my project today, I am making a project for the patients and their families at the Arkansas Children's Hospital.  I am being a blessing to my friend Sherry Honeycutt. 


Sherry's house burned down in 2004 and her precious Macy died in the fire just weeks after her 7th birthday.  Sherry and Macy's twin brother Andrew were treated at the Arkansas Children's Hospital and both recovered from their injuries.  Sherry is hosting a Card Drive in memory of Macy to benefit the current patients and families at the hospital.  

Here is the description of the event:
It's time for the 2nd Annual Cards for Kids for Arkansas Children's Hospital in memory of my daughter, Macy. You can help by either making handmade cards (will take store bought as well) and sending them to me, donating goods (their wishlist is attached), or donating financially and we will shop and/or make a financial donation as one. Last year we donated over 100 cards, plus 20 necessity packs for the burn unit, and clothes and toys for the hospital.
Sherry's blog is HERE and  her FaceBook Event page is HERE. She is making this a year round project!!!  One thing I found out after I sent my blank cards in, she wants some of the cards to be signed by us to give to the patients!!


Here are some of the other cards I am sending Sherry.  Some are cards I made for blog hop projects, others are old designs that I had saved on my Gypsy and just re-cut.


This is my feature card.  I used Gypsy Wandering for the frame and flower.


I put two of the frames on the screen at 4 inches.  I hid the inside of the left frame and welded the two together.

I added the flower shadow layer inside the frame sized to 3.47 inches.

I also placed the flower (also sized to 3.47 inches) on the mat.


I ended up cutting a second card in pink and trimmed off the left side to make a background color. I added some stickles to the center of the flower.

I hope you consider making some cards to send to Sherry!!  I sent cards last year and am happy to send some each year.  Thank you Felicity (and Happy Birthday) for giving me the opportunity to share this with so many people today in the blog hop!!

Thank you for stopping by my blog today!!  Your next stop is JULIE!!


Oh Christmas Tree (Frosted Designs)


This week, our new challenge begins at Frosted Designs.  It is a 2 part challenge, using doilies and following the sketch below:


You have 2 weeks to create and link up your project on the side bar at the Frosted Designs Blog.


I used a phrase from Winter Frolic for my title.  I sized Oh Christmas Tree at 1.35 inches.


I chose two shades of green cardstock for the cuts.  I adhered the C R S M S onto the title.

I wanted the title to stand out a bit, so I cut out a tag to adhere it onto.


I found this tag on CTMH Artiste and sized it to 1.59 inches.  I cut out two tags since the paper I used was thin. 


I adhered the two tags together, then adhered the title on top.


I used my Tim Holtz distress marker (Barn Door) to ink the edges.


I cut these ornament borders from Winter Frolic at 1.47 inches.

I ended up cutting out two each in red, green and gold metallic cardstock.


I trimmed 1/8 inch off of each edge of my music cardstock to create a border behind it.  I kept one of the strips and adhered the ornament borders onto it.  I overlapped the ornaments to add interest.

I adhered this strip down on my layout under the pictures.


I adhered the ric rac ribbon on top of the border strip.  This give me an ornament banner.


This quote was on the bottom of the music cardstock - the 1/2 inch that has the bar code that you typically cut off and throw away.  I trimmed it out, inked the edges red and created a border with a scrap of green cardstock.

I started out making my own doilies out of cardstock, but then I found these red doilies.  They are leftover heart shaped doilies from Valentine's Day.  I really like the red color!  I trimmed them and positioned the doilies to look like circles.


I adhered the title on top of the photo.  It may be hard to see in the pictures, but the song printed on the cardstock is Oh Christmas Tree - how perfect for my layout!!!


I also loved the cardinal in the bottom corner so I made sure not to cover much of him up.

We have at least 3 trees every Christmas.  This tree is our live tree.  I love that Tanner is on Mike's shoulders in order to reach the top of the tree!!  Tanner decorated the entire tree this year :)

Don't forget to dig out some of your doilies and create a layout based on the sketch!  Join us at Frosted Designs!!


Saturday, April 20, 2013

Baseball Wreath (Green is Good Blog Hop)


Hello and welcome to the Green is Good Blog Hop!!!


We are creating projects out of something recycled or re-purposed.  There are tons of ways to get greener in everyday life and today we are showing off our creations to celebrate Earth Day 2013.

If you found me first, please head over to the BEGINNING so you don't miss anything (especially her blog candy)!!  

Here is a complete list of blogs in the hop in case you get lost along the way:


Now for my project:


My husband has coached baseball for 17 years so far.  We have several (and I mean a LOT) of baseballs in our garage.  I was able to get him to let me use 14 of them for a wreath project that I saw on Pinterest.  He grumbled something about "wasting perfectly good baseballs" as he collected them :)

He drilled a hole in each ball.  Look what came out of the middle!!


I untwisted a wire hanger and strung the balls on it.


I twisted the ends together using pliers.


I found this baseball glove on Boys Will Be Boys and sized it to 3.50 inches.


I re-used this banner flag.  It was an extra piece from another banner.  Both of my boys are playing on baseball teams and wearing blue.  

The red and white twine is from a Christmas candle.  It was tied around the top as decor and I kept it.


I inked the glove and layered the pieces.  I glued on some knots from leather cording to make the glove look real.


Here is a close up of the glove.


I strung the banner with the twine and a couple of strands from the burlap ribbon.  I tied the banner to the sides of the wreath.


I tied a bow out of burlap ribbon and attached it to the top of the wreath.

This wreath hangs on my front door!

Thanks for stopping by!!  Your next (and final) stop is Holli!