Copyright Information

Thank you for stopping by my blog! I hope you enjoy the things that I create and share! I do have a copyright on my original creations (see logo on my sidebar below).
If you create and post a creations based off of mine, please refer (with a link) back to my blog. Please do not use my ideas for files, profit or for contests. Thank you!


My Craft Goals for 2015

My Goals for 2015:

1. Update my goals for 2016 in January of 2016 :)
2. Maximize my crafting time!
3. Keep plugging away at scrapbooking photos!!
4. Learn how to Heat Press!!
5. Have fun!


Monday, November 29, 2010

Tile for a Friend

We had a great weekend with my husband's cousin and her family staying with us.  I had time to complete one project, a gift for them!  I designed 8 projects on my gypsy and perfected/completed 4 others.  My cricut will be busy this week!!

The R is from Wall Decor and More and the rest is from Base Camp.

I have a lot to post this week and a few blog awards to post as well!!

Don't forget to come back Saturday for the Frosted Design Blog Hop.

Have a wonderful Cyber Monday!!!

Thursday, November 25, 2010

Happy Thanksgiving!!!


I made this cake in my cake class this month.  I hope you have a "sweet" Thanksgiving weekend.  Have fun shopping!!

Tuesday, November 23, 2010

Ice Cream Cone Card with Video


Here is a card I made from the Indie Art Cartridge.


Notes from the video:  The ice cream cone and pieces are sized at 4".  I rotated the left shadow piece to 32.00.  The sentiment "For You" is from Gypsy Wandering and sized at 1.35 height.

An afterthought....I should have cut a shadow of the ice cream only as the cut outs in the ice cream allowed the brown paper to show through.  I solved this by using pink stickles to cover (shown below).

I loaded my paper and cut out the pieces.

Here are the pieces.  I placed the pink paper (on the right) a little bit too low and cut off the bottom of the drip.  I did not have any more of that paper, so I used a lighter pink and re-cut.  When I have to re-cut one piece, I open up a new Layer and copy the image(s) onto it.  That way I am only cutting the piece(s) I need.

I ran the pieces through my Xyron.  I scored the card in half with my Martha Stewart Score Board.

Here you can see the background paper that is showing on the ice cream.

Here is the sentiment inside the card.

Here is the card with stickles on it.  I hope you enjoyed this tutorial and can't wait to see your cards!!

Monday, November 22, 2010

Craft-e-Corner Black Friday Sale

I participated in a Thankful Blog Hop a couple of weeks ago and met Dean and his wife from Craft-e-Corner.  They are having a Black Friday Sale and asked me to share this with you!!


My name is Dean Duehring and I am co-owner of Craft-e-Corner.  My wife and I sell crafting and scrapbooking products at http://www.craft-e-corner.com/

I am letting you know about our great After Thanksgiving Sale specials that I think your followers will be excited to hear about.  I've included our featured specials below:

- Cricut Expression Machine only $199.99!!! That’s over 55% Off the regular price!


- Cricut Expression Machine with 2 cartridges only $229.99!!! That’s 54% Off the regular price!

- Cricut Gypsy Machine only $119.99!!! That’s 60% Off!!!

- Silhouette SD machine only $179.99!!!

- Making Memories Slice Elite Machines only $99.99!!

- Potpourri Basket Cricut Cartridge which includes designs from over 15 cartridges only $49.99!!!


That’s 75% Off the regular price!

Saturday, November 20, 2010

Thankful Tag Challenge ~ Gypsy Chat

Each week there is a Gypsy Challenge on the Gypsy Chat section of the Cricut Message Board.  These challenges are designed to get us using some of the features of the Gypsy ~ this is wonderful for Gypsy users of all stages!

This week's challenge is:

Theme ~ Thanksgiving
Tag or Label ~ weld shapes to create
Buttons or brads
Thread or ribbon


The first thing I did was to weld 4 tags together side by side.  Once I welded the tags, I sized my project to be 11.5 inches wide.

I scored the tags where I welded them.  Then I scored and folded the bottom 1 1/2 inches.  This was my first attempt to sew the seams to make pockets ~ it is hard to see in this photo, but the lines were not very straight!

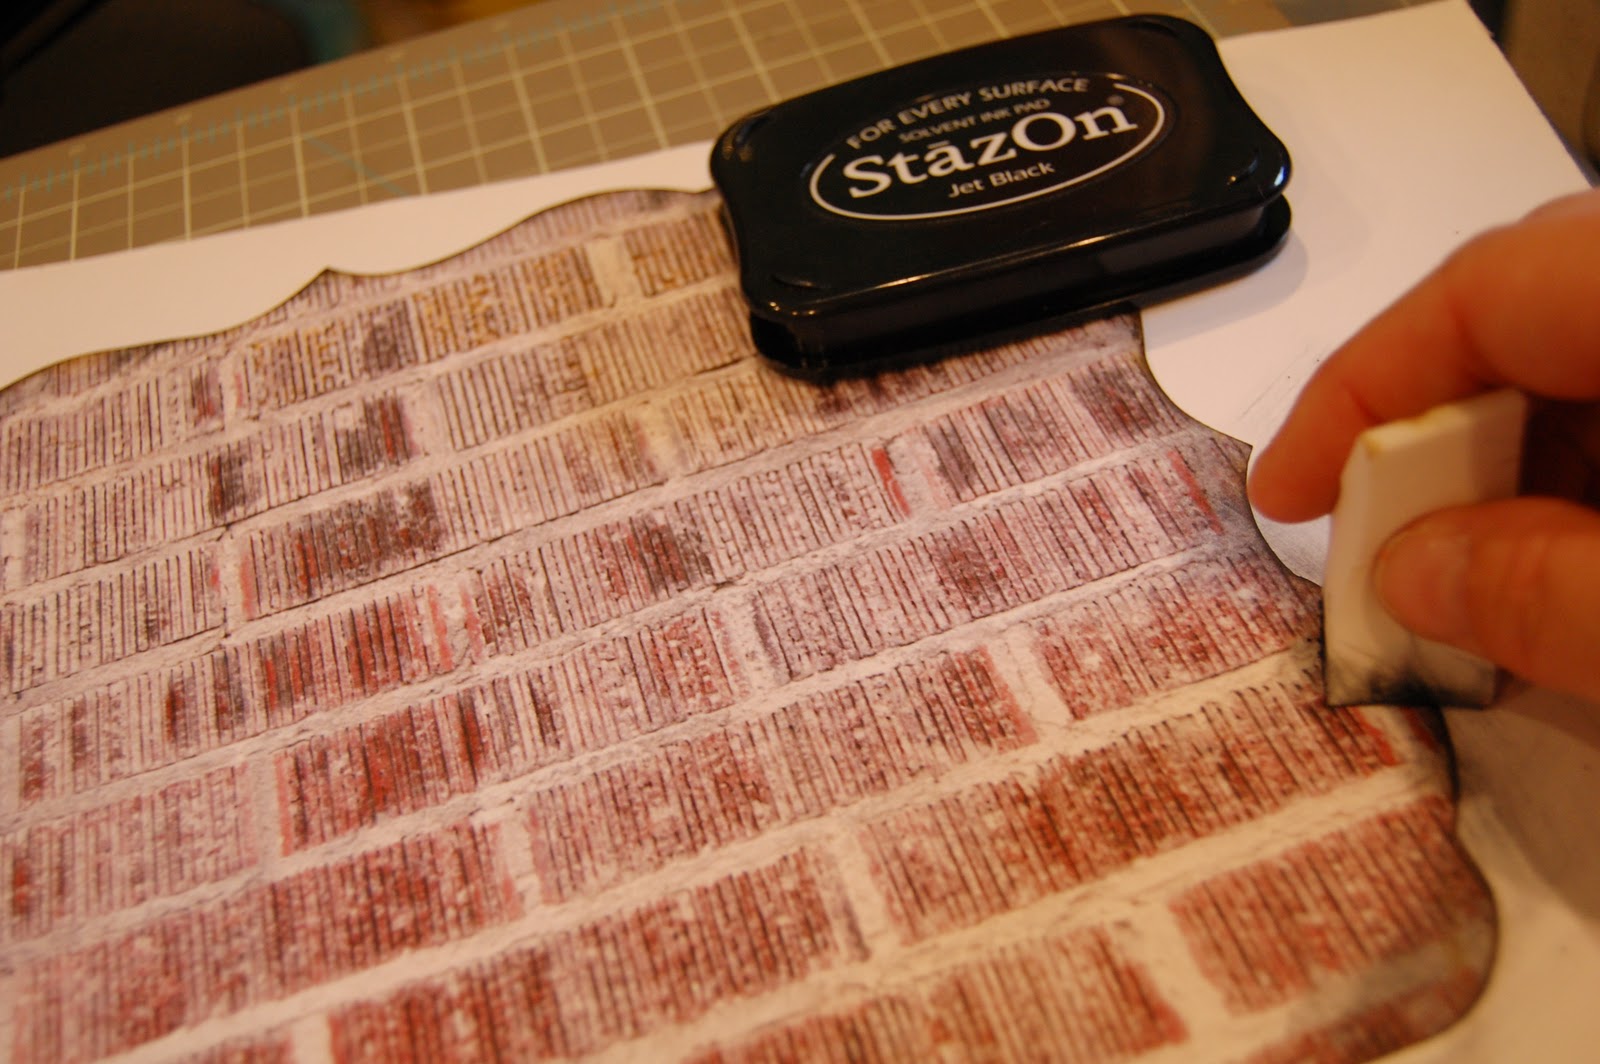
I tried again, but this time made the bottom fold 1".  I went back to the Gypsy and made smaller tags to put in the pockets.  I sized rectangles from George to 2 1/2" wide 3 1/4" tall.  I welded 4 circles to the top.

I inked this flower a little with brown ink.  I also inked the tags and pockets.  I had white thread in my machine, so I inked it brown so it blended in a bit.

Here is my sewing before I inked it!

I added a button inside the flower.  I strung ribbon through the holes.

Here is my tag folder all tied together.

And here it is opened up.  I am thankful for my Family, Friends, Health and Paper.  Yes, I have an addiction to paper.  I spent $25 on paper today after cleaning out my drawer yesterday.  Did I mention that my drawer broke under the weight of all my paper?!?

My name is Lori and I am addicted to paper!!!

Friday, November 19, 2010

Freshman Year Distress Layout (Frosted Designs)

Here is my layout for the Frosted Designs challenge blog.  This week's project is Distressing.  I am working on Tyler's high school book, and this is his Freshman picture and schedule.

I started out by creating my background paper.  I used my Cricut Imagine and the Snapshot:  Texture cartridge to create the brick paper.  The shape is one of the Imagine features, and the paper started out white.  The Imagine printed the shape, then cut it out.

I used my Stazon black ink on the edges of the paper.

I used my Tim Holtz Distresser to rough up the edges of the cardstock, then I inked them.


I cut out the star on my Cricut for my journaling tag.  I wanted to stamp lines on it, so I used the negative piece to cover up the red shadow as I already attached the blue star to it!

I stamped one of my journaling stamps.  I wanted the star at an angle, but not the lines.


I like this stamp as it looks a bit distressed all on its own!

I triple matted my photo so it fit the layout better.  I used my computer to type up Tyler's schedule, matted with the brick red cardstock and distressed the edges.  I also put a staple with my Tim Holtz Tiny Attacher ~the staples are soooo tiny and cute.  I stapled the words before I glued them to the page.

Here is the finished layout. 

Thank you for your comments!!

Thursday, November 18, 2010

Shall We Dance at Homecoming

I finally committed to keeping my Shall We Dance cart.  I have all boys and did not think I would use it at all, but I did find the perfect layout for it!!!

I am working on my son's book....this is last year at Homecoming.  His date wore ivory and gold and I had a terrible time finding paper that looked good but not too girly!!

I used Songbird for the font and welded the letters with my Gypsy.  I LOVE how the letters weld!!  I used Shall We Dance and made the border by welding the Medallions together.  I cut them out of gold metallic paper.

I cut circles out of the same gold paper and made flowers ~ not to frilly but it needed some flowers!!

Here is a close up of the Medallion border.  I think maybe for a different layout, I will make a border of the empty medallions and weave ribbon through them...

Here is the layout again.  Thank you for your comments!!

Wednesday, November 17, 2010

eEeeK! FD Sketch Challenge entry

Here is the Sketch for the Sketch Challenge this week over at Frosted Designs.  We have a weekly sketch challenge (on Tuesdays) and you could win a prize for your entry!!  Come check it out!

 
My Halloween take on it is below:


Of course, as a 2-page scrapper I had to make a coordinating second page!!


I used one of the Halloween paper pads for most of the paper.  I added a little ribbon, some staples and some paper flowers with gems.  This one was fun!!

Tuesday, November 16, 2010

Give Thanks Card (My first video)


This card is made with Blackletter and my Gypsy.  I designed this card for my Gypsy Class.  I have a lot of new Gypsy users and this card uses Welding, Copy and Paste, Hide Contour and Layers (for those using 6x12 mats).

This is my very first video ~  it is a little raw!  Linda ~ I need help posting this as a video instead of a link!!!


Now you just need to arrange the paper on your mat(s) and cut and assemble. 

Thanks for looking!!!

Monday, November 15, 2010

Mickey Snowflake Ornament Winner!!!

I used the True Random Service to pick the winner and she is......


Cherylann who said:

these are so adorable, how imaginative.


One of my special Christmas memories is when my great aunt, who, my had no children but raised my mom after her mother died when she was 7. My great uncle never let my aunt celebrate any holidays. After he passed my mom went and brought her to our house for Christmas, we gave her presents and she laughed and cried, she had not opened any presents since she was a child some 70years earlier. It makes me smile remembering this, it was like watching a child open their first gift.


Cherylann (prinkles)

Congrats Cherylann!!!

Saturday, November 13, 2010

Christmas With A Mickey Twist (Blog Hop)


Welcome to the Christmas With A Twist Blog Hop!  Here are my Mickey Snowflake Ornaments!  We have one tree that is all Disney ornaments and these will look great on it!

You should have arrived from CraftyScentiments, if not, please go to JennBcraftin to start at the beginning of the hop.  Your next stop is Scrappin NanaPuddin!

I used my Gypsy to weld Mickey heads onto the ornaments on the left.  These snowflakes were from DonJuan and Going Places.  I placed Mickey heads inside the ornaments on the right and grouped them together.  These snowflakes are from Speaking of Winter and Wrap It Up.

I cut them out of white paper with glitter dots.  I then opened up a second Layer on my Gypsy and copied all four snowflakes.  One at a time, I flipped the images over.  This way I could sandwich two together.


I glued the ribbon to the back of one ornament...

ran the second piece through the Xyron....

and stuck them together with the ribbon inside.

I inked the inside Mickey Head cuts with a red stamp pad and added silver gems all over.  You can't have enough sparkle on a snowflake!!

Once again, here they are.  Now the fun part.....I will be giving this set of Mickey ornaments away.  All you need to do is be or become a follower or subscriber and leave me a comment with your favorite Christmas memory and a way to contact you!  I will draw a winner using Random Number and post by Monday!

Thank you so much for your comments ~ that really keeps me going!!!

Friday, November 12, 2010

Christmas Blog Hop Tomorrow!!!!

Join me for a Christmas With a Twist Blog Hop tomorrow!!  You can get some ideas to create your own Christmas goodies!!!  The Twist part is not using the "traditional" images (Santa, trees, etc.).  I am putting the finishing touches on my project today!

Wednesday, November 10, 2010

I am a Winner!!!!

I won some blog candy from Darcy!!! Woo Hoo!!  Thanks Darcy!

Tuesday, November 9, 2010

Winner Winner Thanksgiving Dinner!!!

My Blog Hop Winner is ....... Patty K who said:

My favorite memory is have Thanksgiving at my Moms house -she hasen't been well so we all just do our own thing. We always played Win Loose of Draw. She loved that!Your site is great and so are your projects Thanks


My 300 Follower Winner is........  Nanapuddin who said:

I love your mini book! I love mini's! I see you reached 300+! woohoo! congrats! TFS! and inspiring and the chance to win!


Nana - I need a way to contact you please so I can send you your gift!!!

I used the Random Number Generator to select both winners ~ congrats!!!!


One last winner....I decided to give my Thankful Book to Melissa who left me the first comment on both days of the blog hop!!  Melissa said:

Ohhhh so close to 300 Lori! Good for you!


Your mini album is beautiful and if you do sneak it into the blog candy...the winner will be super lucky!


Melissa

www.disneydreamerdesigns.blogspot.com


Thank you to everyone who hopped on over and left me some blog love!  Welcome to my newest followers, I hope I can inspire you!!

Lori