Thanks so much for all of the great comments on my card! I had so much fun putting it together once I knew what project I was making! I also was glad to be pushed out of my box and try a cart that I didn't think I would use much!!
I used Random.org to select my winner and the winner is #12!!!
Congrats Ashleigh ~ I will be sending you an email very soon!!!
Monday, August 30, 2010
Saturday, August 28, 2010
French Manor Blog Hop
Welcome to the French Manor Blog Hop!!
You should have arrived here from Sherrie's blog.
If this is your first blog, please go to see Jana to begin the blog hop.
I am so excited to be part of this!! First of all, this is my first official blog hop! Second, I have not really used FM and this really challenged me to do just that! Third, I have Blog Candy (see below)!!!
I was inspired by a card I saw in a magazine last January. The original card was a Valentine's Day card. I used the Flower and shadow as well as the small doily from the French Manor Cartridge. I also cut out Merci.
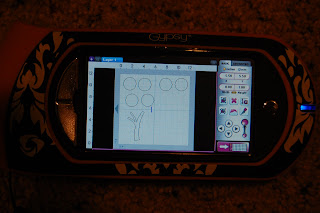
My card is 6x6 so I sized the flower inside a 6x6 grid on my Gypsy mat. I put two flowers on the mat and used Hide Contour to hide one of the center cuts (see screen below). I also put Merci and three small dioly shapes on the mat.
For the leafy part, I used a swirl border and stretched it a bit. I turned off the Aspect Ratio Link (yellow chain located between the words Width and Height on the Basic Menu) and left the height at 1.00 but changed the width to 4.07.
Taking care to line up the mat with the arrow on the left side, I placed my papers where I wanted them. I used My Mind's Eye 29th Street Market paper found at Michaels.
I used my paper trimmer to cut out 1 1/2 x 1 1/2 inch squares out of the coordinating paper. This paper is two sided and has a solid color on the back. I used two of the doilies and part of the center of the flower on three different squares.
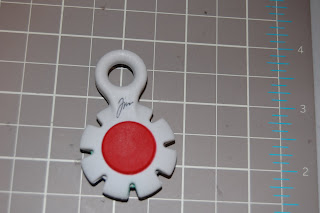
I used my Tim Holtz Distressing tool to distress the edges of the squares and flower.
Here are the edges distressed. Next, I used brown stamp ink on the edges of the squares and the flower.
I added some ribbon, a bow, some pearls and Merci to the card and here it is!! This is not my normal style (a bit girly) but the more I look at it the more I LOVE it!!
Here is my Blog Candy!! I am giving away some Tim Holtz Grungeboard shapes and 5 stamp pads for inking! All you have to do to qualify is 1. be or become a follower, and 2. leave me a comment. I will draw the winner and announce Monday morning as the blog hop goes through Sunday evening.
Thank you for hopping by!! Your next and final stop in the blog hop is Gaby. Thanks for hopping with us!!
Wednesday, August 25, 2010
Happy Haunting Mesh Card
I made this card from the same mesh as my LAYOUT. I used Pumpkin Carving to create this mesh.
I used the Happy Haunting from Pumpkin Carving. I hid the square around it because I just wanted the words.
Here is my Gypsy screen with the two meshes. I created one mesh first then copied and resized the second one. I welded the first row together, then welded the second row to the first and then repeated. I find my pieces weld better if I weld in sections rather than all at once.
Another hint ~ save your work before you start to kern. If you mess something up, you have a starting point. As I weld each part, I save again.
Below are my test cuts. I used black cardstock from Michaels ~ the value pack 12x12. I used a new blade and a sticky mat (as opposed to some of my older, less sticky ones).
Here is the finished card once again.
Sunday, August 22, 2010
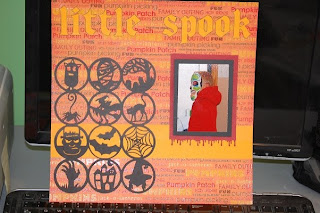
Little Spook
I just LOVE the Pumpkin Carving cartridge!! I made this mesh and then did not want to cover it up! I also made the same mesh a little smaller and will have a card to share with you later....
I put 4 rows of 3 circle images from Pumpkin Carving on the mat and welded them together. I copied and pasted a second one and made that size bigger.
Here is a screen shot of the mesh.
I cut it out in black cardstock.
I used Blackletter for the font. The yellow kind of got lost on the page, so I outlined the letters with a black pen. The paper is from the new DCWV Fall scrapbook pad. I cut the red mat a little long and used my Martha Steward Drippy Goo border punch on it. To mimic a spider web I put some white tulle around the middle of the page (under the photo and black mat). It is hard to see in this photo!
I added a photo of my very own little spook!!
Saturday, August 21, 2010
Dude Wall Decor
My son went off to college again and this time he moved into an apartment. He has a ton of bare walls!! I made these wall hangings from the Dude Lite cartridge. His room is black, white and grey and he loves snowboarding.
I mounted the snowboarders onto a 12x12 metallic black (it looks siver here) paper and framed each of them in a black frame.
I think he was nervous at first when I described what I was going to make, but he loved them when he saw them!
Thursday, August 19, 2010
Tree from Cindy Lou
I made a layout that is very different from my "normal" style. I created the page first and then found a photo to fit it. I wanted to make a 3D-ish tree. I saw a similar tree in a scrapbook magazine recently, but they tore the circles instead of distressing them.
I started with the tree trunk from Cindy Lou and added some circles that I found on Cindy Lou in one of the shadows.
I used my Tim Holtz distresser for the first time! You just rub it back and forth on the edge of your paper. It is kind of messy, so make sure you have a good place for the crumbs to fall!
Here is what it looks like. Note the little green scraps on my work space!
I inked the edges with a green stamp pad and a triangle wedge (found in the cosmetic department).
I put a little bit of brown on the very edges of the circles and also on the trunk.
I used pop dots to add dimension on some of the green circles.
I found some clouds on Create A Critter and hid the inside cloud line. I took the sun from H2O as well.
I then found the photo and decided on a title (this is usually my first step). I wanted to see how my title would fit on the page. I opened a new layer but could still see the first layer.
From the Layer 2, you can tap the eyeball on Layer 1 to close that layer. This way you don't see the images on Layer 1.
They are gone for now.
Here is my title welded and ready to cut.
I inked the clouds with a light blue stamp ink. I used the negative cut as a mask to ink in the center of the clouds. At first I did not really like the look, but it has grown on me. I twisted the sun a bit so you can see the darker yellow underneath. I used gold stickles on the swirl. I couldn't resist adding apples to the tree with red stickles.
This is my son Tanner and my niece on vacation in 2009. They are on teeter totters side by side holding hands.
Labels:
Cindy Lou,
create a critter,
H2O,
Lyrical Letters,
Scrapbook Layout
Monday, August 16, 2010
French Manor Border Fun!
A friend of mine recently purchased some Martha Stewart punches from HSN and showed me how to punch both sides of a strip of paper to make a really cool border. She had a half of a daisy that made an adorable daisy border.
Today I was playing with my Gypsy and French Manor, and I found a border that can do the same thing!
Select the border function key on French Manor and select the lacy scallop. Put two of the images on the mat together and size.
**Hint ~ when sizing multiple images or layers of images, put them all on the mat together so they are grouped and then size.
I left mine at 1". Ungroup and flip one of the borders. Position it just below the first border and lining up the x coordinate ~ make it the same number for both pieces.
Move the bottom scallop up until it overlaps the top one just a bit. Then group and weld together. Below is a close up.
Here is the test cut. There was one small piece that did not cut all the way and I did not want to tear this delicate cut ~ so I left it.
Friday, August 13, 2010
T-Shirt Bling
 |
I bought this t-shirt on vacation. I thought it was pretty, but it was missing something......so I added some iRock candy!! I used the iRock pre-glued crystals with my Jolee's Jewels heat setter.
Here are some close ups. I used yellow, turquoise and clear crystals to add some bling to my flowers.
After hearing some complaints about the battery powered iRock tool, I decided to try the corded tool made by Jolee's. I found mine at Michaels in the bead section.
Here is a final look at my completed project. I hope you like it!
Wednesday, August 11, 2010
Lacy Label Card
I made this shape card for my Gypsy class this week. I used Lacy Labels for the first time. I really like this cartridge ~ I can see a bunch of mini albums coming out of this cart!!
I put two shadow shapes side by side and welded a rectangle in between them. I did not realize until I made a test cut that I needed to flip one of the scallops. I just tapped the right scallop until it was purple and from the Advanced Menu I flipped it sideways. I re-welded it and it was ready to go.
Here is my mat loaded up with paper to coordinate the cuts ~ love this part!!
I added the inside pieces to the 2nd Layer and cut them out. I wasn't going to use them until I saw the card put together ~ it was missing something! I used the Hide Contour feature to hide the circles in the center of the stars. It made them look like flowers, but I wanted stars.
I trimmed out the negative part and used it as a template.
These stars were tricky to fit in the right place!
Here is the front of the card pre-bling! I have to say I am really enjoying the bling!!
And here is the finished card. I added blue rhinestones to the creme stars and light blue rhinestones to the dark blue stars. They do look a bit like flowers now, but at least they are sparkly!
Subscribe to:
Posts (Atom)


