Copyright Information

Thank you for stopping by my blog! I hope you enjoy the things that I create and share! I do have a copyright on my original creations (see logo on my sidebar below).
If you create and post a creations based off of mine, please refer (with a link) back to my blog. Please do not use my ideas for files, profit or for contests. Thank you!


My Craft Goals for 2015

My Goals for 2015:

1. Update my goals for 2016 in January of 2016 :)
2. Maximize my crafting time!
3. Keep plugging away at scrapbooking photos!!
4. Learn how to Heat Press!!
5. Have fun!


Saturday, December 29, 2012

Michele's Craft Room ~ 1st Blogaversary Hop

Hello and welcome to Michele's first blog hop in honor of her 1st year of blogging!  You should have arrived from Elizabeth. If you found me first, please head to Michele's BLOG to start at the beginning!

Michele says:
I have participated in tons of hops and have seen so many cute ideas and new techniques so I decided to create one of my own! I consider it my diary. It's fun to look back at the projects I created a year ago and know now what I could have done differently to make it awesome! If you don't have a blog, now is a great time to start one! It's super easy and a great way to share your talent with friends, family and www friends you make along the way! Best of all...it's free!

I have an amazing "present" up for grabs ~ all you have to do is visit each of the blogs below, become a follower and leave a comment. A winner will be chosen on Wednesday 1/2/13!


Here is a complete blog list in case you get lost along the way!
Ellen ~ CardMonkey: http://cardmonkeyspaperjungle.com/***NEXT


Now on to my project!!
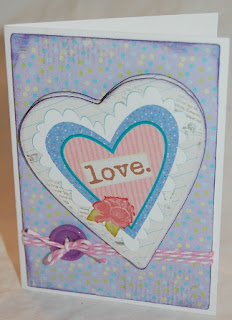
I made a sweet little card with my Cricut Imagine.
I found the image I wanted to use on Imagine More Cards.  I sized the heart to 3 inches and put two of them on my mat.  I opened a 5:7 ratio square on my mat and filled it with the purple dotted paper.  It was also sized to 3 inches.

I printed and cut them out.

I intended on printing out a 5x7 rectangle, but soon realized the smaller rectangle would work just fine.

I cut a piece of white cardstock to 4 1/2 x 6 1/2 inches and folded it in half to make my card base.

I inked the edges of the hearts and rectangle with purple StazOn ink.  I adhered one heart to the purple paper.  I wrapped some pink twine around the purple paper overlapping the heart a bit and adhered the purple paper to the card front.

I added a button with a bow.  Here is a simple card that shows how I feel about blogging - LOVE!

Thanks for stopping by!!  Please hop over to my dear friend Ellen next!


Friday, December 28, 2012

Top 12 Posts of 2012

Here are my top 12 Posts of 2012 and my Goals for 2013!!!


January's top Post is:
I used a Christmas Card to create a Hidden Journal spot.  I took some photos of us playing with technology on Christmas Eve with family.  My teen was teaching his aunt how to play words with friends on facebook while I was messaging her friend as they played!  You can see how I made this layout HERE.

February's top Post is:
My uncle passed away in January and I took on the task of creating a photo board for the memorial.  I found a gem of a photo of my grandparents when they were young.  I only knew them as old prim and proper (and sometimes grouchy) people and was so pleased to find this photo!  They met at a diner where she worked.  I got to thinking about what would have happened if they had never met.....

You can see how I made this layout HERE.

March's top Post:

March was tough to pick - there were a couple of great layouts and a card that I loved, but this one was the most memorable to me.  While I was creating this one on my Gypsy I found out my welding was cutting wonky.  I was able to weld and cut kindergarten with the R welded, but not with TANNE welded.  I have since updated my G which helped a little.  I learned how to get around this glitch (I can only cut the welded images on a separate Layer of my Gypsy).  So it stands out to prove you CAN teach old scrappers new tricks!!  

This is Tanner's kindergarten photo (obviously) but I really did not like the picture.  We were out of town for retakes, so I printed it off in black and white and went with it.  I love the gears and paper!!  The post is HERE.

April's top post:

I used my Chomas gel pen holder to write my sentiment (I do not have many stamps as I am mainly a scrapbooker).  I love the teen tiny flowers!!!  You can see how I made them HERE.

May's top Post:
This was my favorite layout from May because it has so much energy!  Tanner played soccer for the first time and learned quickly!  He had a lot of fun!

You can see how I made this as well as the coordinating page HERE.

Not really a highlight of 2012, but this impacted my creating!!!
I broke my right wrist (yes I am right handed) on the last day of School - May 23rd.  I spent 4 weeks in a cast and 8 weeks in rehab.  I am happy to say I am back at about 98%!!  I had to learn to work around it!

June's top Post:

I saw a wreath on Pinterest that inspired me to create this!  You can see how I made this one handed HERE!

July's top Post:
My middle son was a Junior last year and was the back up catcher on the Varsity Baseball Team.  They got to play three games at Werner Park - the home of the Omaha Stormchasers (formerly the Omaha Royals).  The stadium is about 15 minutes from our home and 5 from the high school.

Tyler was in the bull pen out in center field warming up pitchers most of the game.  He was called in to pinch hit and had to sprint to the dug out from center field in between plays.  I was not expecting him to play at all - I don't know who was more nervous me or him!!!  I was surprised I was able to hold the camera steady to get these photos!!! ***This game and photos took place before I broke my wrist - thank goodness!!

I used my Gypsy to create the double arrow behind WERNER.  You can see how I made this HERE.

August's top Post:

I found this School count down ticker on Pinterest.  I had to make one for my son's teacher!!!  The  one on Pinterest was a count down to how many days until school started - well, I knew my youngest was NOT excited to go to school, so instead I created mine as a count up to the 100th day of school.   Many teachers do something special for the 100th day.  I made an extra one to give a teacher friend of mine and she has one of her kids turn the number each day as a reward for good behavior :)

You can see the measurements and how I made this HERE.

September's top Post:

I could not pick between my two boys....so they both get to be my favorite for September!!!  Tanner's First Day of 1st Grade is HERE:
We walk to school and I love taking a picture of him walking in front of me!

Tyler's First Last Day of High School is HERE:

I can't believe his senior year is half over!!!  So much planning to do for senior night, graduation and his graduation party!!!!

October's top Post:
I love Halloween and had so much fun making this card!!!

You can see how I made it HERE.

November's top Post:
Mike and I celebrated our 20th Anniversary in Mexico.  It was beautiful!!!  

You can see how I made my shell border HERE.

December's top Post:

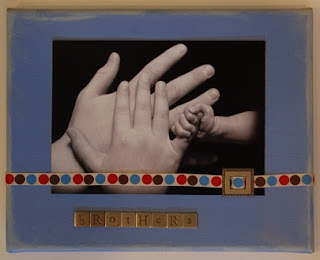
Finally a layout with my oldest son in it - well his hand at least!!  My boys are 22, 17 and 7.  When the baby was 2 weeks old, we tried to take a photo of their hands stacked.  Tanner kept making a fist so I had him grip Tyler's pinky.

You can see how I made this layout HERE.

Here is a photo of the canvas I made with the original photo.

With each pregnancy, I hoped for a girl.  Instead I was blessed with 3 dirty, stinky boys and I wouldn't have it any other way!!!

I hope you had a great 2012.  I had a rough year, but still had a lot of great moments!!!  I am hoping for an AWESOME 2013!!

My crafty goals for 2013 are:

1. Find the rest of my mojo!!!  It broke with my wrist and I have gotten some back.  I need to seek out challenges, blog hops and classes to rejuvenate!!
2. Finish Tyler's High School Album before his Graduation Party!!!
3. Reinvent my scrapbook style - I am feeling a little stale and very cricut dependent!
4. Seek out DT opportunities that match my talents and goals.
5. Conquer my fear of creating videos and learn how to edit!!

My top posts of 2011 can be found HERE.

Finally - I want to thank you for your comments - they inspire me and have really helped me get through the months when my wrist prevented me from scrapbooking as fast and fancy as I wanted!  I am blessed to have so many followers and subscribers and over 90,000 page views on my blog!!!


Tuesday, December 25, 2012

Large Paper Ornaments (Music Program)

Merry Christmas to you!!!!

I love Christmas movies, plays, musicals and of course school music programs!!

The First and Second Graders had a music program together this year.  It was soooo cute!!  The First Graders were singing (and dressed) in Black and White and the Second Graders were singing (and dressed) in color.

My very favorite song was about the 1st Graders saying the Red, White and Black Santa was a "hack" because he was not wearing just Black and White....and the 2nd Graders were singing he is "real" and they went back and forth.  Yes I am weird but I still have that song in my head....He's a hack, he is real, he's a hack, he is real!!!

My son Tanner is in the back row, middle wearing a white shirt (right above the music teacher's left hand).

I often donate my time and my crafts to the school and did not hesitate to make these giant ornaments for the stage.


Here they are up on the stage.  The music program was at our high school in the "big theater" and the kids were so nervous.  Last year as kindergardeners, their program was at the elementary school so this was a big deal to them!!
I can't find my file in my Gypsy, but I found these ornaments on Close To My Heart Artiste.  I cut them out at 11.50 inches.  I cut out four of each shape, alternating colors with the layers to create 4 of each ornaments in black and white....

and in red and green.

These were fun to make and I was a little surprised at how small they looked up on stage!!
It was a great show!!!

I hope you enjoy your day with family and friends!!!  Looking forward to an Awesome 2013!!!

Lori


Monday, December 24, 2012

Ho Ho Ho Simple Gift Idea

Happy Christmas Eve!!!  We are getting down to crunch time here and I wanted to share with you a very simple gift idea.  I needed a raffle item to donate to my son's bowling tournament.  I try to make something bowling related and something Holiday related each year.  This is what I did for the Holiday gift.

I found this image from Close To My Heart Artiste and sized it to 10 inches.

I cut out the Ho Ho Ho in black vinyl.  If you have not cut vinyl with your cricut before (or it has been a while) you can see one of my tutorials HERE.

I used a 12x12 Scrapbook Frame from Michaels and a piece of Christmas scrapbook paper from Hobby Lobby inside. 


Add the vinyl on the glass and you have a nice wall decor.

We are headed to the zoo to enjoy Christmas Eve today.  Our family got together yesterday instead of today because my brother is a UPS driver and will be working until very late tonight.  It seems weird to not be together today, but we had a great time last night!!!

I hope you have a wonderful holiday!!

Sunday, December 23, 2012

The Bell Still Rings (and other gift items)

I was inspired by a project on Pinterest to make this.  I made this for a raffle item for my son's bowling tournament.

I bought a 12x12 canvas and painted it blue with acrylic paint.

I used Paper Lace 2 for the font.  I sized the letters to 1.59 inches and left space for the bell.  I bought the bell and ribbon at Michaels.

For my next project (also inspired from Pinterest), I used a 12x12 tile from Home Depot.
The star is from Winter Frolic.

The letters are from Lovely Floral.

The swirl is from Home Accents.
I hid the background piece of the star from Winter Frolic.  It is sized to 5.64 inches.

I sized the letters to 2 inches and centered them to form the tree shape.

I added the swirl to the bottom as the trunk at 4.99 inches.

I just love the details of these letters.  I purchased this cartridge (Lovely Floral) specifically for the font!


I cover journals a lot as gifts.  I stock up on these journals when the back to school supplies go on clearance.

I found this apple filled with "teacher" words and printed it off onto cardstock.  I covered journals with school themed papers and layered on the apple.  I used tissue tape on the binding and added a little ribbon.

These were given to Tanner's Kindergarten and First Grade teachers, the art teacher,  and one other favorite teacher.

For my next gift - I had to get creative when our spirit wear order did not come in before Christmas.

Our youngest son will be playing select baseball for the first time this spring.  We ordered Grandma a shirt, and Grandpa a shirt and hat.  I had to wrap something, so I made my own out of paper:

He is playing for the Papillion Storm Chasers and will be #2!

I used Baseball for the cap.  I cut two out at 5.82 inches, one in white and one in black cardstock.  I fussy cut the white part.

The SC is from Hannah Montana sized to 1 inch.  The 2 is from Varsity Letter sized to 1.39 inches.

I used my white gel pen to draw the line at the top of the bill.

I used a circle punch to create the button for the top of the hat and trimmed off the top.

I used Paper Dolls for Everyday for the Jersey and sized it to 18.11 inches (5.5 inches using Real Size).  I cut it out in white and black cardstock.

I used Varsity Letter for the 2.

I made two of these, one for each!

Now back to my favorite one...


I hope you still truly believe!!!

Have a very Merry Christmas!!!


Saturday, December 22, 2012

'Tis The Season Gift Bags

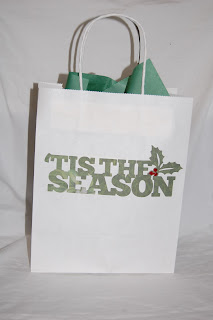
I made these gift bags for the teachers, staff and my daycare parents.  I used Teresa Collins Christmas Sentiments (a CCR Exclusive) and sized the sentiment to 7 inches wide to fit the 8 inch wide bag.

I used red and green Christmas papers to cut them out and added some stickles.


Here is a close up of the wet stickles.
I used these plain white gift bags from Michaels.  I keep plenty of these on hand as they are easy to embellish!!