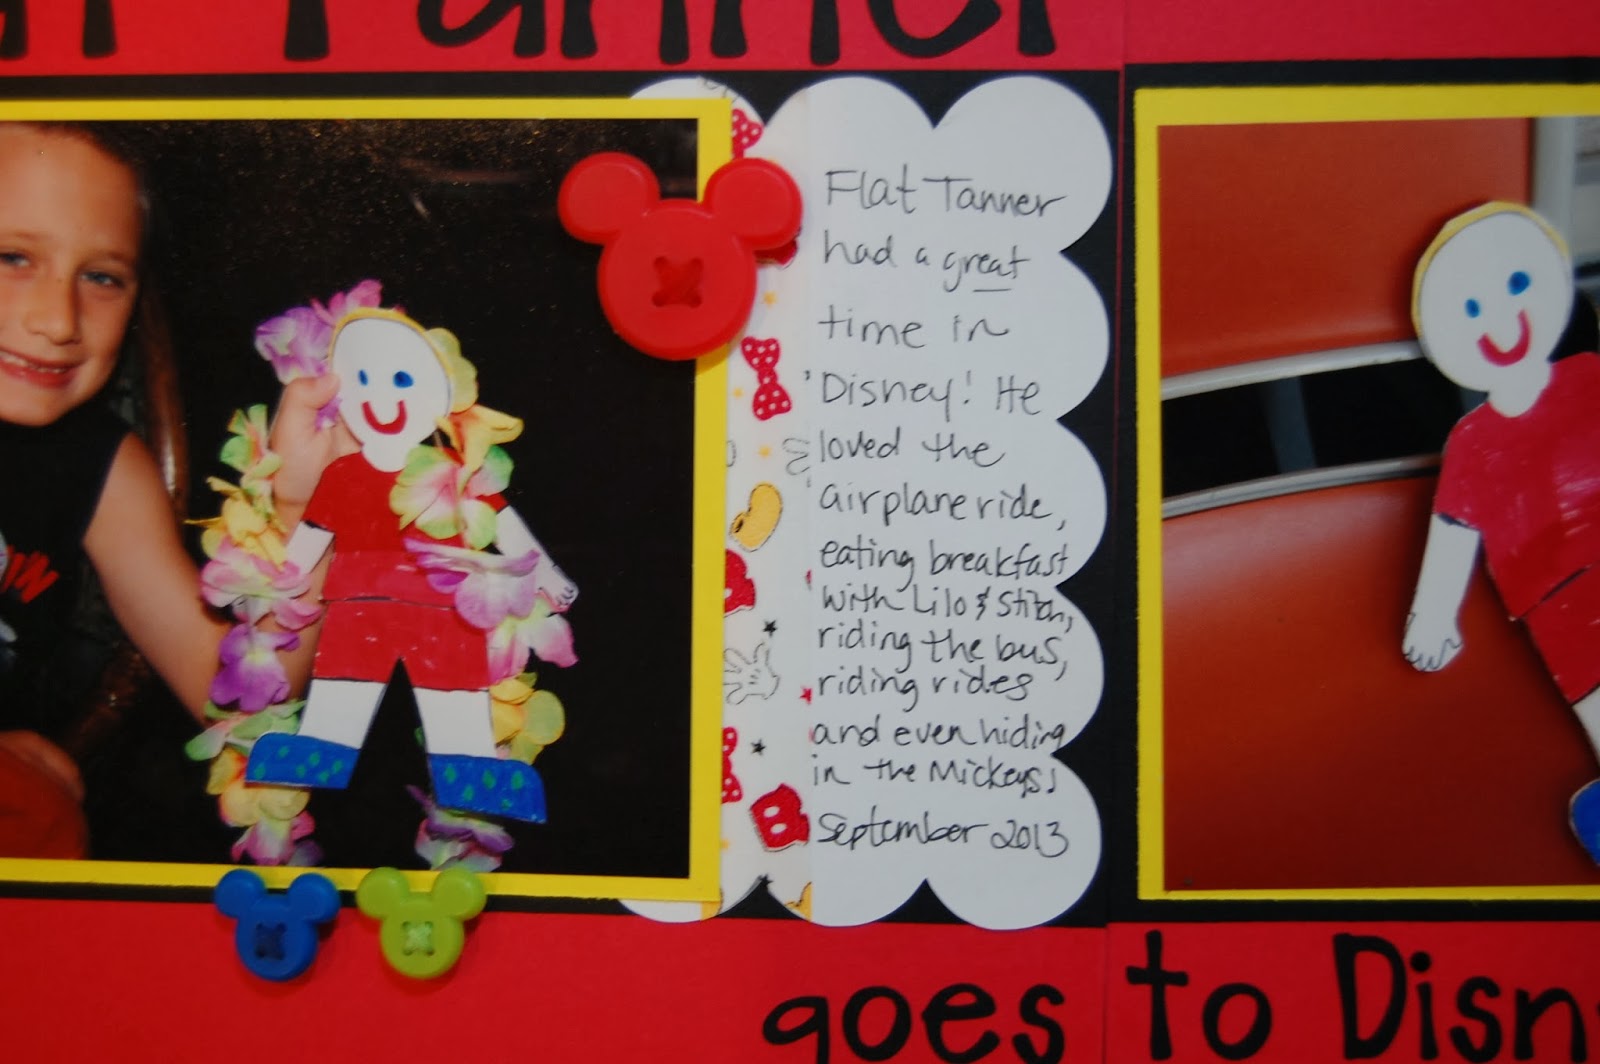
Copyright Information

Thank you for stopping by my blog! I hope you enjoy the things that I create and share! I do have a copyright on my original creations (see logo on my sidebar below).
If you create and post a creations based off of mine, please refer (with a link) back to my blog. Please do not use my ideas for files, profit or for contests. Thank you!


My Craft Goals for 2015

My Goals for 2015:

1. Update my goals for 2016 in January of 2016 :)
2. Maximize my crafting time!
3. Keep plugging away at scrapbooking photos!!
4. Learn how to Heat Press!!
5. Have fun!


Thursday, October 31, 2013

Trick or Treat Pumpkin (Blog Hop)


Happy Halloween!!!

Welcome to the Crazy About Cricut Halloween Blog Hop!


I was looking for Halloween images to get an idea for my project.  I find it so much easier to use My Cut Search.  This image is from Martha Stewart Seasonal Cake Art - not a cartridge I would go to first for a Halloween image!!


I sized Trick or Treat to 5 inches.  I cut it out of black glitter vinyl.  I used my go-to kiss cut settings on my cricut:  3-3-3.  Blade depth, pressure and speed!

I weeded the vinyl and used transfer tape to adhere it to my pumpkin.

I chose the flattest side for my vinyl.  This vinyl is thicker than regular vinyl, so it does not stick in every groove - but it is stuck pretty good and I am ok with that!!

The flourish came from Home Decor.  I sized it to 1.47 inches.  I flipped the design.  I cut this out of Dazzling Diamond from The Buckle Boutique.  I cut Dazzling Diamond out with the gel gems face down on the mat (which is why I flipped the design).

I use my Deep Cut Blade set to 6.


Here is the vinyl.


I added the Dazzling Diamond flourish.  I just love how sparkly this product is!!!  It adds the perfect sparkle to my pumpkin!


I used ribbon from Michaels and tied a pretty bow.  I used my glue gun to adhere it to the top of the pumpkin.


I am really happy with how this turned out!!

Your next stop in the hop is CHERYL.

Here is a complete list of stops along the way:

  1. Jenny - http://crazyaboutcricut.blogspot.com/
  2. Lori - http://scrappinmystressaway.blogspot.com/****HERE
  3. Cheryl - http://cardsbycg.blogspot.com/****NEXT
  4. Wandy - http://greenapplescrapper.blogspot.com
  5. Heather- http://paper-junkie.blogspot.com
  6. Sarah - http://sarahvaitstamps.blogspot.com
  7. Tracy - http://lovesbuggin.blogspot.com/
  8. Carol - http://www.workmanscraps.com
  9. Elizabeth - http://www.ejoym.blogspot.com
  10. Amanda- http://amandascraftsandmore.blogspot.com/
  11. Angela - www.crazy3monkeys.blogspot.com
  12. Lisa - http://lisaslittlerascals.blogspot.com


Wednesday, October 30, 2013

Flat Tanner Goes to Disney!


Today I am pulling double duty.  I am featured at She's A Sassy Lady and at Let's Scrap with a layout from our recent trip to Disney.

Tanner's second grade class read the book Flat Stanley.  They each colored a Flat Me and sent them off on an adventure.  We took Flat Tanner to Disney with us!


I used this sketch from Let's Scrap to create my layout.

I used red, black and yellow cardstock with a piece of Mickey paper from my Disney stash.


I wrote on a tag about the adventures in the photos.  Flat Tanner rode the bus, ate breakfast with Lilo and Stitch, rode some rides and hid in the Mickey display.


For those of you Disney lovers like me, you know all about Hidden Mickeys.  Flat Tanner wanted to be a Hidden Flat Tanner :)

I added a bit of twine and some Mickey buttons I have had for a few years.


The washi tape anchored this button.


I used my Cameo to cut my title.

I had a lot of fun with Flat Tanner in Disney - probably more fun than Non-Flat Tanner did!!

Thanks for stopping by!!!

Monday, October 28, 2013

Trunk or Treat

Happy Halloween Week!!!!  Halloween is my very favorite holiday!!!!

My son's elementary school hosted a Trunk or Treat Event on Friday.  It was super fun and I decorated my car with a Pirate theme.  

I used Square 1 Masterpiece Glow in the Dark Repositionable Adhesive Backed Fabric for the pumpkins.  I did not want to carve them yet so they don't get "yucky" before Halloween night!!


Here is my car right after I set it up.  I made a treasure box and added some pirate things from Tanner's room.  I purchased the banner at Hobby Lobby.


Here is my car lit up!!  I had so much fun!!!

Sunday, October 27, 2013

Halloween Coasters


Hello and Welcome to Day 2 of the UnBOOlievable Blog Hop!!


You should have arrived from HERE.  If you found me first, please go to the BEGINNING so you don't miss a thing!!!  We have two days of Halloween projects for you - so sit back and enjoy!!  We hope to inspire you!!  If you missed yesterdays projects, you can always take a peek by clicking HOME at the top of each blog.

For my project today, I made a set of spooky tiles to give as a gift.

 I purchased some white 4x4 tiles from Home Depot.  

I purchased these fun tile images from the Silhouette Online store. I sized them to fit my tiles and cut them out in black vinyl.


These can be used as coasters or home decor.


I added some pretty Halloween ribbon to tie the tiles together.


I put this vinyl "Wicked" on a gift bag and added a simple bow.

Your next stop in the hop is LUCY!

Here is the blog line up in case you get lost along the way:


4. Lucy ~ http://love2createitall.com/***NEXT


15. Miranda ~ www.nanasscrapspot.com


Saturday, October 26, 2013

Halloween Subway Art


Hello and Welcome to Day 1 of the UnBOOlievable Blog Hop!!!


You should have arrived from ANGELA.  If you found me first, please go back to the BEGINNING so you don't miss anything!!!  We have two days of Halloween projects to share so sit back and prepare to be inspired!!!

I just love decorating for Halloween AND I love subway art.  Naturally I "needed" to create some Halloween Subway Art!!!  I wanted my project to be reusable for each Halloween.


I found these 8x8 metal tiles at Michaels in the dollar bins.  I was able to peel the stickers off (it was much easier than I feared) and painted one with white acrylic paint.  I painted two coats, letting it dry completely between coats.


I used this subway art design that I purchased in the Silhouette Online store.  I sized it to fit my 8x8 tile.

I cut it out of black vinyl and adhered it to my tile.

I painted the edges black with acrylic paint to finish it off.  I just love it!

Be sure to stop back tomorrow to see what else I made with vinyl.....

Your next stop in the hop is LUCY.

Here is the entire list of blogs in the hop in case you get lost along the way:


4. Lucy ~ http://love2createitall.com/****NEXT


15. Miranda ~ www.nanasscrapspot.com


Friday, October 25, 2013

Splish Splash LO


Hello!!! Today is my day to host at Frosted Designs and I have a Brand New Challenge for you!!  My Challenge is Tag, You're It!  I want you to use at least one tag on your project - or create a decorative tag!

I am typically a layout girl, so I added a tag to my layout.  Not just any tag though, I used the Color Washed Cold Press Watercolor Tags.


I recently found these photos taken over 7 years ago!  My friend Elaine would take my son Tanner and strip him down and put him in her deep kitchen sink.  Tanner loved when mommy went to Elaine's house to craft!!!

I used some paper from Pinkpaislee's Hey Kid paper pad for my canvas and my photo and title mats.


I used my Dylusions Cherry Pie ink spray to color the tag.  I punched tiny holes in the tag and tied on some yellow twine from the October Scrapbook Kit.  I included some Pinkpaislee word stickers to my tag and made a border with them across my page.


I used my cameo for my title and offset shadow.  I inked everything with black ink.

I also ran some yellow twine at the top of the black cardstock border.


I added a ticket and pop-dotted a die-cut "Hey Boy" where my photos overlap.  Boy, Tanner really is interested in that water!!!


I hope we inspire you to use some tags!!

You have until November 7th to link up your Tag, You're It project with us!!

Here are the amazing products I used:


Thursday, October 24, 2013

Halloween Charger Plate with The Buckle Boutique


I made this fun Halloween Charger Plate using Dazzling Diamonds from The Buckle Boutique and some vinyl.

I had orange Dazzling Diamonds and I really love Halloween - so it was natural for me to make a pumpkin!!

I grabbed my Gypsy and MyCutSearch.com and found a pumpkin I liked.


I put a circle on my mat to represent the inside of the charger plate.  This pumpkin is from Gypsy Wandering and is sized to 5 inches.  I cut this out of my Dazzling Diamonds orange sheet!!


The spider web is from October 31 and is sized to 5.82 inches.  I cut this out of white vinyl.


I used this flourish from Home Decor sized to 1.69 inches for my pumpkin vine.

I used this leaf border from Wall Decor and More.  I hid the inside cuts with Hide Contour and sized them to 1.59 inches.

I cut both borders out of green viny.


Here you can see how I layered the leaves and vine.


I grabbed the spider and the font Frightmares (from dafont.com) from my Cameo and cut them out in purple vinyl.


You put it all together and have a fun Halloween home decor item!


For more information on the Dazzling Diamond Sheets, check out:
The Buckle Boutique's Website . . . click HERE
The Buckle Boutique Blog . . . . clickHERE
Facebook Page . . . click HERE
Twitter Page . . . click HERE
Pinterest Page . . . clickHERE


Monday, October 21, 2013

Clipboard Photo Display


I am super excited today - my project is being featured at The Buckle Boutique!!!

I saw a few decorated clipboards on Pinterest and wanted to give it a try!!  I used a standard sized clipboard and covered it with paper from Frosted Designs October Scrapbook Kit.  I painted the edges of the clipboard with pink acrylic paint.


I cut out the border word "love" from the Silhouette Online store in black vinyl.

I used some Dazzling Diamonds from The Buckle Boutique.  I just LOVE Dazzling Diamonds because I can use my Cricut, my Cuttlebut, a punch or my scissors to make this any shape I want!!!  


I trimmed some DD with my scissors to bling up the top of the clipboard.  I used a heart punch to add a blingy heart!

I finished it off with a ribbon flower and a tulle bow.

The best part about this clipboard is you can easily change out the photo!  I tacked up a photo with Belle that I double mounted.


I can easily swap this out with another photo.  This would make a nice gift or a fun clipboard at school!!

Hope you have a wonderful Week!!

The Buckle Boutique's Website . . . click HERE
The Buckle Boutique Blog . . . . clickHERE
Facebook Page . . . click HERE
Twitter Page . . . click HERE
Pinterest Page . . . clickHERE


Friday, October 18, 2013

Spooky Birdcage Halloween Card (TBB Blog Hop)


Welcome to the Buckle Boutique Blog Hop Bling Party where the Design Team will be showing you projects that you can create using a variety of products from The Buckle Boutique. Make sure you start at the beginning of the hop with http://thebuckleboutique.wordpress.com/.  From The Buckle Boutique, you will follow the hop as follows:

Lori ~ HERE
Stephanie ~ NEXT


The best part about being on this Design Team is the freedom to experiment with The Buckle Boutique products.  I am in the Halloween mood as it is my very favorite holiday!!!  I made this bird cage card Halloween Style!!


I started with a Lori Whitlock bird cage easle card that I purchased from the Online Silhouette Store.

I cut out the card base out of lime green cardstock.  I cut out the bird and bird cage in black cardstock.  I cut out the background layer and card liner in Halloween papers from my stash.


I trimmed some orange Dazzling Diamond adhesive gel gems and adhered them to the front of the birdcage.

I added a lime green bow to the top.


The card liner has a tiny hole for a brad.  This holds the card upright.


I stamped Halloween Greetings on a tag I cut out of lime green cardstock.  I pop-dotted it to the card.

Thank you so much for stopping by today and sharing some Halloween fun with me!!!  Come back on October 25 and 31 for two more projects on my blog featuring The Buckle Boutique.

We have Trick or Treat Blog Candy!!!  Everyone gets a piece of candy:
This weekend only, October 19th and 20th, receive 15% off your total order from The Buckle Boutique! Use code friends15 at checkout! Discount can not be combined with any other offer, is limited to in stock merchandise only and is not applicable on custom or previous orders.


The Buckle Boutique's Website . . . click HERE
The Buckle Boutique Blog . . . . clickHERE
Facebook Page . . . click HERE
Twitter Page . . . click HERE
Pinterest Page . . . clickHERE

Your next stop in our hop is Stephanie.