Copyright Information

Thank you for stopping by my blog! I hope you enjoy the things that I create and share! I do have a copyright on my original creations (see logo on my sidebar below).
If you create and post a creations based off of mine, please refer (with a link) back to my blog. Please do not use my ideas for files, profit or for contests. Thank you!


My Craft Goals for 2015

My Goals for 2015:

1. Update my goals for 2016 in January of 2016 :)
2. Maximize my crafting time!
3. Keep plugging away at scrapbooking photos!!
4. Learn how to Heat Press!!
5. Have fun!


Thursday, May 31, 2012

Mini Note Card Set and Discount Code (Pink By Design)

Last month, the lovely Sarah Hamer (and Mr. Pink and children) came to Michaels to do a Make-it-Take-it at my request.  We had several ladies come and create!!
Sarah pre-cut and scored the papers for our mini card folder and card set.  This gave everyone more time to select a stamp set to use :)

While she gave instruction and advice, I got to spend a little time with her cute kids!!!  Alexis and Jaxen made me some super cute pictures.  Alexis showed me a sneak peek of her very first stamp set she designed for PBD (on sale now BUTTERFLY KISSES).


Here is my awesome boss and friend posing with Sarah and I.

I modified my set a little bit.  Sarah brought dark purple cardstock.  I wanted mine a tad bit larger (I write big) and I made two extra cards.

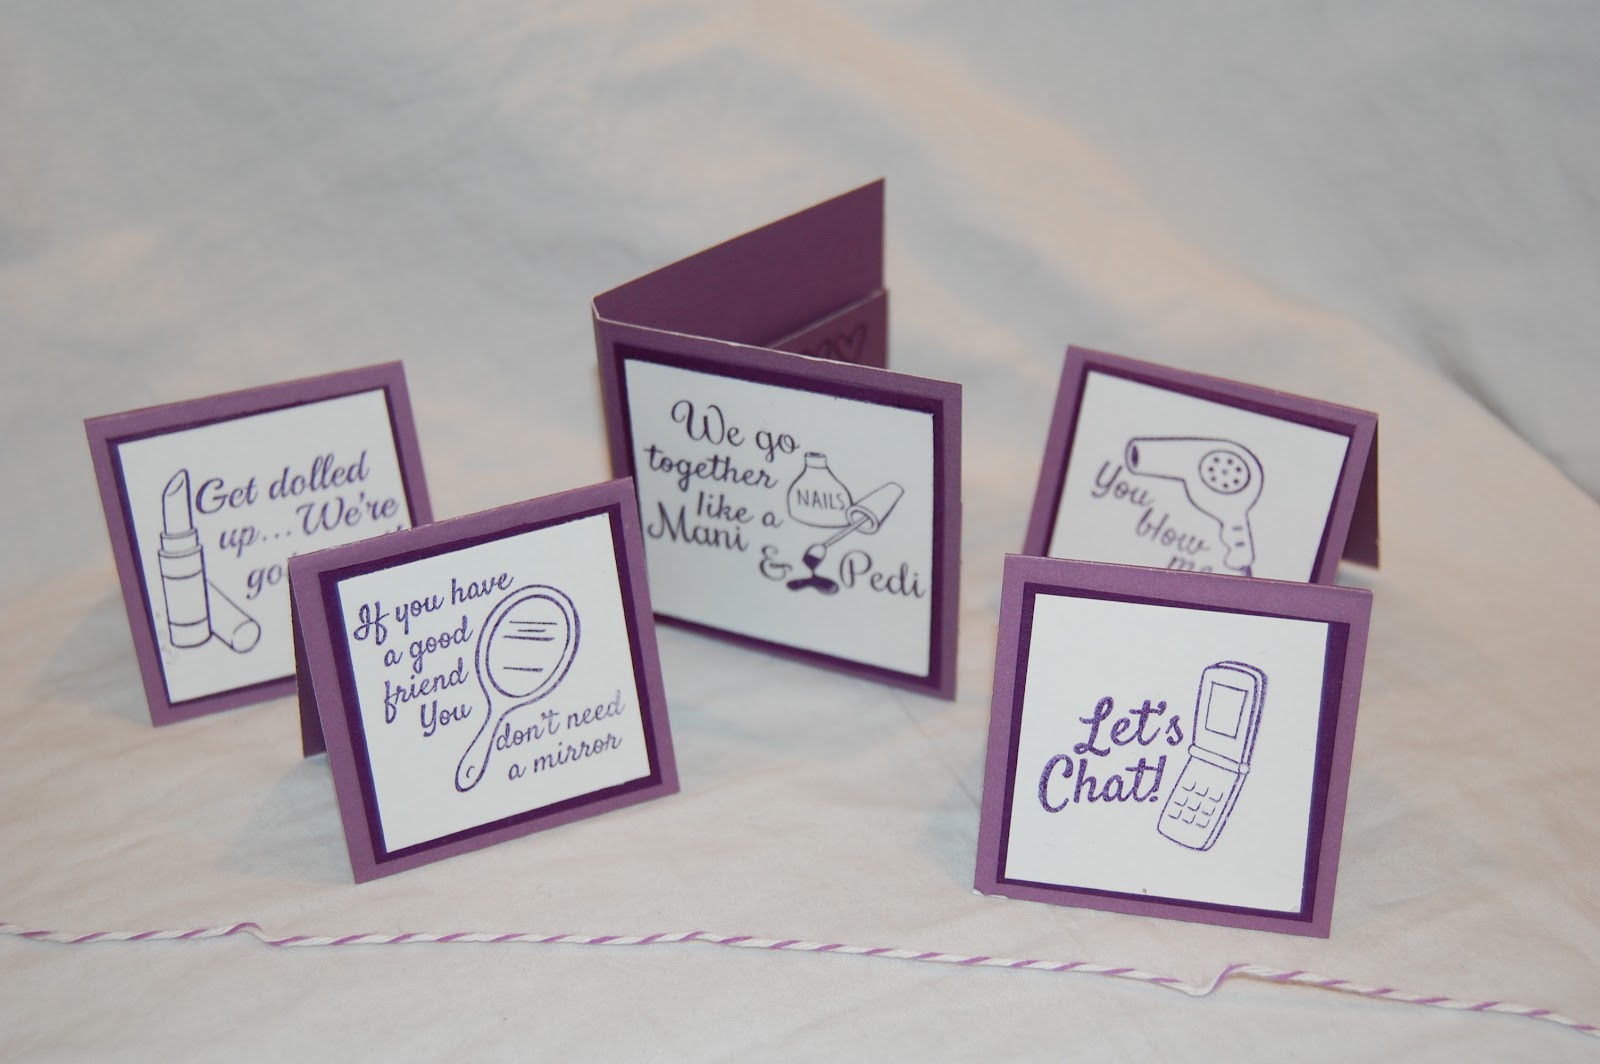
I used her Girlfriends stamp set on my cards.

The measurements I used are:  
5 1/2 x 4 1/2
Scored at 2 5/8 and 2 7/8 for the spine
Scored at 2 3/4 for the pocket

Score on the fold lines.

The note card is sized to 2 1/4 x 4 1/2.  The white cardstock is 2 x 1 3/4 and the dark purple is 4 x 4 1/16.

Here is my folder cover.  I used PBD Girlfriend stamp set.  

The white cardstock is 4 1/4 x 4 1/4 and the dark purple is 4 1/2 x 4 1/2.

Once I scored and folded the folder (that sounds funny), I used my ATG gun to glue the spine and both edges.  I also added the hearts inside.

Here are my cards going into the pockets.

We used some purple twine to tie it closed.
Are you ready for the BEST PART?!? 

Sarah gave me a very private discount coupon code for her store to share with you!!!!  You can shop HERE and use the code: lorisfriend15 to get 15% off your purchase through midnight CST Sunday June 3, 2012 ~ HOW COOL IS THAT?!?

Let me know what you think of Sarah's MITI project!

Some of the ladies made sets for their children's teachers, beach or coffee sets for friends, and fun mani pedi sets for herself!!  What theme would you make?

Monday, May 28, 2012

Ouch!

I apologize for the photo quality as I have not yet mastered my Nikon left handed yet.  I broke my right wrist Wednesday setting up for my Gypsy class.  The pain is constant, but I am also frustrated with my lack of mobility!!!

I have a couple of posts all ready to go (thank goodness) and have taken this opportunity to play with some digital scrapbooking.  I even played a bit with my Gypsy -enough to know I prefer the right hand orientation even with limited use of my left hand.

I am hoping to have my friend Jenny help me complete some projects or even Guest Design (hint hint)!!!

Here is a layout I created last night about Tanner's Kindergarten Graduation.


If you are interested in saving $10 off the software plus $10 off add ons (like background papers, embellishments or album kits), use my code:  STMMMS39803.


I will keep you posted about my wrist and would love for you to sign my cast by leaving me a comment!!!

Friday, May 25, 2012

Wedding Card (Frosted Designs)


This week at Frosted Designs, our Fabulous Friday Challenge is to create a Wedding project.

I recently went to my very first Card Class.  Joyce is a consultant for Stampin' Up and a good friend of my friend Jenny.  It was fun mainly because the 5 of us pretty much knew each other and we had a lot of laughs while learning new techniques!

This was one of the four cards we made.  We got to try out the Big Shot with heart shaped dies.  We used the Movers and Shapers magnetic system to overlap the hearts.  My first thought was "I could do this on my Gypsy" and of course I came home and created a file!!!

We used the Scalloped Heart of Hearts Embosslits Die to cut out and emboss a black and white heart.  We added two pearls to the white heart and a ribbon and silver brad to the black heart.

We made a pocket in the back of the inside card with a tag for advice or a sentiment.

It is hard to see here, but the white paper is really pretty with a white pattern in it.  I have not used SU papers in a very long time and I really liked how thick the paper is.

We used the round tab punch to create this tab for the tag.

The stamp says For the Newlywed.

I apologize this is not as detailed (and photographed) of a tutorial as normal...I thought it would be rude to photograph everything during card class!!!

Thursday, May 24, 2012

2012 Graduation Card

I am back today at SweetSassyDiva's with another Graduation card!

We have had a lot of Graduation Parties to attend and I really like to make home-made cards for the kids we know.

This one is super simple and can easily be customized to school colors.

I got out my Gypsy and got to designing!!
I used the shadow numbers from Varsity Letter sized to 2.06 inches.

I welded 2012 together.  I copied and flipped a set of 2012 and used Hide Contour to hide the inside cut of the "0".

I was able to fit cards on my mat.

I cut these out in white cardstock.

Since our HS colors are blue and white, I did not cut out another shadow layer of the numbers.

For another school, I cut out green shadow layer to cover the white and used a black skinny number (below) inside the green.

I put the numbers on my mat sized to 2.06 and used Hide Contour to hide the outside cuts.

I cut these numbers out in blue and adhered them to the card.
I added a graduation cap from Jolees.

I will make more of these next year (with a 3 instead of a 2) for my son and keep one for his scrapbook!!

Thanks again for having me over Bobbi Jo!!

Wednesday, May 23, 2012

Graduation Card


It is Graduation Season!!!

I am typically a scrapbooker, but I do like making Graduation Cards.

My son is a junior and we have been invited to several parties this year so I am taking notes for next year!!

Lori here from ScrappinMyStressAway sharing my Graduation Card at Sweet Sassy Diva's today.

I started out with a purple 8x8 piece of cardstock.  Tony's school color happens to be one of my favorites!!

Fold both ways at 4 inches and fold one diagonal.  I used my Martha Steward Score Board to score.

I pierced a hole and put a purple brad in one of the unfolded squares of the paper.  I created a tassel with purple twine and tied it around the brad.

I used this circle from Happy Graduation sized at a WIDTH of 3.5.

I sized the width to 3.5 instead of the height as the design measures more wide than tall (see the black  square on my mat) and I usually forget to take Real Size off so I measured it as it was.

I cut two pieces of white carstock 3.75" x 3.75" and adhered the circle on one.

On the other, I used one of my CTMH stamps that came with my Art Philosophy bundle and personalized it for Graduation.

I adhered the white cardstock to the inside of my card, the one with the circle to the top (with the tassel) and the one with the sentiment on the bottom.


Here is what the card looks like closed.

Here it is partially opened up.

I went to a Stampin' Up Card Class with my good friend Jenny last week and got this idea from the demonstrator Joyce.  She has about a million (it seems) projects in her basement area on display and was helpful enough to share the instructions!!

Here is another card I made this year using Varsity Letter and my Gypsy:


 Come back tomorrow to see how I made this one.


Tuesday, May 22, 2012

Disney Blog Hop Winner!!!

Congrats to my winnner #8!!!


And #8 is............................(drum roll here)...................................................................


Tina Gale!!!  And she said:


Love your layout! Disney is our fav vacation spot. My son is working at WDW and we went in May for my birthday. We've never done the cruise but would love too!

My favorite memory will be this last trip where my two kids planned everything and let me be a pampered princess the whole trip!
tina gale
http://tiggersscrapplace.blogspot.com

Monday, May 21, 2012

Layered Card (She's A Sassy Lady)

This week over at She's A Sassy Lady, Sheila has a Gypsy Made Simple project (with a video) and a challenge.  You can see her blog post and link up your project HERE.

I got my Gypsy girl and opened up Art Philosophy.  I found my card base and sized it to 5 inches.

My second layer is the same shape sized to 4.65 inches.

I copied the shape onto a new layer and sized it to 4.06 inches.

I grabbed these tags from Art Philosophy.  I hid the slit using Hide Contour.

I sized the two smaller tags to 0.62w x 1.65h.  I unlocked the chain between width and height and stretched the third tag to 0.62w x 2.62h.

I cut out the layers of this butterfly from Sentimentals sized to 1.59 inches.

I used this beautiful butterfly paper from Quick Quotes.

I stamped "flutter" on each card, but left the inside blank for now.  Here is where I have a fear of commitment when I am not making a card for a specific occasion....


I tied some sheer ribbon to the side.  I just love that butterfly inside!!!

I had so much fun making this Sheila!!  It has been a while since I had time to play!!

Saturday, May 19, 2012

Mount Rustmore from Castaway Cay (Disney/Pixar Blog Hop)

Welcome to another Original Disney Pixar Blog Hop!!

If you are looking for the Memories in Tyme Wedding/Anniversary Hop please go HERE!

This is a 2 day hop, I am only hopping on Day 1, but my post will be up for both days in case you want to come back and catch the blog addresses for Day 2.

Here is a complete line up for both days:


Day One - May 19th
Shawn http://craftychicsblog.blogspot.com/
Ellen  http://cardmonkey-business.blogspot.com/
Tami  http://tamiscraftconnection.blogspot.com/
Madison http://www.funkycards.blogspot.com/
Cathie http://www.creativecutterroom.com/
Lori  http://scrappinmystressaway.blogspot.com/***HERE
Amy Chomas http://amychomas.blogspot.com/***NEXT
Kathy http://kathyscozies.blogspot.com/
Amy Voltz http://www.lovetocrop.com/
Sarah http://www.pinkcricut.com/

 Day Two - May 20th
Shawn http://craftychicsblog.blogspot.com/
Ellen  http://cardmonkey-business.blogspot.com/
Kim http://uscrap2.blogspot.com/
Bobbi Jo http://sweetsassydiva-gspot.blogspot.com/
Jenny http://jennyplace26.blogspot.com/
Jessica http://thecreativestamperspot.blogspot.com/
Jenny http://www.crazyaboutcricut.blogspot.com/
Tami http://www.scrappinrabbitdesigns.blogspot.com/
Kathy http://kathyand3kids.blogspot.com/
Kristal http://www.gettingcricky.com/

We went on our very first Disney Cruise last October.  We have been to WDW several times, but never Disneyland or a Disney Cruise.  This was a whole new experience for me.  I did miss getting up at the crack of dawn and being at the parks all day long until after the night show/parade.....but we will go again in 2013 when Fantasyland is open!

I think the highlight of the cruise for me was our day at Disney's private island Castaway Cay.  There is a character spot at Mount Rustmore which is Disney's version of Mt. Rushmore.  I thought it would be fun to re-create this into a mountain backdrop.

When I plan a 2 Page layout, I open a 12x24 mat on my Gypsy.

I put the mountain from Pop-Up Neighborhood sized to 11.50 x 7.23 and centered it.

I used the font from Mickey Font sized to 1.46.  I picked this size so that the word Rustmore would fill the page.

I opened another layer and put Mickey, Goofy, Pluto and Donald from Mickey Font on.  I included all of the layers.


Here are my heads!!  I flipped Mickey and Pluto so they face the opposite direction.

I cut out the mountain in silver cardstock and used my Brick Red and Vintage Photo to "rust up" my mountain.  I tore some extra strips of silver cardstock to add dimension.

I rusted up the character heads and then pop-dotted them onto the mountain.


I added some palm trees and leaves from Life Is A Beach.

I added a picture of the Disney Dream (from a postcard) to the ocean in the background.

Thanks so much for stopping by!  I hope you enjoy my project and tutorial.  I do have some Disney themed blog candy to share today.  You just need to leave me a comment here that has #1 your favorite kind of vacation (Disney, beach, camping, ski trip, etc) plus a favorite memory from one, #2 a way to contact you.  I will let Mr. Randy pick the winner on Tuesday the 22nd.

Our Sponsor of this Blog Hop is


Your next stop in this hop is the Amazing Amy Chomas!