Today I am the Guest Designer at TheBugBytes and I am going to show you how I made this circle album for my Mother-in-Law for Mother's Day. I hope all of you Mothers out there had a wonderful day yesterday ~ I sure did!! I saw a circle album during the Disney Pixar Blog Hop #2 last week HERE at Tami's Craft Connection, but she did not show instructions. So, I decided to create my own.
My first attempt was to use 5.5inch circles, but they were way too small once I folded them. I made 4 circles at 11.50w x 11.07h out of blue paper I made 5 circles at 11.0w x 10.59h out of coordinating paper. I used a paper pad since I did not have 5 matching papers at home. I used Plantin Schoolbook, but any circle will do.
Then I folded the circles in half, then in quarters (half again).
I used the bone folder from my score board to score the folds.
Here are my four blue circle pages all folded together.
Then I folded four of the patterned papers the same way and glued them to the inside of the blue circles. This way when you fold the blue circle up, you see blue on the outside, not the patterned paper.
Then I used my ATG gun to glue the pages together into a book.
Here is the cover of the book. Before I covered it with paper....
I glued a ribbon to the cover. In hindsight, I should have glued the ribbon a little higher up the spine.
Here is the book covered.
Each page of the book folds out.
Now, I need to decorate the pages and cover!
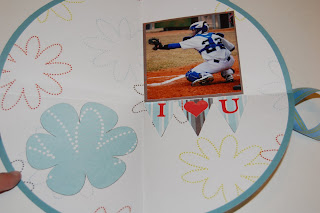
I designed several things on my Gypsy, but ended up using only a couple. My Mother-in-Law is very practical so flowery pretty things weren't necessary for her. I opted for small banners from Straight From the Nest cut at 4.00w x 1.76h. I cut out I heart U and the flower from Plantin Schoolbook to put on the flags.
I used this title from Mother's Day 2010 cut at 4.04w x 3.82h. The flower is from Plantin Schoolbook at4.15w x 6.36h.
I inked the edges with Vintage Photo from Tim Holtz.
Here are Tanner's pages.
Here are Tyler's pages.
Here are Kramer's pages.
And here is the last page with the three of them all together.
I cut my photo down the center so the page would fold back together.
Here is a top view of the album.
Another top view with a paged opened up.
I love trying out new things! I am glad I found this project to tackle!!
Thanks, Pam, for hosting me on your blog! You are a constant source of inspiration to so many of us!!


7 comments:
Beautiful! Love that it will also stand up by itself :D. TFS!
very pretty album! :-)
Lori... I LOVE this! How cute!! Thanks for the step by step because you know I am going to be making one myself!!
barb :)
This is an adorable album. Love the quarter circle idea. TFS
I left you a blog award. Pop over and check it out.
onceuponapaper.blogspot.com
Such a cool idea! I love how it turned out!
Lovely album!
Thank you for visiting my blog and the wonderful comment you left on my "Love Letter" layout!
Post a Comment