Copyright Information

Thank you for stopping by my blog! I hope you enjoy the things that I create and share! I do have a copyright on my original creations (see logo on my sidebar below).
If you create and post a creations based off of mine, please refer (with a link) back to my blog. Please do not use my ideas for files, profit or for contests. Thank you!


My Craft Goals for 2015

My Goals for 2015:

1. Update my goals for 2016 in January of 2016 :)
2. Maximize my crafting time!
3. Keep plugging away at scrapbooking photos!!
4. Learn how to Heat Press!!
5. Have fun!


Sunday, February 26, 2012

I got Published!!

OK, It was me that go puslished not my work, but still!!!


My sister-in-law is in black and white and I am on the right.


 This photo was on the front page of the Community Connection section of the Omaha World Herald on Saturday (2/25/12) and was taken by Kent Sievers.

I included a link to the article which is all about why people scrapbook ~ something you all can relate to!


And here is the layout I was working on when Kent snapped the pictures!
I was running the letters through my Xyron!!


I measured the photo (8x10) and created a mat by placing a square from George on my Gypsy mat and unlocking the chain between Width and Height (when you click on it it will turn from yellow to white).  When you unlock the chain, you can size the width and height separately.  I sized my square to 10.97 w x 8.25 h.  When I use Real Size, the square measures 10.25 x 8.25.

I added the shadow font of the alphabet from Nate's ABCs at 1.12 inches.  I welded them to the top and bottom of the mat.

I opened a second layer and added the regular font of the alphabet sized at 1.12 inches.  I cut out the letters in blue and red so I could alternate colors.

In the article, my friend Tammy called me the "Queen of Scrapbooking" which was very nice of her!!  Her youngest son is the same age as my youngest and I have taken care of him since he was 6 weeks old.  I knew she had a similar class composite photo for him, so I cut out an extra mat and gave her the letters I did not use so she could make a similar page.
Because sharing is what scrapbookers do so well!!

Thank you for stopping by today!


Saturday, February 25, 2012

Gettin' Crafty With Cricut Cuts Blog Hop Day 2

Welcome to Day 2 of the Gettin' Crafty With Cricut Cuts Blog Hop!

If you want to see my project from Day 1, go HERE!

This blog hop is dedicated to making a project using your cricut and the cuts you can make from a cartridge. This should be a lot of fun.

With so many talented ladies and such a selection of Cricut cartridges, there will be a wide range of projects for you to enjoy.There were no rules, stipulations, or no holds barred to create and create we did!!!

If you just happened to be visiting my blog today, I greatly appreciate that but would love for you to start at the beginning of our hop so, that you don't miss a single project with Lisa. If you have arrived from Evila, then you are on the right cut of the path!!!


Remember, this is the second day of the two day hop. Be sure to check HERE for my project from yesterday!!

If you get lost along the way, here is the entire hop that you won't miss a single piecing!!!


I created a birthday card for my 17 year old son.  I started out with my Gypsy and Gypsy Wandering.

I found this tag shape from Gypsy Wandering and put two on my mat sized to 4 inches.  I used Hide Contour to hide the inside cut of the tag on the left, then I welded them together to create my card base.

I took the shadow of the 17 from Something to Celebrate sized to 3 inches and welded them into the center of the cut out.  I placed the regular 17 sized to 3 inches on my mat.  I copied the regular 17 and scootched it off the mat so I could cut out just the flames.

Here is a close up of the welded window card.


I ended up cutting out the card base in white cardstock.  I cut a second card base in this baseball paper (I printed and cut it out using my Imagine a long time ago and did not use it) and trimmed it in half to cover just the front of the card.  I cut out the numbers in PLSHS paper ~ this is my son's high school colors and acronym.  I cut out the flames in yellow cardstock.

I put it all together for him just in time for his birthday and baseball season!!

Thanks for stopping by.  Your next stop in the hop is ASHLEY.

Friday, February 24, 2012

Gettin' Crafty With Cricut Cuts Blog Hop

Welcome to the Gettin' Crafty With Cricut Cuts blog hop!!  
This blog hop is dedicated to making a project using your cricut and the cuts you can make from a cartridge. This should be a lot of fun.

With so many talented ladies and such a selection of Cricut cartridges, there will be a wide range of projects for you to enjoy.There were no rules, stipulations, or no holds barred to create and create we did!!!

If you just happened to be visiting my blog today, I greatly appreciate that but would love for you to start at the beginning of our hop so, that you don't miss a single project with Lisa. If you have arrived from Evila, then you are on the right cut of the path!!!


Remember, this is a two day hop and be sure to stop back tomorrow for more creativity!!!

If you get lost along the way, here is the entire hop that you won't miss a single piecing!!!


This time of year I am catching up on last year's pages for my boys.  Once baseball season starts, my scrappy time is limited.  Tyler went to a baseball camp called Coast to Coast in Arizona this past December.  I used my Gypsy to help me lay out my design.  When I design a 2 page layout (wich is most of the time), I open my Gypsy to a 12x24 mat.

I wrapped the title around the corner of my left page and used letters from Birthday Bash (shadow) sized at 1.46 inches.

I put a baseball corner in the corner from Sports Mania sized at 3.77 inches.

There were 3 boys from Nebraska at this camp and I took a photo of them.  My son, his friend Tony and a player from a Lincoln team.  I took a square from George and unlocked the chain to size it to 6.69w x 4.25h (when you use Real Dial size, the actual size is 6.25 x 4.25 for a 1/8 inch mat around a 4x6 photo). I welded the words "Nebraska Boys" from Opposite Attracts sized to 1 inch.

Here is a close up of the bottom of the photo mat.

I opened up Layer 2 and copied the shadow letters on the top half of my mat.  I put the regular letters (also sized to 1.46 inches) on the bottom of my mat.
I cut out the shadow in black cardstock and the regular layer in red cardstock.

I opened Layer 3 and put the three layers of the baseball corner on it.
I cut them out in red, white and black cardstock.

On layer 4, I copied the photo mat and the regular layer of letters on my mat.  I cut them out in black and red cardstock.

My son is in the middle!  His team colors are blue, black and white/gray so it was fun for me to use red on this layout!


I took some scrap paper and made a rosette to put in the center of these four photos.  I used a 3D sticker from my stash and a red cardstock circle for the center.

I used this Karen Foster baseball paper and brown kraft cardstock for the base of my layout.  I took these four highlight pictures of Tyler and trimmed them to 4x4 and matted them together on red cardstock.

I included a group photo of all of the players, and one of just the 15+ players.  I also included a photo of the catchers listening to instruction.

I rarely scrapbook without using my Gypsy and Cricut Expression ~ it makes things so easy!!!   Thanks for stopping by today!!  Your next stop is Ashley!

Wednesday, February 22, 2012

Creating Titles with Gypsy (Christmas Card Photos LO)

I had several people ask me for help making titles with the Gypsy recently.  For this week's class, I created this layout title along with some helpful information.  I combined this title with 2x2 or 2x4 squares from Christmas cards and Christmas card photos, along with our Christmas card photo.  I got this idea from Ali Edwards a few years ago and it is a great way to sum up each Christmas.
For my title, I started with Winter Frolic.  I found this phrase and put the shadow layer on my mat.  I sized it to 11.52 inches WIDE.  The height is 3.77 inches, so I placed the regular layer on my mat sized to 3.77 inches tall.

I wanted to weld the year to my shadow layer.  I grabbed 2011 from Winter Woodland sized to 1.12 inches tall and welded it to the title.  I placed the regular layer of 2011 also sized to 1.12 inches on my mat.

Because I wanted two different colors of paper for my title, I copied one to Layer 2.

I used black cardstock for my shadow, red and green cardstock for my top layers.

Here is the title all put together on my layout.
I grabbed this tag from Winter Woodland sized to 2.41 inches.  I liked the "greetings" as these were all from Christmas cards. 

I used the same black and red cardstock to cut out the tag. 

Here is my completed layout.  I have included my tips and tricks below for creating a title on the Gypsy. Enjoy!

Word title using shadow letters:
Place your title using the shadow feature on your mat.  Making sure the title is grouped together, adjust the width to 11.50 inches.  Place the regular letters on the mat and make the HEIGHT the same (not the width). 
If you want a welded title, weld your shadow letters only.  Then size the width to 11.5 inches.  Do not weld your regular letters, just know that some will overlap and some may not.

Word title
When you want to use a word or phrase from a cartridge, place it on your mat.  If there is a shadow feature, place the shadow on the mat.  Size the width to 11.50 inches.  If you have any layers, size them to the same HEIGHT as the shadow size. 

Welding images together
Place the images you want to weld on your mat.  You can weld border features, shapes, letters, numbers or combination of any of these.  Size the Width to 11.50.  Note, if you have several things to weld and they are larger than 11.50, start with a 12x24 mat.


Bonus:
After you cut your shadow layer (or title without a shadow) save the trash!!  Your leftover paper will become a template for adhering your title on your page perfectly!


Tuesday, February 21, 2012

Slider Invitation

You are invited!!!!  Hi ~ Lori here from ScrappinMyStressAway with a super fun invitation for you!

I saw a slider invitation in Hobby Lobby's  Scrapbooking Magazine (1st Quarter 2012) and thought it looked like fun to make.


As usual, I grabbed my Gypsy and got started.

I lined up all of my elements on separate Layers.  I started with a 6x6 square.  I put a circle at 5 inches on the next layer.  
I put the doily from Easter 2010 on the next layer at 3.13 inches.
I put a scalloped oval from Art Philosophy on the next layer at 2.57 inches.
I put the fancy oval tag on the next layer at 1.25 inches (the size of the coordinating stamp).

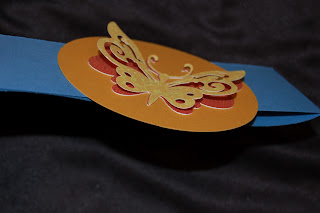
I welded two butterfly borders from Paper Trimmings at 1 inch and put them on the next layer.

I opened yet another layer and copied all of the pieces onto one mat to cut them out.

I used white card stock for my doily, orange cardstock for my circle, and scrap paper for the rest.

I cut a 6 1/4 x 6 1/4 square from light blue cards tock.  I cut my striped paper 6x6 and adhered it to the blue card stock.

The blue scalloped oval is cut on 2-sided paper.  I don't like the blue side as much as I thought I would.


I flipped it over!  Much better.

I used the You're Invited stamp from CTMH ~ these stamps come with the Art Philosophy Bundle.

I cut out this butterfly (2.24 inches) from Hannah Montana to attach to the slide.

I only glued the center of the butterfly layer and bent the wings up just a bit.
Here is the closed invitation.  I hope you can come!!

Sunday, February 19, 2012

Mardi Gras Banner (Frosted Designs Tutorial)

This week our Fabulous Friday challenge at Frosted Designs is to use brads in your project.  I have been making banners lately.....a lot of banners.  They are just so fun to display.  Mardi Gras is coming up so I thought that would be a great banner!

When I think of Mardi Gras, I think of jazz music, masks, hats and the colors purple, yellow and green.  I grabbed my Gypsy and got to work.

I started with these banner flags from Birthday Bash.  I sized them to 4 inches.  Birthday Bash is a great cartridge for banners, it has several different banner flag shapes.

I got the Jester's hat from Don Juan and sized it to 1.59 inches and Mardi Gras sized to 1.94 inches.  I got the filagre from Don Juan and sized it to 2.76 inches.

I wanted a multi-colored jester hat and filagre, so I cut them out in three colors (also one in black for the jester hat) and trimmed them apart.

I pieced them together and added some gold stickles.


In order to create a layer for the phrase Mardi Gras, I copied another on on my mat and used Hide Contour to hide the inside cuts.
I needed more, so I found the mask on Designer's Calendar and sized it to 3.12 inches.  I cut it out in purple and white, and trimmed the white mask for a layer.  

I cut out the saxophone and trumpet from Quarter note and sized them to 3.12 inches and 1 inch.

My measurements seem odd if you just look at the measurements.  I start with the background piece (in this case the banner flag) and size the pieces to best fit the space.  If I intend on placing an image on an angle, I will rotate the image on my Gypsy screen before I size it.


I added some purple, green and gold stickles to my mask.
I needed a little something between the image and the banner flag, so I grabbed a diamond shape from George and sized it to 3.24 inches.  I cut them out in yellow.

I ended up using only 4 of the diamond shapes because the jester hat and filagre had too much yellow and blended in.

I poked the brads through the green ribbon to attach the banner flags.  I tied on some purple and green ribbons for added pizzaz.


And here is my completed banner.  I hope I inspired you to create a project with brads or eyelets and join our challenge!!