Copyright Information

Thank you for stopping by my blog! I hope you enjoy the things that I create and share! I do have a copyright on my original creations (see logo on my sidebar below).
If you create and post a creations based off of mine, please refer (with a link) back to my blog. Please do not use my ideas for files, profit or for contests. Thank you!


My Craft Goals for 2015

My Goals for 2015:

1. Update my goals for 2016 in January of 2016 :)
2. Maximize my crafting time!
3. Keep plugging away at scrapbooking photos!!
4. Learn how to Heat Press!!
5. Have fun!


Friday, September 27, 2013

Look Mom....No Teeth


This week at Frosted Designs, our challenge is Creativity with Texture.  In other words - Get Messy!!!

We were challenged to use everyday things to help add texture to our projects.


I cut this background image from the Silhouette online store out of scrap paper and used it as a mask for my background.  I used Dylusions ink Cherry Pie.  This was my first time using Dylusions ink and I was very impressed!!!  The color is very vibrant!!!


Here is what my paper looked after I took the template off.  I trimmed the edges a bit and mounted it to a piece of 12x12 black cardstock.


Here you can see the background.


I used the Dylusions ink on some circles I punched from an old paperback book.  I folded them in half and used thesm as banner flags.

I also spritzed a piece of cardstock with a grid design on it.  This allowed more of the white to show through.  I inked the edges with black ink.

I added some color with a black cardstock thick stripe and a blue circle.  This grounded my photo and added some depth.


I used the most perfect chipboard piece to point out Tanner's smile!!

I used a font from my computer to cut out my title - Look mom no teeth!


This layout was a little challenging for me as I typically pull colors from my photo.  I really did not have any colors to pull here so I went with what I had the most of!  The more I look at this layout, the more I like it!!

Be sure to head over to Frosted Designs to link up your Creativity with Texture project!!


Wednesday, September 25, 2013

Caught On Film


Today I am sharing this fun layout over at Frosted Designs!

Tanner is getting very tired of me taking his picture.  I feel like a mom-arazzi!!!


This photo was taken at Mike's 25th Class Reunion Family Picnic.  Tanner finally gave up and let me take a picture!!


I embellished by using chipboard arrows that I inked with a black Tim Holtz marker.


I put a photo of Tanner behind this polaroid frame and pop-dotted the Every Day Life button.


I used the camera tag for journaling.


From my cameo, I cut "photo", "say cheese", "Caught on Film" and the photo strip.  

I put everything on this fun Snapshots - Border paper.

Everything else (including the background paper) is from the Frosted Design store.


Monday, September 23, 2013

Blinged out Mickey Bag


We are planning a Disney World trip and that means I need to get a "bag" ready!  My bag typically holds my camera, the pre-scrapbooked autograph book, black sharpies, wallet, snacks, tissues - you get the picture.


I found this Jansport bag that is somewhat insulated, has a mesh pocket for a drink on the side and handy inside pockets.  I wanted to bling it up a bit so I grabbed my Red Dazzling Diamond Rhinestone Resin Self Adhesive Sticker Sheets from The Buckle Boutique (you can find them HERE)!

Next I grabbed my Gypsy.


I used Disney Mickey Font for the Mickey Head and sized it to 5 inches.  I put my Dazzling Diamond sticker sheet face down on my cricut mat.  I put my Deep Cut Blade and set it to 6 and cut.

***NOTE I did not need to flip my image as it is the same both ways.  If I cut a word or different kind of shape, I would flip it since I put my Dazzling Diamond sheet face down on the mat.


The last part is easy - just peel and stick!!

Thanks for stopping by today - I hope you have a Dazzling Diamond Day!!

Friday, September 20, 2013

Peace Love Mickey Clipboard

Welcome to the Day of Peace Blog Hop with Connie Can Crop and friends


Today we invite you to come check out this great group of crafters who will be showcasing cards, layouts, or projects all about today, the International Day of Peace.

The United Nations' (UN) International Day of Peace is celebrated on September 21 each year to recognize the efforts of those who have worked hard to end conflict and promote peace. The International Day of Peace is also a day of ceasefire – personal or political. . 

Connie Can Crop is the  first stop on this very important Blog Hop.

This is a one day blog hop and we appreciate your leaving a comment to encourage all my fabulous crafty friends to continue sharing their ideas and creations.  

We have an awesome sponsor and giveaway for this hop!


LoveBug Creations is giving away a $10 gift certificate to one lucky winner!! Woo hoo!
You can visit their store here.
Check out what the CT is up to on their blog.
And even like them on facebook for more fun.

  So what do you need to do to win? Easy... become  a follower of each of the fabulous blogs in this hop and leave each of us a  comment letting us know what you like best about our projects. 
Then come back to Connie Can Crop and post that you followed the rules.
You will have until 9:00 pm Sunday to finish the  hop and leave your comments. Winner will be announced on Wednesday at Connie Can Crop.

Be sure to follow everyone and leave a comment  along the way!

 Are you ready to spread the love?


We are celebrating at Walt Disney World today so it is only fitting that I have a Disney project!

Peace, Love and Mickey!!

I make a Disney Autograph album every time we go - this is the album for this trip:


 This 8x8 album has page protectors in the album, so I have to slide out the pages for autographs.  I am bringing a clipboard along to make it easier for the characters to sign the page.

I originally cut out the Disney 2013 in black vinyl, but thought the white would look better on the album cover.  I used the black vinyl on the back of the mini clipboard.


I used a tiny bit of black vinyl to mark the center of the clipboard. 


I put the vinyl on the back, leaving space in the center.


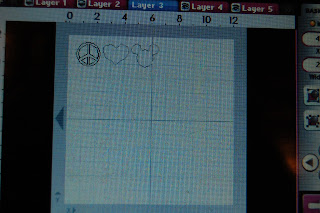
I put a peace sign from Disney/Pixar Cars, a heart from George, and a Mickey head from Disney/Mickey Font on my Gypsy.


I put some scrap vinyl on my mat and cut them out.


I put Peace, Love and Mickey in the center of the clipboard.


I painted the edges of the clipboard with red paint.  I added some Disney Washi Tape and tied some red and black ribbons to the clip.


I hope you have peace in your life today!

 Up next is ALICIA!

Here is our complete line up in case you get lost along the way.

7. Miranda - www.nanasscrapspot.com 
8. Sarah - itswhatkeepsmesane.blogspot.com

Cousins


I recently made the Design Team at Let's Scrap.  This DT is helping me catch up on my layouts!!!

This week's Challenge at Let's Scrap is to use at least 3 layers of paper between your photo and background page AND use one flower tutorial from the tutorial files.

This picture is Tyler (my middle son) and Sophie (my middle niece).  We are at the lake celebrating my niece Jenna's 12th birthday.  Tyler and Sophie sat on the rock wall and I snapped this photo of them!!

I added some Graphic 45 paper - LOVE G45 paper!!!


I followed this flower tutorial HERE for my ribbon flower.  I used Glossy Accents, 3 Girl Jam ribbon and a clear gem.  

I cut some circles out of a paper lunch sack.  I inked and layered them for the other two flowers.  

I added the clock charm to represent how much time passes between our visits to the lake.  We typically miss a lot of lake time due to my son's baseball schedule!!


I trimmed a paper "ribbon" and punched some butterflies with my Martha Stewart Butterfly punch.  I added some gems.


I cut my title with my Cameo.

Having all boys, I don't get to use many flowers in my layouts.  Glad I was challenged to use some today!!!  Thanks for stopping by!!

Wednesday, September 18, 2013

Play Hard (LO)


I chose to create a baseball layout for this week's sketch at Let's Scrap.


This is our sketch by Debby de Wilde.  I adapted the 8 1/2 x 11 sketch into a 12 x 12 sketch.


I used two pictures of Tanner pitching at the 8u All-Star Game.  I cut some baseball laces and my title from my Cameo.  I tied some twine around the page.


I typed "We want a Pitcher Not a Belly Itcher!!!" on my computer and printed it out on cardstock.  I trimmed them, inked them and stapled them to my page.

I tucked a PLAY bingo card between the photos.


I have had this Sports Page paper for years and finally found a layout to use it with!

Consider joining our challenges at Let's Scrap - since joining the site I have created 7 layouts!  The sketches are very inspiring and there is a LOAD (Lay Out A Day) Challenge.  A great way to catch up on layouts!!


Tuesday, September 17, 2013

Pals - First Day of School


Today my project is being featured at Frosted Designs!!


I created a layout of Tanner and his best Pal Jadon on the first day of school.  Members of the High School Band (who went to our elementary school) perform a few songs the first day of school each year.  It is kind of a pep rally for the kids!


I added a little flair button, some chipboard (with an arrow sticker) and I used dylusions ink (Cherry Pie) on a punched circle as well as the chipboard.


I tucked a lime green arrow at the bottom corner of the picture of the boys.  I love how it matched the background paper!


I added some chipboard banner flags under the band photo - it is hard to see in the photo but there was a member from the flag core performing too!


I used my cameo and Square 1 Masterpiece for my title.


I almost missed this photo opportunity as Jadon was in a different area before school.  Right before the bell rang, he and his mom braved the crowd and joined Tanner!  I try to take a photo of them every year!

For more information on the products used from the Frosted Design Store: