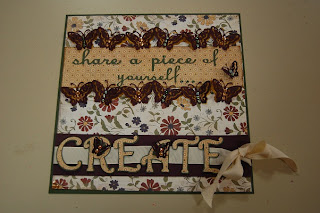
This is my entry for the Cricut Circle Monthly challenge to create a layout or wall hanging describing what Create means to you, using shadows, patterned paper and bling. I did not take many photos while I created this which was probably a good thing. This turned out so different than I imagined it would and changed my mind a dozen times!!!
The first thing I came up with was my saying. I used Songbird for the "share a piece of yourself" and welded the letters together. I used Nursery Rhymes for the font and shadow for the word Create.
I used my search feature to find just the right butterfly. I ended up using Wall Decor and More. I made a border with six butterflies. First I used Hide Contour to hide all of the inner cuts. I copied five more, rotated them back and forth and welded them together. I copied the border.
I put another butterfly on the mat (without the inner cuts hidden) and sized it to match the butterflies in the border. I copied eleven more.
It was after I did all of this work that I noticed there is a border feature on this cart....but I liked mine better for what I had in mind.
I put the letters "CREATE" on their own Layer to help me organize my cuts. I opened another Layer and hid the first Layer so I could see the word CREATE behind my layer. I put another butterfly on my mat and sized it to fit inside the R. I copied two more butterflies (because I try to do things in 3s) and cut them out the same color as the other butterflies.
The yellow paper I had did not really go with the color scheme, so I inked it with Tim Holtz's Vintage Photo distress ink and a sponge.
I bent the wings out and glued just the center of the butterflies down. I put some bling on the butterfly bodies.
I added some ribbon behind the word Create and here it is!! Now I need to find the perfect place to hang it!


2 comments:
Lori, I love it!!!
What a great entry! Love it and the butterflies are awesome!
Post a Comment