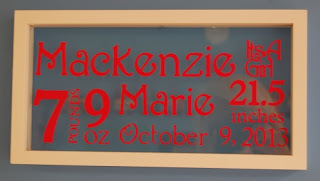
A friend of mine just had a baby girl. She is one of my daycare moms and I am so excited to have a girl coming!!! We are boy heavy over here! I have been wanting to make one of these Baby Subway Art Frames for a while now.
I found this float frame at Michaels on sale. I removed the pictures and used goo gone to get rid of the sticky residue from the tape that held the pictures on the glass as well as the price tag. I never understood why they put sticky labels on glass!!!
The dimension of this frame is 6" x 12", but the inner glass measures 5.5" x 11.5".
I put a rectangle on my mat sized to 5.5" x 11.5".
I opened a new Layer (while leaving the rectangle visible) and started putting some words and numbers on my mat. I typically try out a couple of different fonts before I find what I want.
I ended up using Nursery Rhyme for: Mackenzie, Marie, and It's a Girl.
I used Plantin' Schoolbook for: 7pounds 9 oz and 21.5 inches.
I used Martha Stewart Elegant Cake Art for: October 9, 2013.
I used the settings 3-3-3 for a kiss cut for my vinyl (Speed 3, Pressure 3 and Blade Depth 3).
Here are my tips for creating you own Subway Art:
Play with several types and sizes of fonts
Look at Pinterest for different ideas
If you need a comma or period, sometimes you need to use the semi colan and hide the piece you don't need
If you don't have a float frame, hot glue the glass to the back of the frame
Cut with paper first - especially if you only have one piece of vinyl to work with!
I used Cricut Transfer Tape to transfer the vinyl onto the glass then assembled the frame.
I sometimes use clear contact paper from the dollar store instead of transfer tape as it is not as sticky as the regular contact paper. If I used regular contact paper, I "dirty" it up first by sticking it on my jeans so it is not super sticky.


2 comments:
This is beautiful. And I'm so glad you mentioned using cheap "contact" paper as transfer tape. I used painter's tape, but it was only small pieces for a pumpkin face. But I love what you've done here.
WOW, Lori, this is fabulous!!! TFS
Post a Comment