Copyright Information

Thank you for stopping by my blog! I hope you enjoy the things that I create and share! I do have a copyright on my original creations (see logo on my sidebar below).
If you create and post a creations based off of mine, please refer (with a link) back to my blog. Please do not use my ideas for files, profit or for contests. Thank you!


My Craft Goals for 2015

My Goals for 2015:

1. Update my goals for 2016 in January of 2016 :)
2. Maximize my crafting time!
3. Keep plugging away at scrapbooking photos!!
4. Learn how to Heat Press!!
5. Have fun!


Showing posts with label Just Because Cards. Show all posts

Wednesday, April 18, 2012

Arbor Day Blog Hop


I think that I shall never see
A poem lovely as a tree.
A tree whose hungry mouth is prest
Against the earth's sweet flowing breast;
A tree that looks at God all day,
And lifts her leafy arms to pray;
A tree that may in Summer wear
A nest of robins in her hair;
Upon whose bosom snow has lain;
Who intimately lives with rain.
Poems are made by fools like me,
But only God can make a tree.
...Alfred Joyce Kilmar


In the News: Arbor Day celebrated in Clarksville, 'Tree City USA' as quoted in their local paper
"I have a saying that trees are one of our utilities, and the reason I say that is because they help clean the air, they help control rainwater runoff, they convert carbon dioxide into oxygen," he said. "What we really have when we have a line of trees around the city is a utility that provides good things for the population without having any cost associated with it."

Today, we are celebrating the wonderment of trees and we welcome you in our celebration. If you are just visiting me, I would love for you to have a good "roots" with our hop and start at the beginning of our seedling which is HERE. If you have arrived from Tiffany then don't "bark" up the wrong tree as you are standing in our midst!

I did not have any photos that would work with a "tree" theme right, so I created a card instead.  This apple tree with a swing is my very favorite tree!  This image alone is the reason I purchased Just Because Cards!
I opened up a 12x12 mat in my Gypsy and put all of the tree layers on the mat sized to 6.44 inches (which will fit a card base that is 6.44 inches).  I put the card base on my mat and sized it to 5.5 inches.  I wanted my card to be horizontal (not vertical) and I wanted my tree a little bigger than was suggested by the cricut cartridge.

This is one of the features I really like about my Gypsy ~ I can see my project and how the pieces will go together BEFORE I cut them out!!

I put down my scraps.  I tape everything because my mats just don't stick like they used to.  I also have an E2 and the mats go in at an angle and they bend more than when I use my E or Imagine.  I really get crazy when my paper slips...

Here are all of my pieces cut out.

I layer the tree pieces together and put a little twine on my swing.  I used Denim twine from The Twinery.  I took some striped paper from my scraps and used it as the background of my card.

I tied some red crinkle ribbon around my card mat to showcase the red in the apples.  I stamped "Thinking of You" from Pink By Design as my sentiment on the front of the card.  I left the inside blank.


Thank you for visiting us today as we celebrate the lovlieness of our trees. Your next stop along our trail is ANITA. Thank you for counting our rings and not stumping along the way!

Tuesday, July 26, 2011

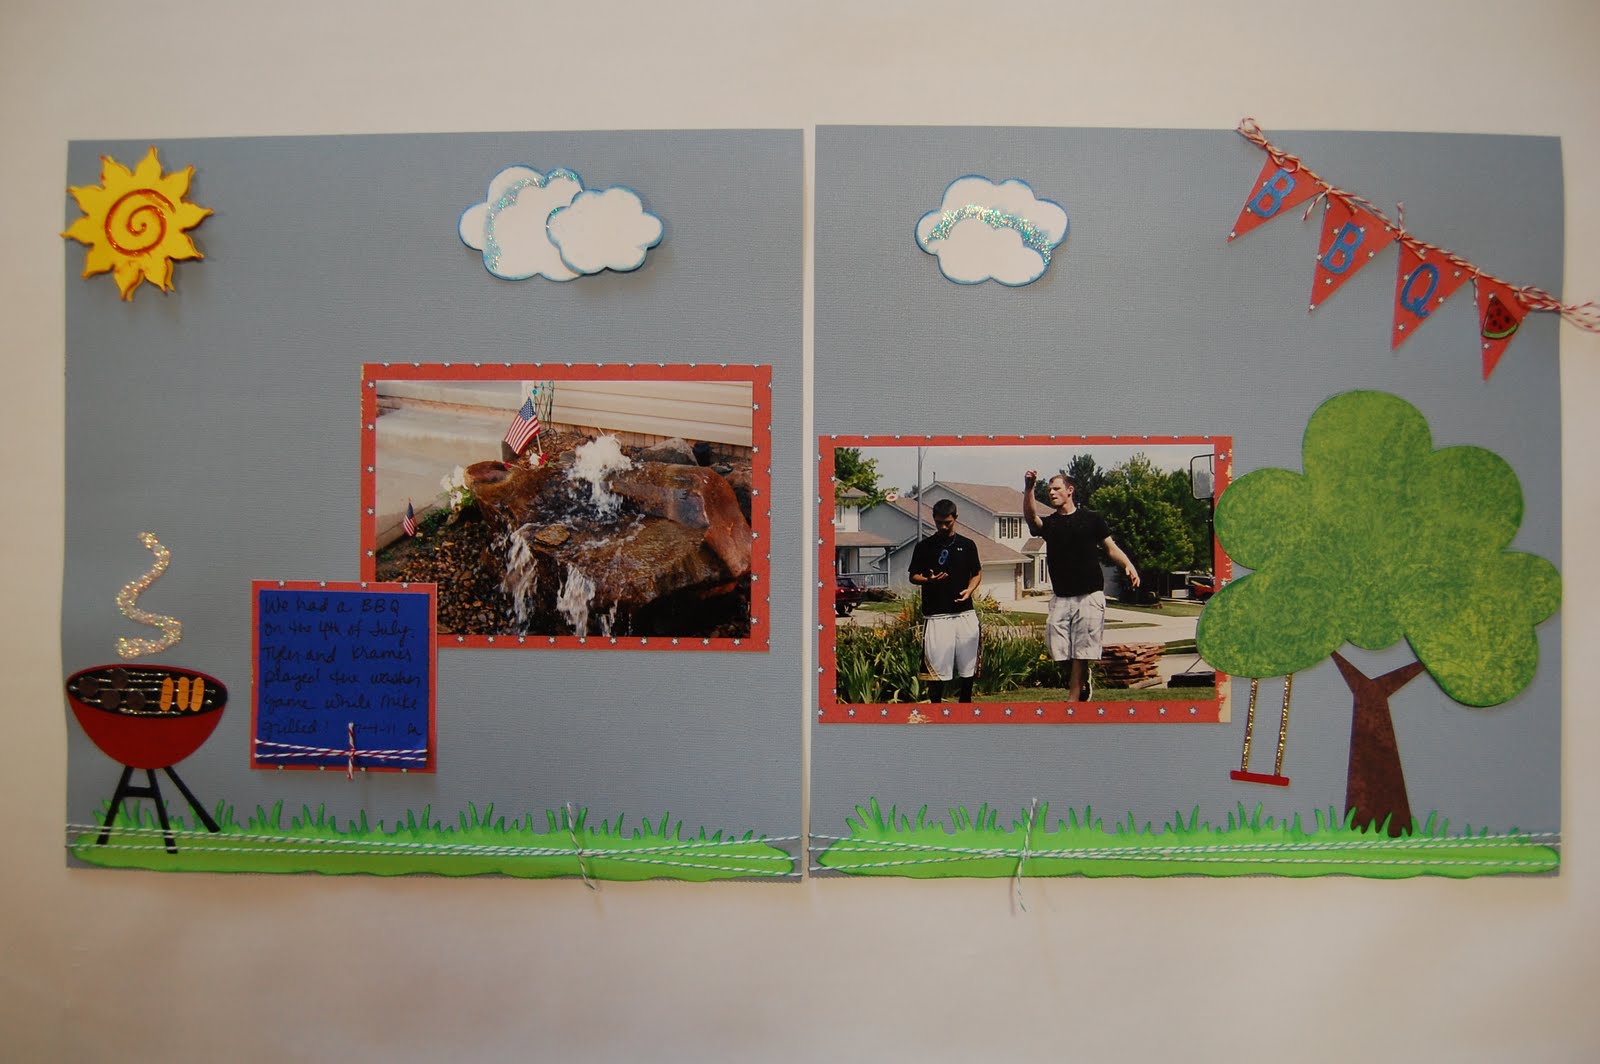
Mix It Up ~ BBQ Layout

Lori here from ScrappinMyStressAway with this week's Mix-It-Up project for SweetSassyDiva.  Our theme was to use several cartridges (check) BBQ theme (check) and a Bold Color (check).  I do not have either of the BBQ themed cricut cartridges, so my Gypsy and I got to work!

The tree is from Just Because Cards sized to 6.23w x 14.93h (real size is 5.78 x 6.92).  The sun is from H20 sized at 2.56w x 2.54h.  The grill shape is from Creative Memories Cheerful Seasons ~ it is the watermelon at 3.79w x 1.59h (minus the slice) and the oval is from George 0.99w x 2.68h rotated 90 degrees.


For the legs of the grill, I used 2 "A"s from Cherry Limeade at 1.52w x 1.94h.  I put another oval on my mat for the grill top.  Again I used George and sized the oval to 0.99w x 2.68h, rotated 90 degrees.  I cut these out in black.

On the 3rd Layer, I put some grass from Everyday Paper Dolls at 12.0w x 2.73h.  I copied a second grass on the mat.  I put the banner from Birthday Bash on the mat at 6.01w x 4.06h.  I put BBQ from Cherry Limeade at .80 inches and the watermelon from Creative Memories at .73 inches.  I copied the watermelon and layer and then hid the watermelon half from each as I only needed the slice. 

I put four skinny balloons (aka hotdogs) on my mat from George and Basic Shapes sized at 0.21w x 0.57h.  I put four circles (hamburgers) on my mat from George at 0.36w x 0.33h.  I put three clouds from Create A Critter on my mat at 2.49w x 2.06, 1.92w x 1.59h and 2.63w x 2.18h.  I hid the inner cut on all three.

Here are the pieces all cut out.

Here is my grill all assembled.

Some hamburgers complete with grill marks! 
Some hot dogs with grill marks!

 
I used some stickles to create the grill top and the smoke.

I put orange stickles on the bottom layer of the sun (under the swirl) and some waterfall stickles on the cloud.

I added some journaling and twine to my layout.

I cut the bird off my banner and added BBQ and the watermelon slice.  I did change my paper for the banner to match the photo mats.

I put some gold stickles on the swing rope.

Here are a couple of photos from our 4th of July BBQ.  I can almost smell the grill!!

Saturday, May 21, 2011

Day at the Beach {Some very exciting news too}

I felt a bond with SweetSassyDiva a while ago on facebook as we are both working hard at losing weight.  We have been passing back and forth praise and support!  I have been a follower of her blog for a while now and when she announced a Design Team Call I thought it sounded like a lot of fun.  I wanted to make sure I had enough time to dedicate to her blog, so I kind of waited until the last possible minute to decide.....and I am so glad I did!!!  I am super excited to be on her Design Team!!!  Here is my Day at the Beach Layout and how I created it.

Usually I start every layout with the pictures, but every now and then I do it backwards!  For this one I started with the paper!!


I used my Creative Memories wavy cutter to trim my blue paper into waves. I adhered the larger wave onto the sand colored cardstock (on the bottom) and pop-dotted the shorter wave on top of it. I tore my blue cardstock for the sky, inked it with Vintage Photo ink and adhered it to the top of the sand colored cardstock for my sky.
On my Gypsy, I opened up a new project with a 12x24 mat.  From Life is a Beach, I put two beach chairs (3.32w x 3.00h) on my screen.  I flipped one of the chairs sideways so they are leaning towards each other.  I put a beach umbrella on the screen and sized it to 4.29w x 4.29h.  I grabbed the sun from Just Because Cards and sized it to 3.13w x 6.85h.  I grabbed the water duckie tube toy from H2O and sized it and the layer piece at 2.67w x 1.92h.  I used Cherry Limeade for my font and put the words DAY and BEACH  at 2" height on my mat.  I welded "at" on top of "the" (both at 1" height) and then sized a cloud from Create A Critter to 3.09w x 3.27h to fit the "at the" on it.


My favorite part was welding the sand castle border from Life is a Beach to make a border. I opened up Layer 2 and put 2 borders on my mat at 1" height. I used my Y axis to line them up and welded them together. Then I changed the width to 12" for a true 12" border. I started my border at 1" and ended it at 13" on my 12x24 mat, then cut out two.

I glued down the sand castle borders just above the waves.

 On Layer 3, I copied and pasted the umbrella two times because this cart does not include layers.  I hid the inner cuts on one of the umbrellas and cut it out in silver paper.  I trimmed off the pole of one of the other umbrella that I cut out in the star paper.  I used purple stickles to outline the seams on the umbrella.

On Layer 4, I copied and pasted two suns, the duckie pieces, the chairs and the cloud. I also put a circle on my mat at 1.26w x 1.21h for the inner circle of the sun. I cut out the sun pieces and the layer of the duckie in yellow and the rest in white. I inked the sun pieces and the chairs in Vintage Photo, and the cloud in light blue. I assembled the pieces of the sun and duckie. I set the chairs and umbrellas on my page to make sure I had enough room for my 4x4 photo.

On Layer 5, I copied and pasted the title which I cut out of dark brown cardstock. I used the same cardstock to mat my photos.  I used the negative piece as a guide to glue down my title perfectly straight.

I glued the "at the" onto the cloud.
 I put the duckie in the water off the page and trimmed him up. 
I glued down one of the sun pieces and then pop dotted the other sun piece with the circle on it. 
I made a towel out of some red ribbon and I glued it over one of the chairs.  I glued down the chairs and umbrella.  I pop-dotted the chair on the right so it looked like the umbrella was further back.

I added some baker's twine on the photos.  I also added some Jolee's sea shell/gem embellishments on one corner of each photo and along the sand castles.
In order to fit my photos in the layout, I trimmed two of them to 4x4.  These photos were from our vacation last summer in the Ozarks.

And here is my "Beach" project, a 2-page layout that is almost as cute as the boys in the photos!!!

Thanks again SweetSassyDiva!!!  I am so excited (did I say that already?) to be on your design team!!

Tuesday, May 11, 2010

15 Border ~ Gyspy Challenge


This week's challenge on the Gypsy Chit Chat forum of the Cricut MB is Mix Em Up. You use 4 carts, 4 welds and at least of of the images is a shape.

I designed this border for my son who just turned 15 and is learning to drive. I welded letters, numbers and shapes from Designer's Calendar, Base Camp, Lyrical Letters, Cuttin' Up, Locker Talk, Street Sign, Doodletype, Going Places and Just Because Cards.

I wanted my border to be 2" x 12", so I put the images on a 12 x 24 mat on my gypsy. I started on the second inch in from the left edge and went to 13 inches from the left edge. I put my 3" x 12" paper on my 12 x 24 mat to cut. I learned this technique from Alicia Garcia's BLOG.

I used this blue paper to test cut my design. I will use red or dark blue on a layout (I am behind in his scrapbook since becoming a "girlie" designer lately ~ LOL)! I put the title on a piece of red paper so it would be easier to see.


A while ago I made a mesh of the number 15 and the word "fifteen" that was 9" x 12". I have not yet cut it out, but I think I like this border much better!!