Copyright Information

Thank you for stopping by my blog! I hope you enjoy the things that I create and share! I do have a copyright on my original creations (see logo on my sidebar below).
If you create and post a creations based off of mine, please refer (with a link) back to my blog. Please do not use my ideas for files, profit or for contests. Thank you!


My Craft Goals for 2015

My Goals for 2015:

1. Update my goals for 2016 in January of 2016 :)
2. Maximize my crafting time!
3. Keep plugging away at scrapbooking photos!!
4. Learn how to Heat Press!!
5. Have fun!


Showing posts with label Wall Decor and More. Show all posts

Thursday, October 24, 2013

Halloween Charger Plate with The Buckle Boutique


I made this fun Halloween Charger Plate using Dazzling Diamonds from The Buckle Boutique and some vinyl.

I had orange Dazzling Diamonds and I really love Halloween - so it was natural for me to make a pumpkin!!

I grabbed my Gypsy and MyCutSearch.com and found a pumpkin I liked.


I put a circle on my mat to represent the inside of the charger plate.  This pumpkin is from Gypsy Wandering and is sized to 5 inches.  I cut this out of my Dazzling Diamonds orange sheet!!


The spider web is from October 31 and is sized to 5.82 inches.  I cut this out of white vinyl.


I used this flourish from Home Decor sized to 1.69 inches for my pumpkin vine.

I used this leaf border from Wall Decor and More.  I hid the inside cuts with Hide Contour and sized them to 1.59 inches.

I cut both borders out of green viny.


Here you can see how I layered the leaves and vine.


I grabbed the spider and the font Frightmares (from dafont.com) from my Cameo and cut them out in purple vinyl.


You put it all together and have a fun Halloween home decor item!


For more information on the Dazzling Diamond Sheets, check out:
The Buckle Boutique's Website . . . click HERE
The Buckle Boutique Blog . . . . clickHERE
Facebook Page . . . click HERE
Twitter Page . . . click HERE
Pinterest Page . . . clickHERE


Wednesday, June 19, 2013

Duckies - 2 projects in 1!!


Today I took one cut of Square 1 Masterpiece Repositionable Adhesive Fabric and made two different projects with it.  A gift bag (actually two identical bags) and....


I decorated canvas.


You can get more information about this amazing product HERE.

I started out with my Gypsy and a couple of different projects in mind.


Yesterday I posted the Summer Bucket project.  Today I am using the ducks.

I found the set of ducks on Wall Decor and More cartridge and sized them to 2.76 inches.  I rotated them 90 degrees to fit withing my 8.5x11 rectangle (that represents the sheet of adhesive fabric).


I cut them out with Square 1 Masterpiece Removable Adhesive Fabric.  I used the same settings as vinyl for cutting - blade depth 3, speed 3 and pressure 3.


I peeled the ducks off the paper backing and stuck them on a kraft gift bag from Michaels.


I painted the bag with yellow acrylic paint.


When the paint was dry, I peeled off the ducks.


Look - no tangles and all in one piece!


I stuck the ducks down on another gift bag - I typically make 2 or 4 gift bags at a time.


Once the paint is dry, I put washi tape around the edges and added buttons on the corners.


I tied a bit of twine around one of the handles.

I was not done with the duckies though....


I painted an 8x10 canvas blue and stuck the duckies about 2/3 the way down.  I tied a bit of tulle to the top.  This would be cute in a baby room or child's bathroom.  Once the child grows out of duckies, just peel them off and re-use the canvas for something more age appropriate!!!

I have been having fun exploring crafty options with this product.  You can print it, cut it, punch it, remove it and re-use it!!

If you missed my Square 1 project from yesterday, just hop over HERE!

I am also linking up at Pink Cricut!!


Saturday, July 21, 2012

Cricut Imagine + CCR = Layout!

I decided to give CCR another try after I saw a YouTube video combining the Imagine with CCR.   Now I can't find the exact video that I followed.  I found another one HERE in case you want to see how to combine the two to create a print out a layout.  This video was made when CCR was in the Beta stage so some of the specifics have changed.  The biggie is when you add elements to your patterned  page, instead of clicking on Don't Weld (like this video shows) CCR will ask you if you want to make an additional layer - click yes and you can fill your shape/image with a different color.

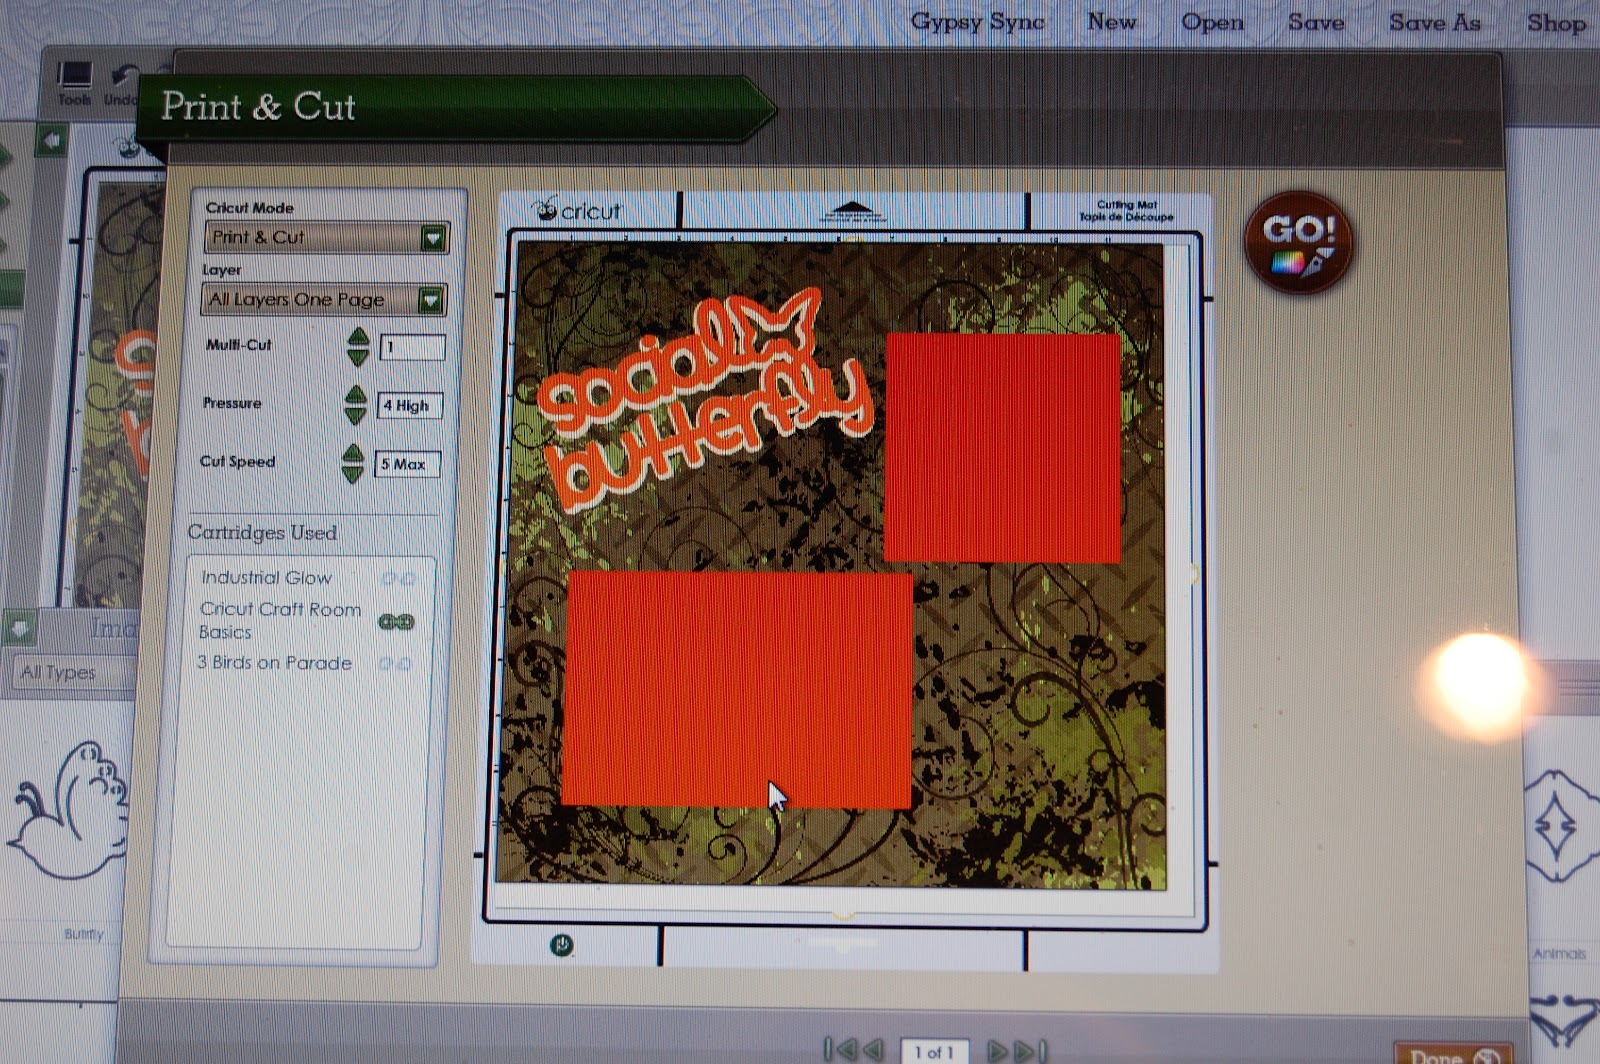
I put a 12x12 square shape on my mat and selected the paper I wanted from Industrial Glow.  Next I added two photo mats.  I sized a square 4.25 x 4.25, put it on my mat and colored it orange from the color options.  I repeated this with a rectangle 4.25 x 6.25 in the same color.

I grabbed this title from 3 Birds on Parade and colored the shadow layer cream and the title in orange.  I layered them one on top of the other.

Since I have a Gypsy, I had to dig out my carts and plug them into the Imagine to print out.

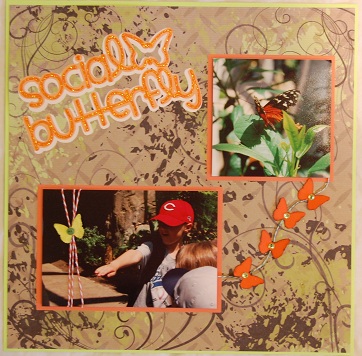
I felt this layout was a little flat, so I got to work!!

I added orange stickles to the title.

I pop-dotted the photos on the mats.  I created a string of orange butterflies (inked in brown) to connect the photos.  I added green gems.

On Tanner's class field trip to the zoo, the guy in the Butterfly House put a butterfly on each of the kid's hands.  It was so cool!!

I added some twine and a little green butterfly to the photo and then trimmed of 1/8" from each side and mounted the layout to a lime green cardstock- and this layout is done.

Now, I am a 2-page scrapper and I have a lot of photos of this trip.  Here is how I created page 2:
I cut the remaining photos to 4x4 and adhered them around the page (lime green cardstock) leaving the center open.   I went back to CCR and grabbed a 3.75 x 3.75 square and used the same background paper from Industrial Glow.  I manipulated the pattern to make it smaller so it matched the 12x12 page.

I grabbed these butterflies from Wall Decor and More (banner function) and added them to the square.

I also cut out the same butterflies (on my E) in orange cardstock so I could layer them on top.  I pop-dotted the butterflies on and added green gems.

I tied a bit of twine around the bottom of the square and added a journaling stamp from Pink by Design.


I think it turned out pretty good for my first time :)

Here are my two layouts together.  Maybe there is hope for me and CCR after all!!

Sunday, April 22, 2012


Happy Earth Day! 

Welcome to the Recycle, Reuse & Re-Purpose Blog Hop in Honor of Earth Day! Every year, The United States and over 100 different countries join together in the celebration of Earth Day on April 22nd. Earth Day is the largest, most celebrated environmental event worldwide. On Earth Day, we remember to appreciate nature and learn ways to protect our environment. Find ways that you can help keep the planet clean and help protect our environment!

Today our Hop is Hosted by Tina from Crafty and Green. She Loves to Craft Green!! What a Great Way to Share our Love of the Earth by having a Fun Blog Hop! You should have hippity hopped along from AMY, but if you just stopped by my blog to visit today, I don't want you to miss a single thing!! Please start at the beginning which is HERE.

For your convenience, here is an entire list just in case you get lost along the way:
  1. Tina- http://craftyandgreen.blogspot.com
  2. Amanda - http://Oldenough2beakid.blogspot.com/
  3. Lisa W.-http://mycraftyspaces.blogspot.com
  4. Gill - http://creationsbygillm.blogspot.com
  5. Amy - http://www.lovetocrop.com/
  6. Lori - http://www.scrappinmystressaway.blogspot.com/ ****HERE
  7. Ann Marie- www.creativeramblings345.blogspot.com****NEXT
  8. Cheryl - http://cardsbycg.blogspot.com/
  9. Kimberly ~ http://scrappingrookie.blogspot.com/


Sponsors & Blog Candy:
What's a Hop without some fun Candy to go Along with it? 

 Scraptastiscal Kreations- $20 Gift Certificate

_____________________________________________________________

Crafty Sentiments Designs- 3 Digi Stamps

_____________________________________________________________


Simply Silverton- A bath kit in the fragrance of the winners choice-
Two 4 oz bars of soap, 7 oz body Souffle, and 16 oz of Bathsalts.
(Natural organic soaps and body products)
___________________________________________________________

Rules to be Eligible for The Blog Candy:
1.)  You MUST visit each blog and leave a comment on every blog in the hop
2.) You must become a follower of Crafty and Green if you aren't already!
3.) For an “Extra” Entry for the Blog Candy, Please Friend Tina at CraftyandGreen on Facebook

Now, Onto My Project:
I made two projects, but only did a tutorial for the first one. The second project (shown at the end) took on a life of its own :)


I went to the thrift store and rescued this nasty looking cookie sheet.  I also rescued a lamp shade that I used in my second project.  I spent $2!

I grabbed some spray primer that I had left over from another project and primed both sides of the cookies sheet.


Next, I spray painted the cookie sheet black to match my scrap nook.

Using my Gypsy and purple vinyl, I cut out "Imagine" from Wall Decor and More sized at 2.29 inches. I cut out the swirl from Home Accent sized at 6.70 inches. 

I use settings 3-3-3 on my Expression (or Vinyl on my E2) and then weed out the extra pieces.  I use clear contact paper as my transfer tape.  I de-stick my clear contact paper on my jeans.  I forgot this step once and really regretted it!

I took some denim from some of my old jeans after I lost weight and glued a strip onto a cardstock circle making a flower.  I put a purple gem in the center and glued it to the cookie sheet.

I mounted my magnet board to my cupboard door (that hides my circuit board) above my desk.
I removed the lamp shade from the frame and used the bottom ring as a frame for my wreath.  I cut strips of denim and tied them onto the ring along with white tulle.  I tied a tulle bow and clipped on three gerber daisies from Michaels.  I hung this on my basement door near my craft nook.

I used the top of the lamp shade for another Recycled project ~ a clip it.  You can see the project and how I made it HERE.

Thank you so much for joining me today to celebrate Earth Day. Now, Please Hippity Hop on over to the talented ANN-MARIE to see what she has created for your viewing Pleasure!


Thursday, February 10, 2011

Word Challenge LOVE {Canvas}

This week's challenge at Frosted Designs is using the word Love.  I looked at some square canvases at Michaels and they were over $20 for a set of 4.

Then I remembered that I had these at home.  I paid $1 each for these for a daycare project and these were the left over canvases.

I used red acrylic paint on the canvases.  I painted two coats.

I found some paper that coordinated and cut them to fit the canvases.

I cut out letters from Wall Decor and More to fit inside the paper and cut them out in metallic black cardstock.

I placed the letters on the paper to see if I liked the look.

Then I dug out my alcohol inks and some paper flowers to create just the right color flower.

I ran my letters through my 5" Xyron.

I stuck the letters on the papers and added some paper flowers, ribbon and pearls.

I used my pink ATG gun to stick the papers to the canvases.

I used a few glue dots for reinforcement.

I inked the edges with a black stamp pad.

Here is the final project ready to be hung up!!

If you are in the mood for love, join us at Frosted Designs....you just might win a prize!!