Copyright Information

Thank you for stopping by my blog! I hope you enjoy the things that I create and share! I do have a copyright on my original creations (see logo on my sidebar below).
If you create and post a creations based off of mine, please refer (with a link) back to my blog. Please do not use my ideas for files, profit or for contests. Thank you!


My Craft Goals for 2015

My Goals for 2015:

1. Update my goals for 2016 in January of 2016 :)
2. Maximize my crafting time!
3. Keep plugging away at scrapbooking photos!!
4. Learn how to Heat Press!!
5. Have fun!


Showing posts with label Halloween. Show all posts

Wednesday, October 29, 2014

Trunk or Treat

Friday night was Trunk or Treat Night at my son's school.  I decorated my car as a Vet Clinic.  I tried as hard as I could to treat all of the animals (and butterflies and even a bee) that came to my clinic, but no one would get on my table!!  Elsa forgot to bring Sven to his appointment too!!   I still had fun passing out "treats" to everyone! 
j
I used my Cameo to design and cut out my sign.  I used vinyl on poster board.  I adhered the poster board to a piece of black foam core board and taped it to the top of my hatch. 
I filled my "treats" container with candy.  I printed off some checklists for treating animals.  I included some first aid supplies and toys from my daycare.

Here are some of my patients.  Rocky Racoon has a broken arm, Dotty Dalmation has stitches and Izzy Iguana has a sore throat. 
I had a lot of fun with the animals (and children) who came by!!

Wednesday, October 22, 2014

Pumpkin Patch LO

Hello and Happy Wednesday!!  Today begins another sketch challenge at Let's Scrap!!

Last Friday we took our annual field trip with the daycare to the Pumpkin Patch.  The photos were perfect with these Carta Bella papers.

Here is our sketch:
I created the background shapes, pumpkins and my title on my Silhouette and cut them out with my Cameo.
I cut out the layers with cardstock and Carta Bella papers.
For the title, I created an offset layer so the letters would stand out on the busy paper.  I pop-dotted the title to my layout. 
I pop-dotted the pumpkin on my page.  I wrote some journaling on the background piece.  I inked the edges of all of my papers with Vintage Brown ink.
I used orange and black twine across the bottom of the layouts.  I added a bit more journaling here. 
Here is another pop-dotted pumpkin.  You can see my son Tanner and his best friend (Tanner's head is a little cut off) in the hayrack ride.
We have such a great time at the pumpkin patch every year.

I hope you join us at Let's Scrap!!


Saturday, October 18, 2014

Creepy Candy Corn Bucket

Welcome to the Monster Mash Blog Hop Day #2

I was working in the lab, late one night
When my eyes beheld an eerie sight
For my monster from his slab, began to rise
And suddenly to my surprise

He did the mash, he did the monster mash
It was a graveyard smash!

Connie">http://conniecancrop.blogspot.com/">Connie Can Crop and her ghoulishly wonderful friends are so glad you could join us for this Monster Mash! We have so many frightful projects you'll be screaming for more! 

This is day #2 of the blog hop and we appreciate your leaving a comment for all of these talented creatures who are here sharing their ideas and creations. We are thrilled to death that you came back!

The zombies were having fun, the party had just begun
The guests included Wolf Man, Dracula and his son!
A Woooo!

We have three terrifying yet amazing sponsors and giveaways for this hop!


Creative Kuts is giving one lucky winner a $10 gift certificate for their online store. 
Be sure to check out their spooky SVG files!

You can
visit her Shop
here and
follow them on Facebook here.

AND


is giving away this Frightfully Fun Stamp set from CTMH


AND

Connie Wallenbrock is giving away this Mini-Medley Accents Pack from CTMH


Perfect for your Halloween creations!


What do you need to do to win? Easy... become a follower of each of the fabulous blogs in this hop and leave each of them a comment letting them know what you like best about their projects. 

Then you can mash, then you can monster mash
The monster mash, and do a graveyard smash
Then you can mash, you'll catch on in a flash

Then you can mash, then you can monster mash
You will have until 12:00 am Monday to finish the hop and leave your comments.

Winners will be announced on Wednesday at Connie Can Crop.

Be sure to follow everyone and leave your spirited comments along the way!

Let's get this Monster Party started!

I found this design online.  It was used on a mason jar, but I wanted a bigger container.  I purchased this clear pail at a local craft store.  I sized the image to fit the front half of the bucket and cut it out in black vinyl on my Cameo.

I filled it up with candy corn and tied a bow on top.
I love the creepy cat and the bats!!  This will make a nice Halloween gift!

Up next is the lovely and talented ASHLEY!

Here is our complete line up for day #2 in case you get lost along the way:


Thanks so much for joining us for such a fun day! Happy Haunting!


Wednesday, October 1, 2014

Trick or Treat Spooky Tree

I used a piece of 12 x 12 burlap from DCWV, some vinyl and a frame to create this fun Halloween craft.

I modified a file that was shared in a group (sorry not mine to share) and added the Trick or Treat from the Silhouette store.  I also added the moon and witch from the Silhouette store.

I put the vinyl on the glass and the burlap inside the 12 x 12 frame.
I love the look of burlap right now, but regular vinyl does not stick to it.  I do not have a heat press, so I found a better way for me to make my project!!!
Halloween is my favorite holiday to decorate for - I hope you have a Crafty Halloween!!


Tuesday, September 16, 2014

Blinged Out Pumpkin

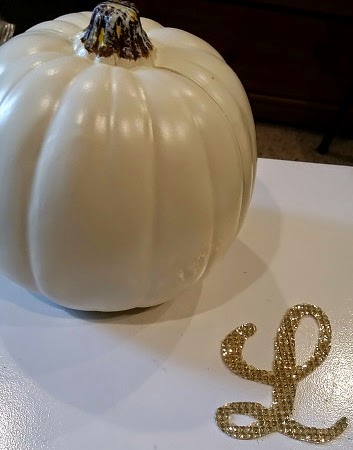
Halloween is my favorite holiday!!  I love the fall colors and decorating my house and daycare.  I found two different pumpkins on Pinterest that I loved - so I combined the two designs together.  I put my "L" on the front and gems on the top.

I purchased a 5 inch creamy white foam pumpkin from Michaels. 
My "L" was cut from a piece of gold Buckle Boutique Rhinestone Resin Self-Adhesive Sticker Sheet.  You can find these HERE (some colors are on sale right now too)!

I used my Gypsy with my cricut expression.  I got the "L" from Quarter Note.  I measured my pumpkin and determined the "L" should be around 3.5 inches.  I sized my "L" to 3.59 inches.  

I flipped the "L" to cut it out in reverse. 
The Rhinestone Sticker Sheets cut best face down on a sticky mat.  My mat is not as sticky as I would like, so I taped the edges down too.

Here are the instructions for cutting with a Cricut:

Cricut
  1. Use a deep cut blade
  2. Place your blade depth at 6
  3. Use a mulit-cut of 3 or 4 depending on how new your blade is
  4. Put your speed on slow
  5. Place the product face down on the Cricut cutting mat, making sure it is in a very sticky spot.  I usually run my hand over it to really make sure it is stuck down.
  6. Use Flip Mode on your Cricut  (since you have the product upside down, you need to flip the cut for the image to be correct when you flip it over)

Here is the "L" cut out.  I peeled the backing off and stuck the "L" on the flattest side of the pumpkin. 
It looks pretty, but I wanted a little more sparkle!! 
I purchased these gems from Michaels,  The pack includes clear, gold, dark grey and black crystals in 3 sizes.  I used Beacon 527 glue to adhere them to the top of the pumpkin.

I put 5 or so dots of glue on at a time and stuck the gems on. 
I am so happy with how this turned out!!

I hope you have a Blingy Fall!!


The Buckle Boutique's Link Listing
The Buckle Boutique's Website . . . click HERE
The Buckle Boutique Blog . . . . click HERE
Facebook Page . . . click HERE
Twitter Page . . . click HERE
Pinterest Page . . . clickHERE

Monday, October 28, 2013

Trunk or Treat

Happy Halloween Week!!!!  Halloween is my very favorite holiday!!!!

My son's elementary school hosted a Trunk or Treat Event on Friday.  It was super fun and I decorated my car with a Pirate theme.  

I used Square 1 Masterpiece Glow in the Dark Repositionable Adhesive Backed Fabric for the pumpkins.  I did not want to carve them yet so they don't get "yucky" before Halloween night!!


Here is my car right after I set it up.  I made a treasure box and added some pirate things from Tanner's room.  I purchased the banner at Hobby Lobby.


Here is my car lit up!!  I had so much fun!!!

Sunday, October 27, 2013

Halloween Coasters


Hello and Welcome to Day 2 of the UnBOOlievable Blog Hop!!


You should have arrived from HERE.  If you found me first, please go to the BEGINNING so you don't miss a thing!!!  We have two days of Halloween projects for you - so sit back and enjoy!!  We hope to inspire you!!  If you missed yesterdays projects, you can always take a peek by clicking HOME at the top of each blog.

For my project today, I made a set of spooky tiles to give as a gift.

 I purchased some white 4x4 tiles from Home Depot.  

I purchased these fun tile images from the Silhouette Online store. I sized them to fit my tiles and cut them out in black vinyl.


These can be used as coasters or home decor.


I added some pretty Halloween ribbon to tie the tiles together.


I put this vinyl "Wicked" on a gift bag and added a simple bow.

Your next stop in the hop is LUCY!

Here is the blog line up in case you get lost along the way:


4. Lucy ~ http://love2createitall.com/***NEXT


15. Miranda ~ www.nanasscrapspot.com


Saturday, October 26, 2013

Halloween Subway Art


Hello and Welcome to Day 1 of the UnBOOlievable Blog Hop!!!


You should have arrived from ANGELA.  If you found me first, please go back to the BEGINNING so you don't miss anything!!!  We have two days of Halloween projects to share so sit back and prepare to be inspired!!!

I just love decorating for Halloween AND I love subway art.  Naturally I "needed" to create some Halloween Subway Art!!!  I wanted my project to be reusable for each Halloween.


I found these 8x8 metal tiles at Michaels in the dollar bins.  I was able to peel the stickers off (it was much easier than I feared) and painted one with white acrylic paint.  I painted two coats, letting it dry completely between coats.


I used this subway art design that I purchased in the Silhouette Online store.  I sized it to fit my 8x8 tile.

I cut it out of black vinyl and adhered it to my tile.

I painted the edges black with acrylic paint to finish it off.  I just love it!

Be sure to stop back tomorrow to see what else I made with vinyl.....

Your next stop in the hop is LUCY.

Here is the entire list of blogs in the hop in case you get lost along the way:


4. Lucy ~ http://love2createitall.com/****NEXT


15. Miranda ~ www.nanasscrapspot.com


Monday, October 7, 2013

Broom Parking Sign


Today I am pulling double duty!!  I am Hosting She's A Sassy Lady's BLOG and participating in an exciting Blog Hop for Frosted Designs!  I am a Designer for both blogs!


Welcome to the Frosted Designs Grand Opening Blog Hop! We are so excited to share our love of creating with all of you and couldn't think of a better way to celebrate than by doing a blog hop! So... are you ready?!!!

The rules are simple this time.....

1. You are going to "hop" to each of the blogs on the list. Each of these designers will have a different word on their blog that you need to "collect".

2. Each designer is going to showcase a project they made using products from the Frosted Designs store as well as showcase some of their favorite products! They may also be giving away prizes of their own!!

3. Once you have "collected" the words, you will have a phrase. You are going to email this phrase to frosteddesigns@ymail.com. We will pick one random winner to receive a $20 Gift Certificate to the Frosted Designs Store! (Gift Certificate does not include shipping.)


That's it.... easy peasy!!!


I absolutely love Halloween.  I love decorating for Halloween, picking out costumes, planning my daycare party - everything about Halloween!!  I saw this image and just knew it would be a fun one to cut out!


I took an 8x8 flat canvas and sprayed Dirty Martini Dylusions Ink on it.

I have to say that I was hesitant to use Dylusions Ink.  I tried glimmer mist and even made some of my own, but the color was not very vibrant and it just wet and curled my paper.  My glimmer mist also got clogged a lot.  I was VERY happy with the Dylusions!!!  This is after just one "coat" of spray! 


I purchased this Broom Parking sign from the Silhouette online store and cut it out in black vinyl.


I used transfer tape to pull up the vinyl and position it on the canvas.  I added the Kaiser Craft rhinestones for a little sparkle!!


I removed the center vinyl oval and replaced it with a gem.


I found the Dylusions Ink and Keyser Craft rhinestones from the Frosted Designs brand new online store!!!

I have a special Discount Code that is valid October 7-13 for 30% off EVERYTHING in the store!!

This includes:
*The scrapbooking kit (link below)
*Pre-orders  (some are brand new releases)
*Already discounted items
*Mixed Media Items

My code is GRANDOPENINGLORI

You also need my word for the Frosted Designs sentence (last stop in the hop):  MEDIA

Here is the entire list of blogs in the hop:


Thank you so much for stopping by!  Us DT Members are having a contest to see who has the most sales with our Discount Codes.  I am giving away a little something fun.  Please leave me a comment AND follow me on Bloglovin' for one chance to win.  Leave a separate comment telling me what you ordered for a second chance to win.

Be sure to visit Rikki next!!!

In addition to the two linked items below, I really love the UmWow mini chipboard shapes!!!  I have three sets (so far)!!!