Copyright Information

Thank you for stopping by my blog! I hope you enjoy the things that I create and share! I do have a copyright on my original creations (see logo on my sidebar below).
If you create and post a creations based off of mine, please refer (with a link) back to my blog. Please do not use my ideas for files, profit or for contests. Thank you!


My Craft Goals for 2015

My Goals for 2015:

1. Update my goals for 2016 in January of 2016 :)
2. Maximize my crafting time!
3. Keep plugging away at scrapbooking photos!!
4. Learn how to Heat Press!!
5. Have fun!


Tuesday, January 24, 2012

Pumpkin Patch Landscape LO

This week at SweetSassyDiva's our theme is a Scene.  I created a Pumpkin Patch Scene 2 page layout.  Every fall, I take my daycare kids to The Bellevue Berry Farm and Pumpkin Patch near my house.  We look forward to it every year!

This layout took me 3 days and (merging) two different ideas to complete!!  I changed my mind so many times I lost count!
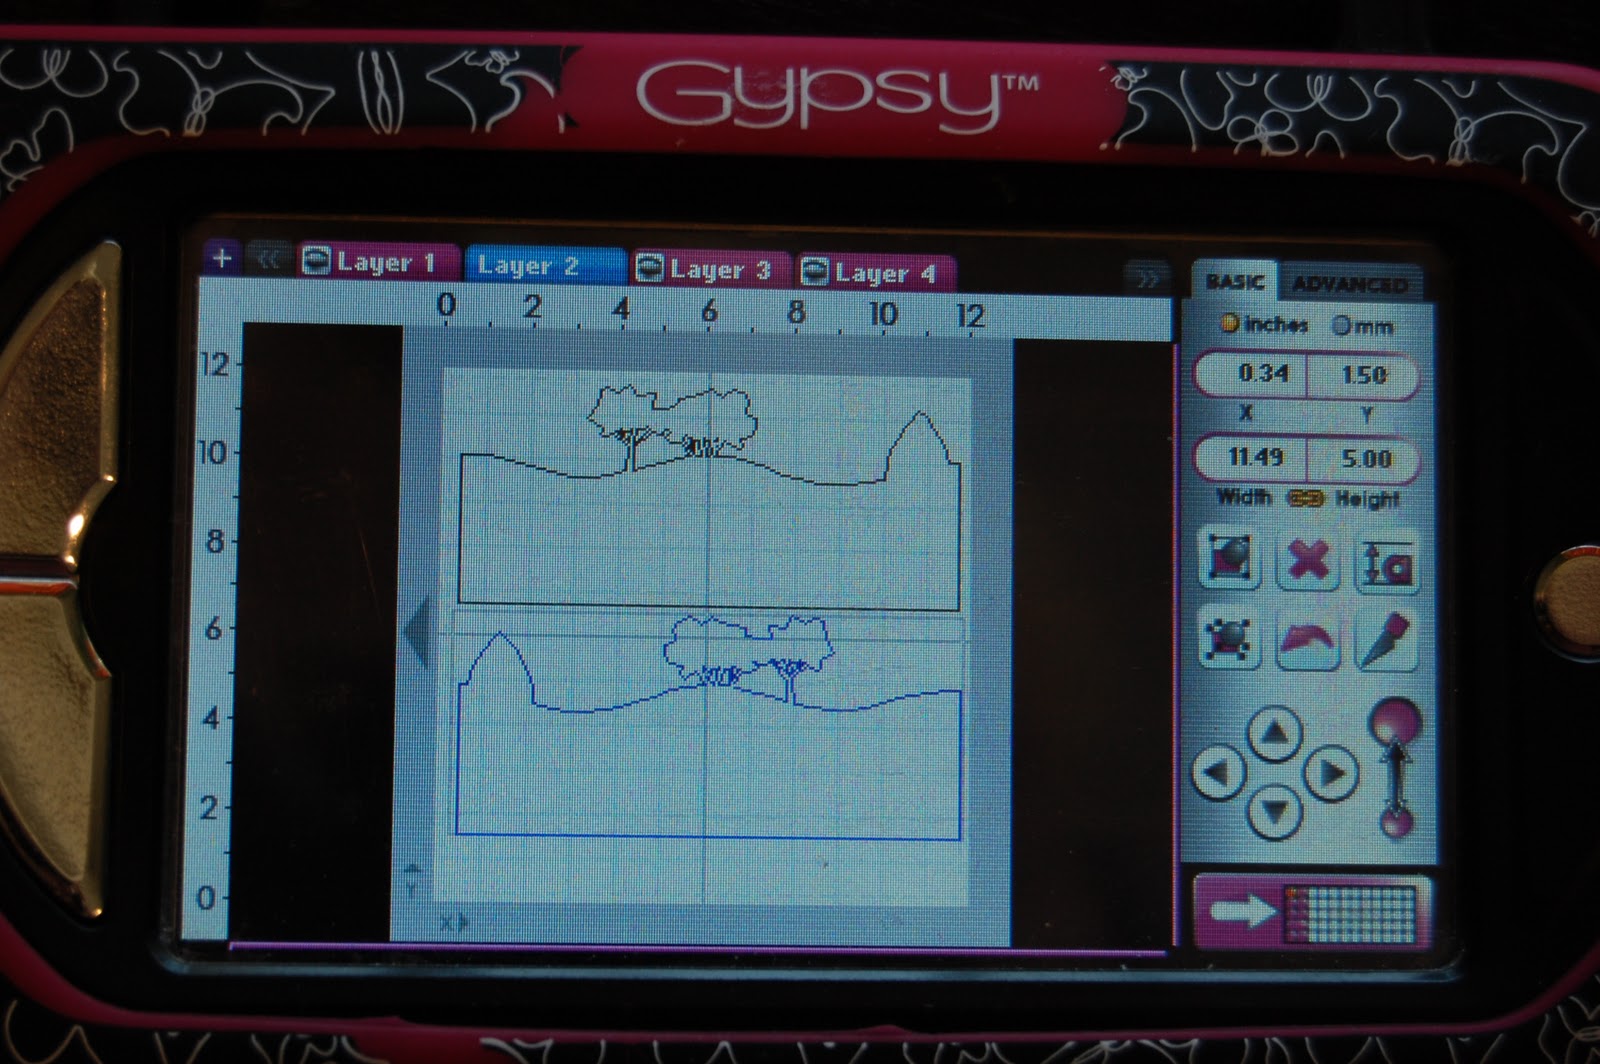
I started with this hill from Pop Up Neighborhood (found in the Accessory Function) sized at 5.00h x 11.49w.  I copied a second scene and flipped it.


I opened up a new Layer and took the shift layer of the Accessory Function and put the hills on my mat twice.  I flipped the second one.

I opened another Layer and put the Accessory Layers on it twice.  This was the trees and trunks.  I flipped the second layer.  I positioned the pieces on my mat by color for easier cutting.

Once I cut out the hill layer (without the trees) and set them on my workspace, I thought there was too much sky showing.  I cut another set of hills.

I needed some other pieces for my Pumpkin Patch, so I opened up an old file that I started but did not use.  I tried to cut the wheat from Pop Up Neighborhood, but as you can see below the paper tore.  I liked the barn, pull cart and the tractor.  I thought I might use the pumpkins but changed my mind. 


I went back to my first file and added these pumpkins from Pumpkin Carving.  I welded two sets together (sized at 1.24 inches) to make a large border.  I grabbed the cart and campfire from Old West, but ended up not using them.  I found the Pumpkins from Chic and Scary and sized it to 6.32w x 2.18h so it would fit across the top of my 4x6 photo.

I journaled on the hay in the cart.  I pop dotted the barn and some of the pumpkins.

I added twine across the bottom.  I filled in the pumpkin border with some additional pumpkins.

I used some lime green stickles to color the stems on the pumpkins.

I have been saving this cloud paper for some time ~ glad I finally got to use it!!  Thanks for stopping by!


Monday, January 23, 2012

Little Love Note

I made a little love note!  

I took this heart from George and welded it into the bird's beak.  The bird came from 3 Birds on Parade.

I put the layers of the bird around my mat.

I added my cardstock ~ I was able to use some scraps.
I found this pocket envelope on Paisley and sized it to 2.61 inches.

I cut these out of some leftover doublesided Valentine's paper from my stash.

I cut out some doily shapes from Easter 2010 sized  at 1.59 inches.
I wrapped a ribbon around my envelope and trimmed a piece of pink cardstock to tuck inside.  I used a stamp from Close To My Heart for the top of the paper.
I made this card to link up at Sheila's BLOG today.  Come on over and link up your Valentine's Day project!!!


Friday, January 20, 2012

Frosted Designs Winter Wonderland Blog Hop


Welcome to the Frosted Designs Winter Wonderland Blog Hop!!!  You should have arrived from Marina.  Here is a complete list of blog hop participants in case you found me first, or get lost along the way!

Andrea  http://www.scrapality.com/     


Two ways to win the big prize at Frosted Designs


1. Have the phrase emailed to me at danica4us@yahoo.com by midnright Sunday. (Subject Line should say "Blog Hop")
2. Link your LO to the Frosted Design Blog by Midnight Sunday.

The word you need from my blog is "STAYING".  Now on to my project:


I created a Winter Wonderland layout for my project today.

Our challenge this week at Frosted Designs is to use Vellum or Acetate in your project.  I used vellum because I had some on hand.
I wanted to print on my vellum with my Imagine.  In order to print on the entire 8 1/2 x 11 piece of vellum, I had to get creative.  You can print on certain shapes, but you can only size the height.  

After using my Gypsy to size and place the item where I want on my mat, I had to work around my limitations.   I opted to Print Page (which prints the entire 12x12 area) and filled in the rest of the mat with white cardstock.  I cut out a 8 1/2 x 11 section of the cardstock. I switched the overspray option to OFF. 

I used Enjoy the Seasons for my snowflake paper image.

Here is the printed paper and vellum.

I grabbed some snowflakes from When It's Cold Outside.  I sized them at 3.96, 4.20 and 5.25.  I moved them into an 8 1/2 x 11 rectangle of my mat.


Luckily I noticed the arrow was pointed the wrong way on my mat before I cut!! I rotated the snowflakes so they cut where the vellum is placed on the mat.  I opened another layer in my Gypsy and put some snowflakes from 1.75 - 2.05 inches across the top of the mat.

First I cut out the vellum.  I consulted my friend's site Above Rubie's Studio to check the Complete Cricut Cutting Guide.  In order to cut vellum, you need to set your Cricut to Regular Blade 4 (blade depth)-3(speed)-3(pressure).

When the vellum was cut, I selected Return to Design, switched my settings back to cardstock (5-4-4), switched Layers on my Gypsy and cut out the smaller snowflakes.

I cut out Winter Wonderland and the shadow from Winter Frolic at 3.47 inches for my title.  I layered the vellum snowflakes in the bottom right corner overlapping the picture.  I pop dotted the title on top of the smaller snowflakes, also overlapping the photo.  I put some gems on the snowflakes.

I had two of these crystal snowflakes and stuck them hanging off two corners of the page.

Here is a close up of the vellum snowflakes.

I don't use vellum very often, but I am glad I did!  I challenge you to use vellum or acetate and link up at Frosted Designs!!


Thank you for stopping by, your next stop in the hop is JONI

Tuesday, January 17, 2012

Tina's Big 3-0 Birthday Bash Blog Hop

Welcome to Tina's Big Birthday Bash Blog Hop!

First we would love to welcome you to celebrate Tina"s Big 3-0 Birthday Bash Blog Hop. With that being said, Happy Happy Birthday Tina! We wish you the happiest of birthdays with all your wishes and dreams come true. This hop is to celebrate Tina's birthday and shower her with birthday wishes! Be sure to stop and make sure you wish Tina a Happy Birthday

There is a phenomenal line-up today showering Tina with birthday wishes and don't want you to miss a single thing!!!

There is some wonderful blog candy if you remark on each stop along the birthday trail of wishes along with becoming a follower, if you aren't already! This blog candy will blow you away so, be sure to leave your comments along the birthday trail!!!
  1. K Andrews Design Stamp Set- Scripture Sayings 
  2. $30 GC to Scraptastical Kreations!
  3. 11x14 Print from My Family Keepsakes


You should have arrived from JANET.  If you found me first (instead of last) please go to the BEGINNING so you don't miss anything!!!

Here is the complete order in case you get lost:
  1. Tina- http://craftyandgreen.blogspot.com
  2. Ashley - http://theglamoroussideofscrapping.blogspot.com
  3. Caroline -  http://www.stampingsandinklings.blogspot.com/
  4. CallyAnn~ http://callyanncraftycreations.blogspot.com
  5. Barbara-http://barbarab3.blogspot.com/
  6. Susan - http://susanascorner.blogspot.com/
  7. Ellen - http://cardmonkey-business.blogspot.com/
  8. Amanda http://craftsbyamanda.blogspot.com
  9. Shawnee - http://www.blessedonthebrightside.com
  10. Amy Jo - http://lv2scrapandfibrofacts.blogspot.com
  11. Nikki-http://creationsbymommy.com
  12. Lynne - http://slasewcraftiness.blogspot.com/
  13. Monica- http://scraps2treasure.blogspot.com/
  14. Anita~ http://www.anitaandbugs.blogspot.com
  15. Enjoli- http://mississippihippycrafts.blogspot.com/
  16. Erin - http://deeplyrootedlife.blogspot.com
  17. Jamie- http://myamusinglife.blogspot.com
  18. Shannon - http://scraplady324.blogspot.com
  19. Janet- http://createatdreamscrapbooks.blogspot.com/
  20. Lori Apgar- http://www.scrappinmystressaway.blogspot.com/
  21. Debbie http://craftydeb-ddscrafts.blogspot.com/

And now on to my project.....


I wanted to make a window card and use my new cartridge Something to Celebrate.  I started with a frame from Gypsy Wandering sized to 4 inches.  I duplicated the frame and hid the inside cut with Hide Contour for the frame on the left.  I welded the two frames together.  I grabbed the 30 candle image from Something to Celebrate and sized it to 3.71 inches and welded it to the inside of the frame.  I copied the 30 image two times to create layers.  For the flame layer, I moved the image almost off my mat so I did not waste much paper.

I used white cardstock for the card base, red cardstock for the candles and a yellow scrap for the flame.  I wanted to use printed paper for my cardbase, but it was too thin.

Here are my cuts.

I copied the card onto Layer 2 and cut it out with the patterned paper.  If I were thinking, I would have welded the 30 inside the frame first, then copied it to another layer.  Instead I welded the two frames together.  This is how I learn my best lessons!!!

I just trimmed off the half that I needed and added the leftover to my scrap pile.

I ran my 30 through my Xyron then tied a twine bow on.

Adhered it into place.

And here is my card!  Happy Birthday Tina!!!  I dreaded turning 30, but took turning 40 in stride.  I hope you have a wonderful decade!!

Don't forget to stop by all of the blogs to qualify for some great prizes!  You next stop in the hop is DEBBIE!

Thank Ewe Card

This week at SweetSassyDiva's our theme is a Sketchy Card.
This is the sketch.


I saw these little sheep on Winter Frolic and wanted to make a card for my Aunt Chris.  She collects sheep.  I cut the sheep out at 1 inch.  I found the Square and Circle from Paper Trimmings.   I sized the square at 2.73 inches and the circle at 2.06 inches.  

I used black and white cardstock for the sheep.  I used a piece of  double sided cardstock from my stash for the square and circle.

I did not use the shadow of  the sheep because I flipped over the double sided cardstock.  I trimmed some strips from the double sided cardstock.  I weaved the green one throught the loops on the square.  This gave the illusion of grass.  I pop-dotted the sheep on for dimension.

My collection of stamps is very limited, so I used my computer for the sentiment.

'
I printed out my sentiment onto white cardstock and used the same burgundy cardstock from the front of the card to mat it.

Thank Ewe Bobbi Jo for having me over today!!!