Copyright Information

Thank you for stopping by my blog! I hope you enjoy the things that I create and share! I do have a copyright on my original creations (see logo on my sidebar below).
If you create and post a creations based off of mine, please refer (with a link) back to my blog. Please do not use my ideas for files, profit or for contests. Thank you!


My Craft Goals for 2015

My Goals for 2015:

1. Update my goals for 2016 in January of 2016 :)
2. Maximize my crafting time!
3. Keep plugging away at scrapbooking photos!!
4. Learn how to Heat Press!!
5. Have fun!


Monday, September 6, 2010

A Sassy Apple A Day!

Hello!!  I am a Guest Designer on Sassy's BLOG again today.  My Gypsy is home and a bit worn out as I have been designing like crazy!!  I have been so busy with back to school crazy things and all my teacher kids are back in my daycare so I don't have as much craft time during the day.  Too many projects....so little time!!

You know what they say....an apple a day keeps the doctor away!!  Well, this apple is just too cute.  I have seen several projects lately using pages of books and I couldn't resist.  Since I used the actual pages from a book (not copies) I did not want to include this apple in a layout with photos.  I decided to make a card for my son's preschool teacher.
I used the apple from create a critter.  I made the largest apple 3.47 inches tall and the others 3.24, 3.0, 2.76 and 2.53 inches tall.  I cut out the largest apple in green and red.
I used a Thesaurus that I found at Wal-Mart for $1.00 for the smaller apples.  I set my Speed at 3, Pressure at 4 and Blade at 5 (I normally keep my blade at 6 all the time except when cutting vinyl).  I also tried to line up the apples where the words on the page were.

The heights of the smaller apples are:  2.29, 2.06, 1.82, 1.59, 1.51, 1.35 and 1.20 inches.
I cut off all of the red stems and book page stems.  I glued the largest red apple onto the green apple.
I used my Fantastix and brown ink to ink all of the edges.
For the red apples, I used my Tombow adhesive to glue a strip down the middle of each apple.
I bent the edges a bit so the apple had some dimension.
Here are the 5 layered apples.
For the remaining apples, I put adhesive on the edges.  I did not want adheisve in the center. 
Here are the layers all together.
Before I attached the inner apples, I sewed them together.  Had I put adhesive in the center it would have gunked up my sewing machine needle.
Finally I glued the inner apples to the outer apples.
I used watermelon seeds from Doodlecharms for the apple seeds.  I used Hide Contour to erase the watermelon shape.
Then I rotated the image and put it on the smallest apple.  Then I adjusted the size.  I cut out two sets of seeds.
I went back and cut out another set of apples and thought you might want to see the book I used and how I positioned the pages on my mat.
Now the rest of the card!  I used Gaffer Tape from 7 Gypsies that I have had forever and have never used!  I cut a square of brown star paper from Creative Memories (it has the same design with blue stars on the reverse side).  I cut out "thank you" in yellow from Nursery Rhyme.  I tied a bit of jute cord to the stem of the apple.
And here it is again!  I just love this layered apple look and will be using this one again!  I hope you like it!

Sunday, September 5, 2010

Practical Scrappers

I was scrolling through my blog lists to see what is new and I visited Practical Scrappers and found one of my layouts being featured from their message board.  Woo hoo ~ thanks for the shout out PS!!

Friday, September 3, 2010

Disney Autograph Book part 2

Here are some more pages from my Disney Autograph Book.  Scroll down to the previous post if you missed the first set of pages.

I only have Mickey & Friends, Mickey Font and Pooh Font Cartridges.  I do not like cutting out 6 or 7 pieces and putting them together to make a character for this book since the pages are 8 x 8.  The characters are so small and I also got a late start on this album.  I do use stickers and actually make some generic pages and bring stickers along.  You never know which characters you will see.

Carts Used for Chef Mickey:  Mickey and Friends (I welded the Mickey Heads together) and Mickey Font
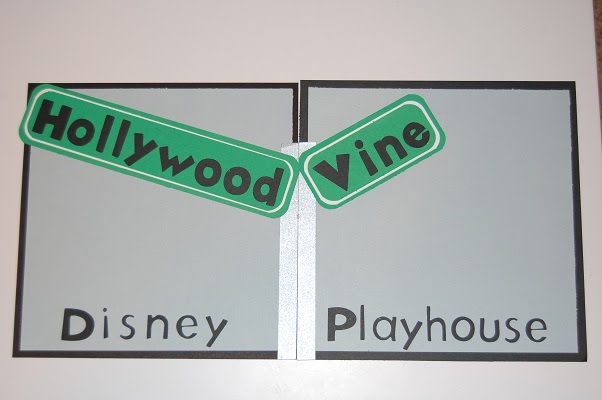
Carts used:  PDDU, Opposites Attract & Street Sign
Cart used:  Street Sign.  I turned off the Aspect Ratio Link (chain located between the words Width and Height on the Gypsy) and stretched the outer letters.  I kept the width the same and adjusted the heights working from the center of the word to the outside.
Carts used:  Nursery Rhyme (font) and Easter 2010
This one was so fun to make.  I used Carnival for the banners and rides, Pooh Font for the letters and Mickey & Friends for the mickey head.

I am working to finish this album and will post more very soon.   I am also working on a seperate small album for the Mickey's Not-So-Scary Halloween Party.  I am having so much fun with my new Halloween carts!!! 

Thursday, September 2, 2010

Disney Autograph Ablum part 1

We are headed to Disney this month and I am working on an 8X8 Creative Memories album to use as an Autograph Book.  I decorate the book ahead of time and have the characters sign the page.  I later add a wallet size photo to the page.

In September, the Food Plan at Disney is free and we upgraded our hotel to include Character Meals into our Food Plan.  We have 8 meals booked.  I started this album with our Pirates & Pals pages as we are doing that the first night.  The rest of the pages are the first of our Character Meals.  I will continue with the album tomorrow.
Carts used:  George & Basic Shapes, PDDU & Blackletter
Carts used:  PDDU, Don Juan
Carts used:  Pooh Font, Mickey Font
Carts used:  Mickey Font & George and Basic Shapes
Cart used:  Pooh Font
Cart used:  Nursery Rhyme

My album is on order.  I ordered black pages and some of my pages here are 7.5 x 7.5 to allow for a black border.  I will carry the ablum with me and keep the page protectors, journaling stickers and extra character stickers at the hotel.

Monday, August 30, 2010

Blog Hop Winner!!!

Thanks so much for all of the great comments on my card!  I had so much fun putting it together once I knew what project I was making!  I also was glad to be pushed out of my box and try a cart that I didn't think I would use much!!

I used Random.org to select my winner and the winner is #12!!!

Congrats Ashleigh ~ I will be sending you an email very soon!!!

Saturday, August 28, 2010

French Manor Blog Hop


Welcome to the French Manor Blog Hop!! 
You should have arrived here from Sherrie's blog.
If this is your first blog, please go to see Jana to begin the blog hop.

I am so excited to be part of this!!  First of all, this is my first official blog hop!  Second, I have not really used FM and this really challenged me to do just that!  Third, I have Blog Candy (see below)!!!

I was inspired by a card I saw in a magazine last January.  The original card was a Valentine's Day card.  I used the Flower and shadow as well as the small doily from the French Manor Cartridge.  I also cut out Merci. 
My card is 6x6 so I sized the flower inside a 6x6 grid on my Gypsy mat.  I put two flowers on the mat and used Hide Contour to hide one of the center cuts (see screen below).  I also put Merci and three small dioly shapes on the mat. 

For the leafy part, I used a swirl border and stretched it a bit.  I turned off the Aspect Ratio Link (yellow chain located between the words Width and Height on the Basic Menu) and left the height at 1.00 but changed the width to 4.07.

Taking care to line up the mat with the arrow on the left side, I placed my papers where I wanted them.  I used My Mind's Eye 29th Street Market paper found at Michaels.

I used my paper trimmer to cut out 1 1/2 x 1 1/2 inch squares out of the coordinating paper.  This paper is two sided and has a solid color on the back.  I used two of the doilies and part of the center of the flower on three different squares.
I used my Tim Holtz Distressing tool to distress the edges of the squares and flower. 
Here are the edges distressed.  Next, I used brown stamp ink on the edges of the squares and the flower.
I added some ribbon, a bow, some pearls and Merci to the card and here it is!!  This is not my normal style (a bit girly) but the more I look at it the more I LOVE it!!
Here is my Blog Candy!!  I am giving away some Tim Holtz Grungeboard shapes and 5 stamp pads for inking!  All you have to do to qualify is 1. be or become a follower, and 2. leave me a comment.  I will draw the winner and announce Monday morning as the blog hop goes through Sunday evening.

Thank you for hopping by!!  Your next and final stop in the blog hop is Gaby.   Thanks for hopping with us!!