Copyright Information

Thank you for stopping by my blog! I hope you enjoy the things that I create and share! I do have a copyright on my original creations (see logo on my sidebar below).
If you create and post a creations based off of mine, please refer (with a link) back to my blog. Please do not use my ideas for files, profit or for contests. Thank you!


My Craft Goals for 2015

My Goals for 2015:

1. Update my goals for 2016 in January of 2016 :)
2. Maximize my crafting time!
3. Keep plugging away at scrapbooking photos!!
4. Learn how to Heat Press!!
5. Have fun!


Friday, October 15, 2010

Halloween T-Shirts

We are headed to the pumpkin patch today for our annual field trip.  I thought it would be fun to make some shirts.  The witch came from A Child's Year.

I cut the images on Freezer Paper.  Freezer paper is shiny on one side and dull on the other.  You flip your image and cut shiny side up.  Put the negative piece (the stencil) shiny side down on your clean t-shirt and iron on.  I spent about 1 - 2 minutes ironing.  Paint with fabric paint and a sponge brush.  Let dry then pull off the freezer paper.

The bat came from Paper Doll Dress Up.

The pumpkin and face came from Pumpkin Carving.  The face is one of the square images.

The kids got to paint their own shirts.  I used Tulip fabric paint that can be found at Michaels or Wal-Mart.  For the pumpkins, once the orange paint is dry, iron the pumpkin face template on and paint with black paint.

Here is me peeling off the freezer paper.

And here is my shirt ~ fitting some days!!!

Thursday, October 14, 2010

T Wall Hanging

Tanner and I wanted to make a wall hanging for his room.  I put several T's on my Gypsy mat and cut them out with vinyl.

When I cut vinyl on my Expression, I set my dials to 3, 3, & 3.  This means speed and pressure at medium and the blade dial at 3.  This give you a  nice kiss cut ~ the blade only cuts through the vinyl not the paper backing.

While the vinyl cut out, Tanner painted a 16 x 20 canvas blue.  We used acrylic paint and a foam brush.

Once the paint was dry, I carefully peeled off some of the T's and placed them on each end of the canvas.

Tanner loves to craft with mommy!!

I did not know what to do with the rest of the T's and he was just standing there.....

Here is the negative.  Normally, I use clear contact paper as a transfer tape.  I loaned my extra Expression to my sister-in-law and my contact paper was in the tote (as I recently had a vinyl project at Michaels).  I don't recommend this, but I peeled off the vinyl negative and stuck it down on the canvas without a transfer tape.

Then we got out the white acryllic paint and painted over the canvas.

And here is the final project made mostly by Tanner.  He is very proud of his work.

Tuesday, October 12, 2010

CKC Kansas City

I drove down to Kansas City on Friday with my friend Crista.  You may remember her Gypsy on my blog a few months back.  She loaned me hers when mine was at the "spa" recovering from her facelift.

We met these lovely ladies at the crop Friday night.  Marilyn and her daughter Mrs. Jones from Dallas (I remember that because there was a Dallas Jones that kept winning prizes and she joked that was her).  They were celebrating Marilyn's birthday and Marilyn won a Big Shot that night!!

Here is a crowd shot of the crop.

I took a Digital SLR camera class and learned so much!!

I met so many people from Nebraska!  I met Amy from myMonsterCreations and she lives very close to me!  Go check out her BLOG she is having a giveaway this week!

Crista and I had so much fun ~ we can't wait to go again!!!

Monday, October 11, 2010

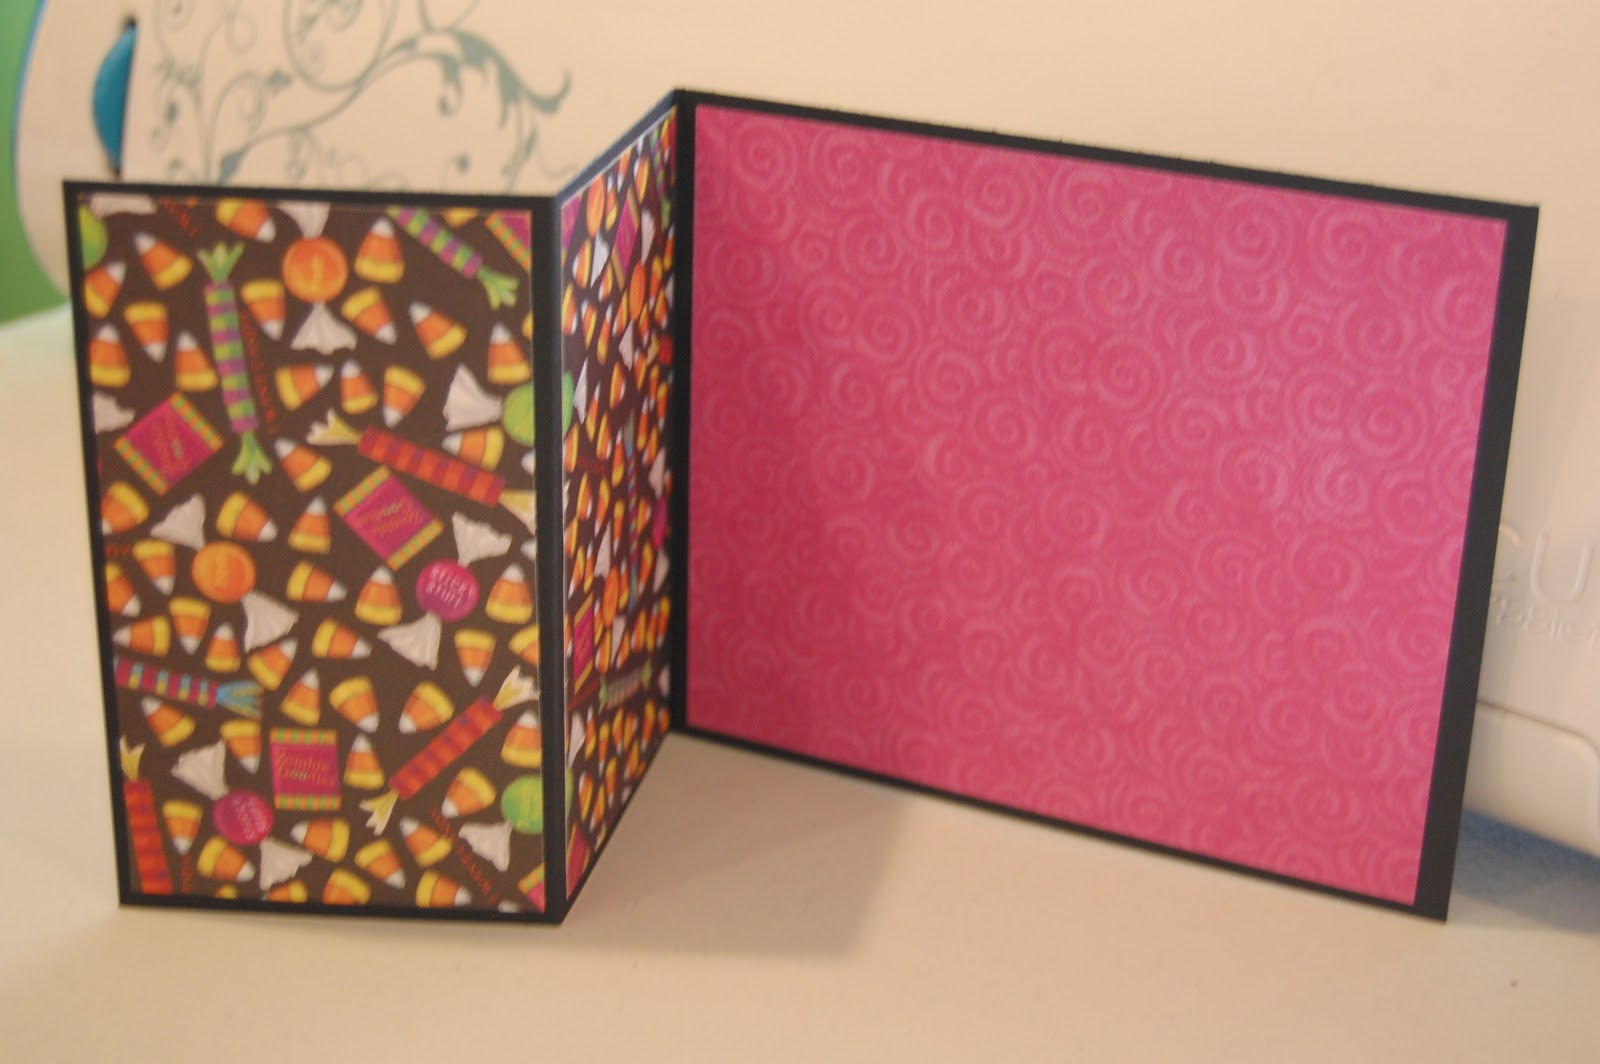
Boo S-Fold Card


I made a Halloween S~Fold card after seeing some cute ones on the Cricut Message board.  I did not search out the instructions (I have a hard time following directions anyway) so I just played around a bit.

I ended up with a 5x12 piece of black cardstock.  I scored the paper at 3 inches and 6 inches.  I folded the card in half and then folded the top flap the opposite way.


With my Gypsy, I used George & Basic shapes to cut the purple paper 5 5/8 x 4 5/8.  Note:  you can use a paper cutter to make these cuts if you choose.  I cut two pieces of the candy paper 2 3/4 x 4 5/8.  I glued the paper onto the card.

I used papers from this mat stack from K&Co that I bought at Michaels.

I cut a piece of lime green cardstock 5 5/8 x 4 5/8 and tore it to create a hill.  I inked the edges with a green stamp pad.

I found the Haunted House on October 31 and the Ghost on Mini Monsters.  I decided to use stickles for the eyes and mouth on the ghost.

I do not have a huge collection of rubber stamps, but really needed a sentiment on this card.  I decided to make my own with my Cri-Kits gel pen.  I put a green rectangle on the card and then sized a smaller white rectangle on my Gypsy.  I opened another Layer and put the word BOO from Calligraphy Collection right in the center of the rectangle.

I put the black gel pen inside the Cri-Kits holder.  I took the blade housing out of my Cricut and replaced it with the Cri-Kits holder.

I selected the cut option for the Layer with the word Boo on it.  You can see here how the word printed.

When the Cricut is finished with BOO, select Return to Design.

Put a piece of scrap paper on your paper under the gel pen as you remove the Cri-Kits housing and replace the blade housing.  This prevents unwanted pen marks on your paper.

Once the blade is replaced, change the layer to the rectangle and cut.  Here is what it looks like.

I inked the edges with black.

And here is the card all put together.  I glued orange crystals on the Ghost's eyes.  I glued the Ghost half-way on the first fold.  This was my first S~Fold card, the first of many!!!

Friday, October 8, 2010

Lil' Pumpkin Box

Today I am the Guest Designer on thebugbytes.  I made a pumpkin box using George, Pumpkin Carving and my Gypsy.

I started out with a square from George 3.74w x 3.50h in the center of the  mat.


I used the Copy & Paste button to duplicate the square.

I lined up the second square with the same x coordinate to get it exactly on the square.  I then used the arrow key to move the second square above the first, with the sides touching.  I welded them together.

I repeated this by turning the original square blue (tapping it with the stylus twice) and duplicating it.  This time, I put the square just under the center square overlapping the sides.  I welded the third square to the first two.

Repeat again, but use the y axis to line up the square to the sides of the center square and then weld.


Here are the five squares welded together.

Next, I selected a square pumpkin from Pumpkin Carving.  I used the Hide Contour option to hide the square around the pumpkin face.  I put the face on the top square but did NOT weld it.  I want the face to cut out and if I weld it into the center of the shape, it would not cut out.

I duplicated the face and put it on the bottom square.

I flipped it upside down so it would be right side up once the box is assembled.  Note the star eyes are on the same side.

Next I need to add flaps so I can glue the box together.  I used this tab shape from George sized at 0.88w x 3.30h  Originally I put the flaps on the solid box sides, but realized that they would show through the face cut outs ~ so I changed the flaps to the face sides.

Here is the box with the flaps in place.


I made a test cut and found part of a flap that was not lined up properly.  Good thing I did a test cut first!!  I went back and scootched the flap over and re-welded and re-cut.

Here is my box fresh off the Cricut.

I used my Martha Stewart Score Box to score the folds.

I creased the folds.

I used my Pink ATG Gun to adhere the flaps and assemble the box.

Here it is all glued together.

I did not have yellow shread, or any color shread for that matter.  I decided to make my own.

I cut strips of yellow card stock scraps and ran them through my paper crimper.

I scrunched them up a bit and put them inside the box.  I started out with black, but really liked the yellow better.

Here is my Lil' Pumpkin Box all ready for some candy or a small gift to eat!