Copyright Information

Thank you for stopping by my blog! I hope you enjoy the things that I create and share! I do have a copyright on my original creations (see logo on my sidebar below).
If you create and post a creations based off of mine, please refer (with a link) back to my blog. Please do not use my ideas for files, profit or for contests. Thank you!


My Craft Goals for 2015

My Goals for 2015:

1. Update my goals for 2016 in January of 2016 :)
2. Maximize my crafting time!
3. Keep plugging away at scrapbooking photos!!
4. Learn how to Heat Press!!
5. Have fun!


Friday, November 16, 2012

Tag Swap Beauties!!!

I did my very first swap ~ a tag swap with my design sisters at The Bug Bytes and She's A Sassy Lady!  There were 15 of us who participated and this is the tag I created to share.  I included all of the tags at the bottom of this post!!!
As a Cricut Circle Member, I got several free CCR Exclusive cuts on my Gypsy in July.  This tag is cut from Teresa Collins Christmas Sentiments.  I cut it at 6 inches.

I cut the tags out of burgundy cardstock.

The tag base is also from TC Christmas Sentiment sized to 6 inches.

I cut these out of kraft cardstock.

I cut out the stars using paper from Imagine Vintage Papers.  I printed a full sheet on my Imagine then cut the stars using my Gypsy and Expression.

I inked all of the pieces with Vintage Photo.

I added these red pearls to the star.

The chevron green paper came from Hobby Lobby and I adhered it behind the cut out 25.

I wrapped up my tags and mailed them to Pam!

Finally, I received this package below:
Pam stamped and colored this beautiful bag that the tags came in!!  She also made us each a card with a very nice message inside!!!

Here are the gorgeous tags I received!!!!

I love the purple one - my favorite color!!!  The penguin is a wobble - so cute!  Look at all of the different designs!

The elf is also a wobble!!  I can't believe all of the pretty details!!

Here are the rest!!

This tag even flips open!!

Thanks so much for organizing this swap Pam and Sheila!!!  I had a lot of fun and it felt like Christmas when I opened my package!!  I think I will display these in my craft room this Christmas :)

Here is how Carolyn made her tags HERE.

Here is how Michelle made her tags HERE.

Here is a list of the Tag Swap Participants if you want to see their other work or how they made their tags!


4) Elizabeth –   http://217creations.blogspot.com/
6)   Michelle -  http://ladyofleisureink.blogspot.com/      
7)   Jeannie - http://nonnasscraps.blogspot.com/      

11)  Carolyn - http://cccscraproom.blogspot.com/      
12)  Charlotte - http://alittlebitofdetail.blogspot.com/      
13) Jennie - http://javajencreations.blogspot.com/      
14)  Cheryl - www.cherylswindow.com


Thursday, November 15, 2012

Frosted Designs Blog Hop Winner!!


I used Random Number Generator to pick my winner #23:

Congrats to Debbie Bakk who said:

What a cute project...and love the die cut mums..very creative as usual Enjoying blog hopping tonight with all of you. Hope to squeeze in a layout by this weekend- its another big bowling tournament for me this sat and sun.

Debbie is a wonderful talented lady who also loves bowling (like my son) and leave me lots of fb love on his posts!!!

Debbie I am sending you some stickles!!

Tuesday, November 13, 2012

Peek-a-Boo Card


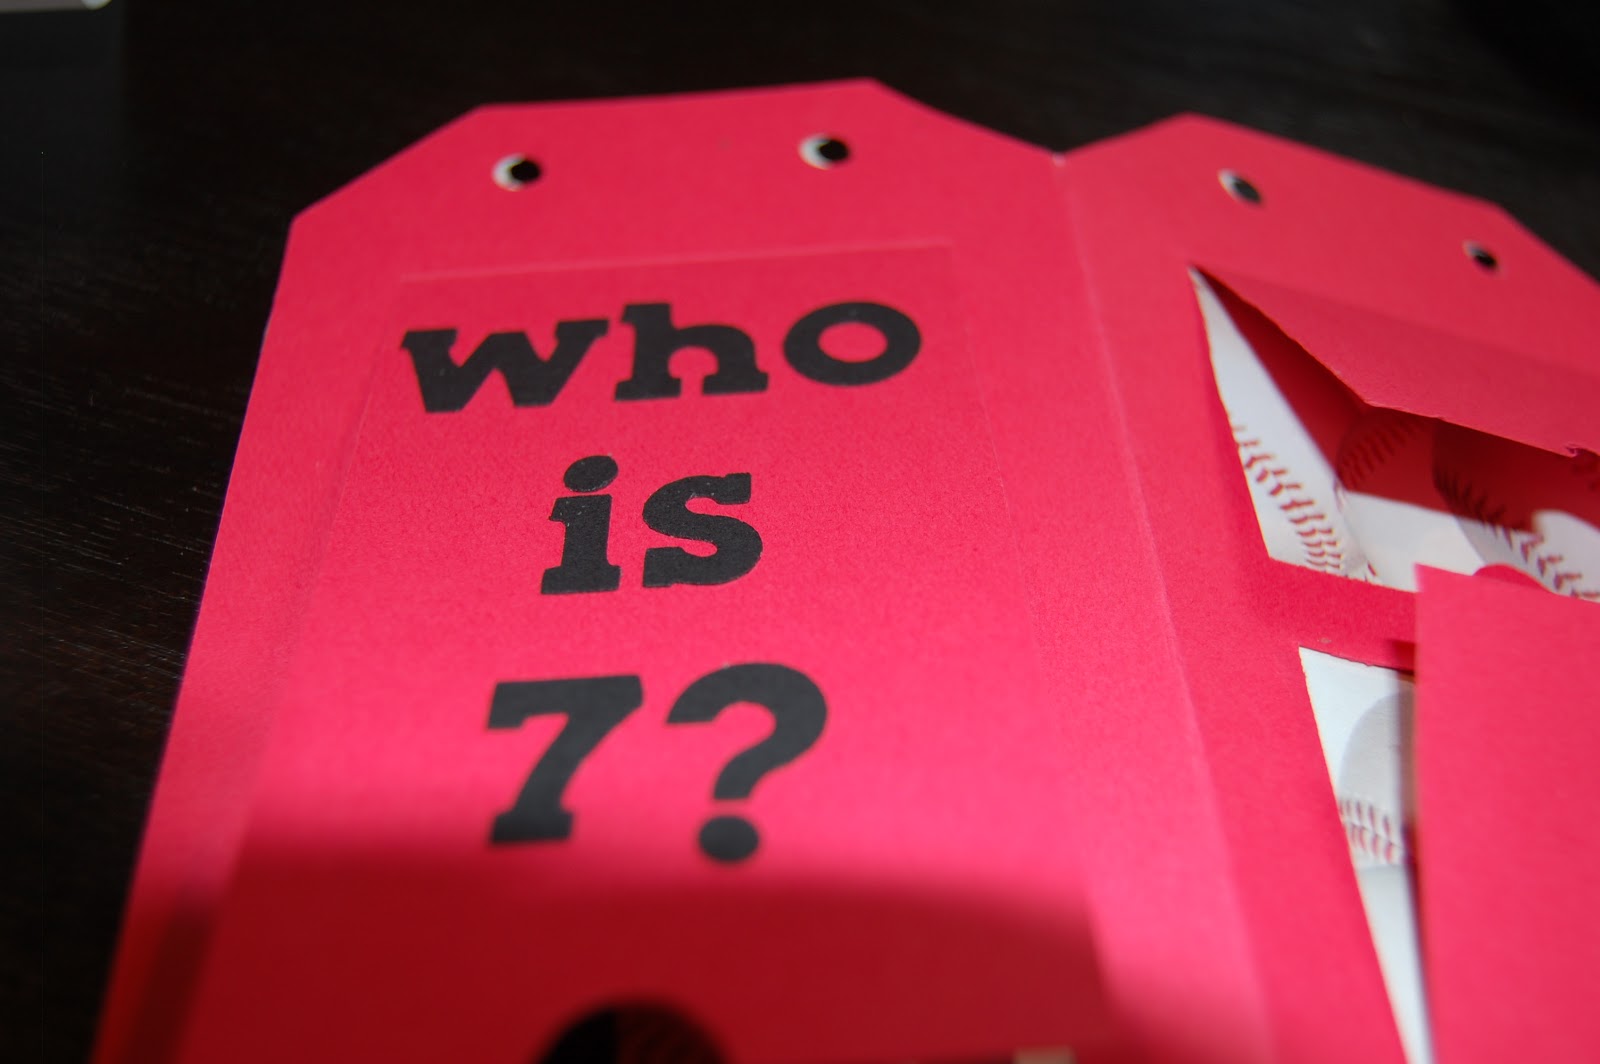
Hello!!!  I am excited to be a Designer today at My Cricut Craft Room!!  Our theme for today is to make a Card to Read With A Child.  I interpreted this to be an interactive (or peek-a-boo) card!

Tanner just celebrated his 7th birthday last week - I can NOT believe that my baby is 7!!!  He was a bit of a surprise and is 11 years younger than our middle son.  I still remember how excited I was (when the shock wore off) that we would get to go back to Disney again!!!!  We have been to Disney with Tanner 4 times and on one Disney Cruise.  We hope to squeek out one more trip next fall before he outgrows it (Mike and I will never outgrow Disney)!!!

I opened the tag card on Fabulous Finds.  I put both layers on my Gypsy mat sized to 5.5 inches.

I cut out the layers in red cardstock and some double-sided baseball paper.

I opened another Layer in my Gpysy to size the words and images for the flaps.

I used Birthday Bash.  I overlapped Tanner and welded it to fit my space.  The letters are .88 each.

The font for the rest of the letters and numbers are sized to .65 inches.

The packages are sized to 1.47 inches.

The baseball is sized to 2.06 inches.

The gecko is sized to 1.47 inches.

The balloon is sized to 3.59 inches.

I assembled the card as my cricut was cutting!  I used my ATG gun to adhere the red layer to the baseball paper.

I moved my images into groups by color.  I cut out the letters in black cardstock, the baseball and bow in white cardstock, the balloon in red (later changed to blue) cardstock, and the gecko and other package in green cardstock.

I used my throw-away piece as a template for my words.  I used painter's tape to hold my template in place.  I ran the letters and 7 through my 1" Xyron.
I stuck the letters all down, and peeled away my template.

Perfect words every time!

Here's Tanner!!

What a fun card for a child to explore!  This card can be personalized for the recipient and for different holidays.

Here are some close ups:


I added some baseball ribbon and it was complete!

Thanks for stopping by today!!  To see additional projects like this one, go to http://mycricutcraftroom.blogspot.com!!

Monday, November 12, 2012

Tennis Anyone?

I am so excited to be at The Bug Bytes today!!

I have a son who is a senior in high school  I am trying to get his album caught up for his graduation party.  Tennis season just ended, and I wanted to showcase his letter certificate.

I started with my Gypsy of course!  I put a square from George on my mat.  I unlinked the chain between the width and height and selected Real Size.  The shapes on George are not true to size - I learned this years ago the hard way!!

The certificate measures 8.5 x 11, so I made my rectangle 8.75 x 11.25 to give me an 1/8 inch border.

I used Varsity Letter for my font and used the shift to put the shadow (bottom) layer on my mat and sized the letters and numbers to 1.15 inches.  I centered them on the top and bottom of the rectangle and welded them on.

I cut my design out of black cardstock.

I used the toss-away piece as a back to my tennis ball paper.  The paper was a little flimsy.  

I trimmed off 1/4 inch off of two sides (a top and a side if you will) to make the tennis ball paper 11.75 x 11.75.  

I adhered the tennis ball paper to the black toss-away piece to create the layered look.

I went back to my Gypsy and cut out the inside cuts of TENNIS and 2012 2013 (also sized to 1.15 inches) in a bright yellow cardstock.


I adhered the certificate and the letters and numbers to the page.  I used glue dots to add his chevron in the event that he wants a letterman jacket.

This could be easily adapted to any sport or activity, as well as other certificates (honor roll, national honor society, recognition from a teacher, etc).

I copied and pasted this image to another layer on my Gypsy and removed TENNIS and added BOWLING as he is at his first tournament right now.  I am getting ready ahead of time!!

I hope I inspired you to add your big items to your scrapbooks in a fun way!!

Saturday, November 10, 2012

Christmas/Holiday Banners for Special Needs Kids (Day 2)

If you are looking for the FROSTED DESIGNS BLOG HOP - go HERE!!

If you are looking for the MY CALENDAR BLOG HOP - go HERE!!


Welcome to the Christmas Banners for Special Needs Kids!!  Today is Day 2 of a 3 day hop.  If you missed Day 1, please hop over to Ellen's BLOG to see some fabulous banners!  Ellen is also the beginning of today's hop and tomorrow's hop!

"In the eyes of children, we find the joy of Christmas. In their hearts, we find its meaning."

As joyous as Christmas is for most families, for some, their holidays are filled with worry, medical treatments and tests, and pain -- for their child must be hospitalized or she or he needs long-term care rather than being home with their families. 

For these kids, Santa doesn't slip down a chimney but rather, often comes in the guise of community volunteers who help make the season bright.  


This is the second Christmas season that our own band of dedicated and loving paper crafters have come together to make Holiday banners for children who are too sick to be home for the holidays.  Welcome to the Christmas Banners for Special Needs Kids blog hop!

I am especially pleased that this year, not only have our numbers of generous crafters swelled so our Hop is over three full days, but also, that we have partnered with another great cause and recipient of our banners!


By teaming up with Madison Womack's I FEEL THE LOVE PROJECT, the banners our crafters have handmade will be going to the hospitalized children at Children's Hospital Central California


Our wonderful sponsors are:


These sponsors have already agreed to contribute to our CHRISTMAS/WINTER HOLIDAY Blog Hop (November 10-17). Please patronize these vendors as our way of saying thanks!

  1. Susan Bermudez, Independent Consultant for Creative Memories, donating a $20 gift certificate for Creative Memories products from her catalog (http://www.mycmsite.com/sites/susanbermudez/).
  2. Lucy Kelleher, Independent Consultant for Close to My Heart, donating a $20 gift certificate for CTMH products.
  3. Scrappin' Madge: $25 Gift Certificate to The Scrappin Lounge Shoppe.
  4. Fresh Brewed Designs: Two prizes - One prize is a rubber stamp, Item #497 "Cutie Pie Ice Skating" (http://www.freshbreweddesigns.com/item_497/Cutie-Pie-Ice-Skating.htm), and the other is a $15 Digital Stamp gift card.
  5. The Paper Temptress (www.papertemptress.com) - Owner Patricia Dunbar will donate a $25 Gift Certificate to her online store, the Paper Temptress.
  6. The Pinque Peacock (www.pinquepeacock.com) - Owners Jessica Shelton will donate a gift certificate to her NEW store (products are being added daily -- watch as she grows!)


Here is a complete list of blogs in case you get lost along the way:


  1. Ellen ♥ CardMonkey - http://cardmonkey-business.blogspot.com/
  2. Jessica S - http://jessicascraftshaque.blogspot.com/
  3. Lezlye - http://lezlyes.blogspot.com/
  4. Lori - http://www.scrappinmystressaway.blogspot.com/
  5. Jenny D - http://www.yogimemories.blogspot.com/
  6. Lissa Marie - http://somanycrafts.com/
  7. Robin - http://scrapandchat.blogspot.com/
  8. Scrappin Madge - http://thescrappinlounge.com/
  9. Jeannie - http://polkacabana.wordpress.com/
  10. Rebecca T. - http://craftingwithrebecca.blogspot.com/
  11. Lisa T. - http://bitbythecricutbug.blogspot.com
  12. Kimi ~ http://lovebugcreations3.blogspot.com
  13. Beth~ http://motherandaughterdesigns.blogspot.com
  14. Dena ~ http://missdjones.blogspot.com/
  15. Patricia ~ http://blogs.papertemptress.com/
  16. Robin L - http://create-a-latte.blogspot.com/
  17. Jenny - http://crazyaboutcricut.blogspot.com/


First, let me show you the banner I made for today's post. I'll be sending this to Madison and the children at CHCC who are benefiting from the I Feel the Love project in December:

I started with this simple banner cut from train cars.
I found these train cars on Pop-Up Neighborhood and sized them to 4 inches.


I cut out the train cars with watercolor paper.  I used multi cut 2 times.

I also cut out the train cars in Christmas paper from K and Company.
Faith is from Home Accents sized to 2.76 inches.

Hope is from Home Decor sized to 2.65 inches.

Miracle is from Home Decor sized to 1.82.

Believe is from Gypsy Wandering sized to 2.06 inches.

I cut them out of black shimmer cardstock.


I added a little black stickles on the wheels and strung the cars together with tulle.


My second banner is what I call the Bonus Banner.  I used leftover pieces from another project that took on a life of its own and totally changed.  The only new part was the word Christmas!
I took these tags from Teresa Collins Christmas Sentiments (CCR Exclusive) cut out at 6 inches on Kraft cardstock. I stamped them with PinkByDesign's Distressed Music background stamp.  I used Walnut Stain ink for the stamp and to ink the edges.

The Trees were cut from Teresa Collins Christmas Collage (CCR Exclusive) and are sized to 5.35 inches.  I used chevron paper from Hobby Lobby to cut them out.

I used Storybook for the letters.  I sized them to  1.71 inches and cut them out of maroon cardstock.

I used some ribbon to string the banner pieces together.


It is such an amazing feeling to create these banners to help brighten the day of a child and his or her family.

Your next stop in this hop is my friend JENNY.