Copyright Information

Thank you for stopping by my blog! I hope you enjoy the things that I create and share! I do have a copyright on my original creations (see logo on my sidebar below).
If you create and post a creations based off of mine, please refer (with a link) back to my blog. Please do not use my ideas for files, profit or for contests. Thank you!


My Craft Goals for 2015

My Goals for 2015:

1. Update my goals for 2016 in January of 2016 :)
2. Maximize my crafting time!
3. Keep plugging away at scrapbooking photos!!
4. Learn how to Heat Press!!
5. Have fun!


Friday, January 24, 2014

Love A Good Book


Hi!!  I love to end my evening sitting in my favorite blue chair with my blanket and a good book (or my Kindle).  I treasure this time as the house is quiet.  I am a night owl and can not fall asleep easily before 11:30.

One of my daycare grandmas crocheted me a prayer blanket for Christmas.  Not only was the blanket special, but the note she wrote me brought tears to my eyes.  She is grateful that I take care of her twin grandchildren.  I was very touched and snapped a selfie on my cell phone to send her.

It was a little while later when I deiced to create a page with it!

When I saw the photo challenge at Let's Scrap, all I could see was lobster and I am NOT a seafood fan!! 


Once I got past the platter of lobster, I noticed the blue table cloth and the chair.

In addition to the photo:  You are free to use which ever LS sketch and what ever in this picture that inspires you. From the following list you are free to choose 3 items:
Bling, lace, ribbon/twine, flowers, cut outs, sewing, swirls,, something stamped, brads, journaling, five patterned papers, circles, stars or buttons.


 Here is the sketch I used:


I used the left side of this sketch.

My additional elements are:  Flowers, twine, cut outs and journaling.


The chair is cut out from my Cameo.  I used twine as my book mark.  I pop-dotted the chair to my layout.


I used some crocheted flowers to coordinate with the blanket.


I tucked the letter Margaret wrote me behind my paper.  I adhered the paper only on the sides and bottom.


I chose a book print paper for my background and cut my title from my Cameo.

This layout is special to me and I was excited to show it to Margaret!  This is very different than the first image I had of the photo for this challenge!!!

I hope you consider to step outside your norm and create a layout for this challenge, you can enter it HERE!!!


Wednesday, January 22, 2014

Baseball Love


Hello!!  Today my layout is featured at Let's Scrap for our current challenge.  The sketch (below) is actually a card sketch, but I used it for my layout.


Tanner plays for the Papillion Storm Chasers select baseball team, which is partially sponsored by the Omaha Storm Chasers minor league baseball team.  Each select team had the opportunity to go on the field during the Star Spangled Banner with the Omaha Storm Chasers.  Mike and I were not able to go to the game since he was recovering from surgery in the hospital.  Tyler took Tanner for us and lucky for me another baseball mom took this picture.  I just love his smile!!


The boys really felt important being out on the field with the team!


I am looking forward to seeing Tanner on the field next year!!

Thanks for stopping by!!

Friday, January 17, 2014

Feeding Time at the Zoo


Hello and welcome to the Just Chillin Blog Hop!!

Join us as we celebrate National Penguin Awareness Day by showcasing projects featuring the fun black and white birds, Penguins!!

You should have come from my friend MIRANDA.  If not Connie Can Crop is the first stop on this Chilly Willy Hop. 

This is a one day blog hop and we appreciate your leaving a comment for all of these talented friends who are here sharing their ideas and creations. 

We have an awesome sponsor and giveaway for this hop!

Creative Kuts


Cheryl will be giving one lucky winner a $10 shopping spree to her paper piecing store.


So what do you need to do to win? Easy... become a follower of each of the fabulous blogs in this hop and leave each of them a comment letting them know what you like best about their projects. 


Then come back to Connie Can Crop and post that you followed the rules.

You will have until 12:00 am Sunday to finish the hop and leave your comments. 

Winners will be announced on Wednesday at Connie Can Crop.

Be sure to follow everyone and leave a comment along the way!


Grab your favorite hot beverage and a warm blanket because we are about to Chill Out!!

We went to the zoo on Christmas Eve this year - it worked out that we had no family gatherings this year.  Speaking of Just Chillin' ~ it was pretty chilly that day so we visited the inside attractions!!  Here is the layout I created:
I found a sketch from Frosted Designs ~ here is my take on it.
We have an amazing zoo - the Omaha Henry Doorly Zoo.  Our Aquarium has just been updated and is one of our favorite indoor attractions.

We got to the penguins at feeding time and I was able to capture this photo.
I spritzed Dirty Martini and Cherry Pie Dylusions ink on the background paper.  I inked the edges of my cuts with Vintage Photo ink.  I added some gems on the patterned paper behind my photo.
I cut my title on my cameo using a font from my computer.
I am really happw with how this layout turned out.  Thanks for stopping by!!!  What is your favorite part of your zoo? 

Up next is the talented Robin Lane!

Here is our complete line up in case you get lost along the way.

1. Connie- http://www.conniecancrop.blogspot.com

2. Ellen - http://cardmonkeyspaperjungle.com

3. Jenny - http://crazyaboutcricut.blogspot.com

4. Pam - http://lovebugcreations3.blogspot.com/

5. Beth~ http://thecraftyscrapyard.blogspot.com

6. Nadja~ http://nadjarobbins.blogspot.com/

7. Miranda - www.nanasscrapspot.com

8. Lori - http://scrappinmystressaway.blogspot.com/***HERE

9. Robin Lane - http://create-a-latte.blogspot.com/***NEXT

10. Amanda - http://cricktncrafts.blogspot.com/

11. Jessica- http://craftinandstampin.blogspot.com

12. Holli - http://SunflowerHolli.blogspot.com

13. Wandy - http://greenapplescrapper.blogspot.com


Joy Layout (Polka Dot Challenge FD)


Hello - Today starts another great challenge at Frosted Designs - Polka Dots!

I created this layout using a picture of the twins I take care of in my daycare at our Annual Christmas Party.  I used paper and die cuts from the December Mixed Media Kit.  I also used blue Metallic Gelatos to ink the edges of my photo mats.


I pop-dotted the ornament in the top corner of the page on top of flower and circle die cuts.


I cut Joy on my Cameo out of gold vinyl to use as my title.


I added this vellum tree (tied with some twine) to my paper.


I love the soft blue and gold together!!!

Thanks for stopping by today - consider linking up your polka dot projects HERE!

Wednesday, January 15, 2014

Fiesta Book Fair


It is that time again - The Book Fair at my son's school!

This year the theme is Fiesta!  I make one large sign, and three smaller signs to promote the event.  The school provides the large paper for the window sign and the large construction paper for the smaller signs.


I love volunteering my time this way - I get to be creative!!!

I started out searching my Gypsy as this is my third year making these signs and my first time since getting my cameo.  I did search in the Silhouette Store too!  I found some images I liked on both - so I used both!  A girl needs choices!!


I purchased this image from the Silhouette Store.  I cut it diagonally in order to make it as big as possible on a 12x12 mat.

I just moved the top layer into the picture, but I cut them out separately.


I also purchased these from the Sil Store - it is a banner.  I did not use the ribbon because my banner has more than 5 flags.  I cut these out in 4 different bright colors.


I used the font Wide Latin to size and cut out Book Fair.

The rest of the letters are cut from the font LD Mon Cherie and sized to 2.5 inches.

And from my Gypsy I used Fiesta for some images.  Fiesta is a digi cartridge that was a freebie the very last time I updated my Gypsy Girl, but it is available in Cricut Craft Room.

Here are the chili peppers.  I cut out 4 at a time.


I cut out maraccas.  I cut several colors of the layers so the Media Specialist can use them on other signs as well.


I cut out some pinatas too.  I made one at 11.5 inches to include on the large sign.  The rest were smaller to use on other signs as well.

I make 3 small signs promoting Blimpie  night including the menu.


The large sign is made using large rolled paper from the school.  This is on my 6' table.  I kept it simple so parents can read from their cars as they drop off their children.

I did add some orange circles to the pinata since there was a lot of red!

Get ready to Fiesta!!!


Thursday, January 9, 2014

Bride Banner featured at CHA


Today my banner is featured not only at The Buckle Boutique - but at CHA!!!!  I am so grateful for my TBB friends!!

I made a banner for my daycare girl Gracie (see below) which inspired me to make a banner for The Buckle Boutique's booth at CHA!


I started out with a dress shape from the Silhouette Store.  I made an offset layer and cut the pieces out.


I used purple for the background layer and a patterned white on white pattern for the dress.

I added a row of iron on rhinestones from The Buckle Boutique on the waist of the dress.  I used liquid glue to adhere the rhinestones to the dress.


I punched holes in the dresses with my Crop-A-Dile and threaded white tulle through them to create my banner.


Here is my original banner.  If you want to see the details, please go HERE!


The Buckle Boutique's Link Listing
The Buckle Boutique's Website . . . click HERE
The Buckle Boutique Blog . . . . click HERE
Facebook Page . . . click HERE
Twitter Page . . . click HERE

Pinterest Page . . . clickHERE


Finding Balance in Your Layouts (Frosted Designs)


I am super excited to be featured at Frosted Designs today!  I am starting a brand new series - I am going to help guide you on how to Tell Your Story Through Scrapbooking.  I taught Scrapbook Design and You (SDU) classes at Michaels and got my certification through EK Success (now called Spotted Canary).  SDU is a four week class, but here at Frosted Designs, I plan to give you condensed “shots in the arm” versions each month to help you create your story on paper. 

Today I am going to focus on BALANCE.  Balance happens to be my One Little Word for 2014 so I thought it would be a good place to start.

Balance means different things in scrapbook layouts.  It can be difficult to find the balance between pictures and titles (sizing), or the balance between having too many pretties (embellishements) or not enough, or even the balance of how much time you are spending to make it a "perfect" layout compared to how much time you can spend scrapbooking.  

Balance can also help you put everything together so it looks pleasing to the eye.  Most people spend 5-10 seconds looking at scrapbook layout in an album - you want to find a way to keep their attention and have them notice the most important part - the photos!!

We are going to focus on balancing our pictures and titles within a layout.  My go-to title used to be 2"x12" which is a 1/6 of the page!!  On some layouts that works just fine.  I had to look at what I wanted the title to represent - a headline, or a one-word POP or something in between.

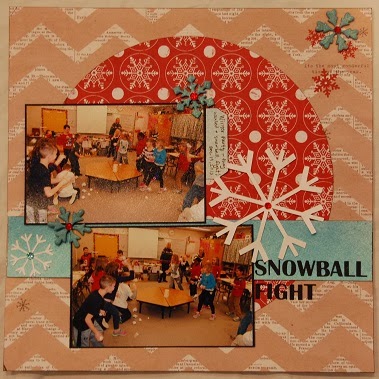
For my layout today, I am scrapping my son's Winter Party at school.  He begged for a snowball fight - so I wanted to use that as the title.  I had 3 photos, but picked the best two because they were all similar and very busy photos.  I wanted to keep the layout pretty simple so it did not compete with the photos.

I found a sketch to use (which is optional but sometimes helps).  The title is small on the sketch, but I don't always follow the sketch exactly so I came up with some different versions to see what looked the most balanced.


I used my cameo to create these visuals for you and I added my supplies.   As much as I like the bigger title, I think the medium title looks best (like in the sketch).   While all three sketches are good, the first two options have too much white space and don't hold my interest as long as the third option.  As you can see, there are NO WRONG answers in scrapbooking - just guidelines!

I really wanted to use the tag Best Day because that is how Tanner described the party.


 I used some Heidi Swapp ink to mist the tag and snowflakes as well as a piece of watercolor paper.  As you can see above, the Best Day is larger than my title and does not look balanced - it looks like I have two competing titles - so I took it off.


Instead I used the top side of the tag and wrote my journaling on it.


Here is my finished layout.  I am very happy with how it turned out.  By the way, the snowballs are crumpled up pieces of tissue paper.

Thank you so much for joining me today!  Balance can be used in many different projects, not just scrapbooking.  But if you do create layouts, you should consider the monthly scrapbook kit - I used papers from the Season of Stars Scrapbook Kit and chipboard snowflakes from the December Mixed Media kit.  The kits are packed with coordinating papers and embellishments.

I would love to hear from you what topics you think will help you create your pages.  Please leave me a comment to let me know what you would like to see next!