I am delighted to be the Guest Designer today at Sweet Sassy Diva's blog. The theme this week is Thank You cards. I do not make my own Christmas cards because I send out photo cards. I do, however, make my own thank you cards. I typically make snowman cards as I love snowmen!!!
I used Smiley Cards (for the first time) to create my snowman card. I put a snowman on my gypsy mat at 3.94 inches. I copied a second snowman and used Hide Contour to hide the inside cuts. I flipped the second snowman and stacked it on top of the first snowman. I added the layers (also at 3.94 inches). I copied the hat layer twice so I could cut out the mouth in red. I hid the mouth from the hat, buttons and glasses on the first (black cardstock) and hid the hat, buttons and glasses from the mouth on the second (red cardstock).
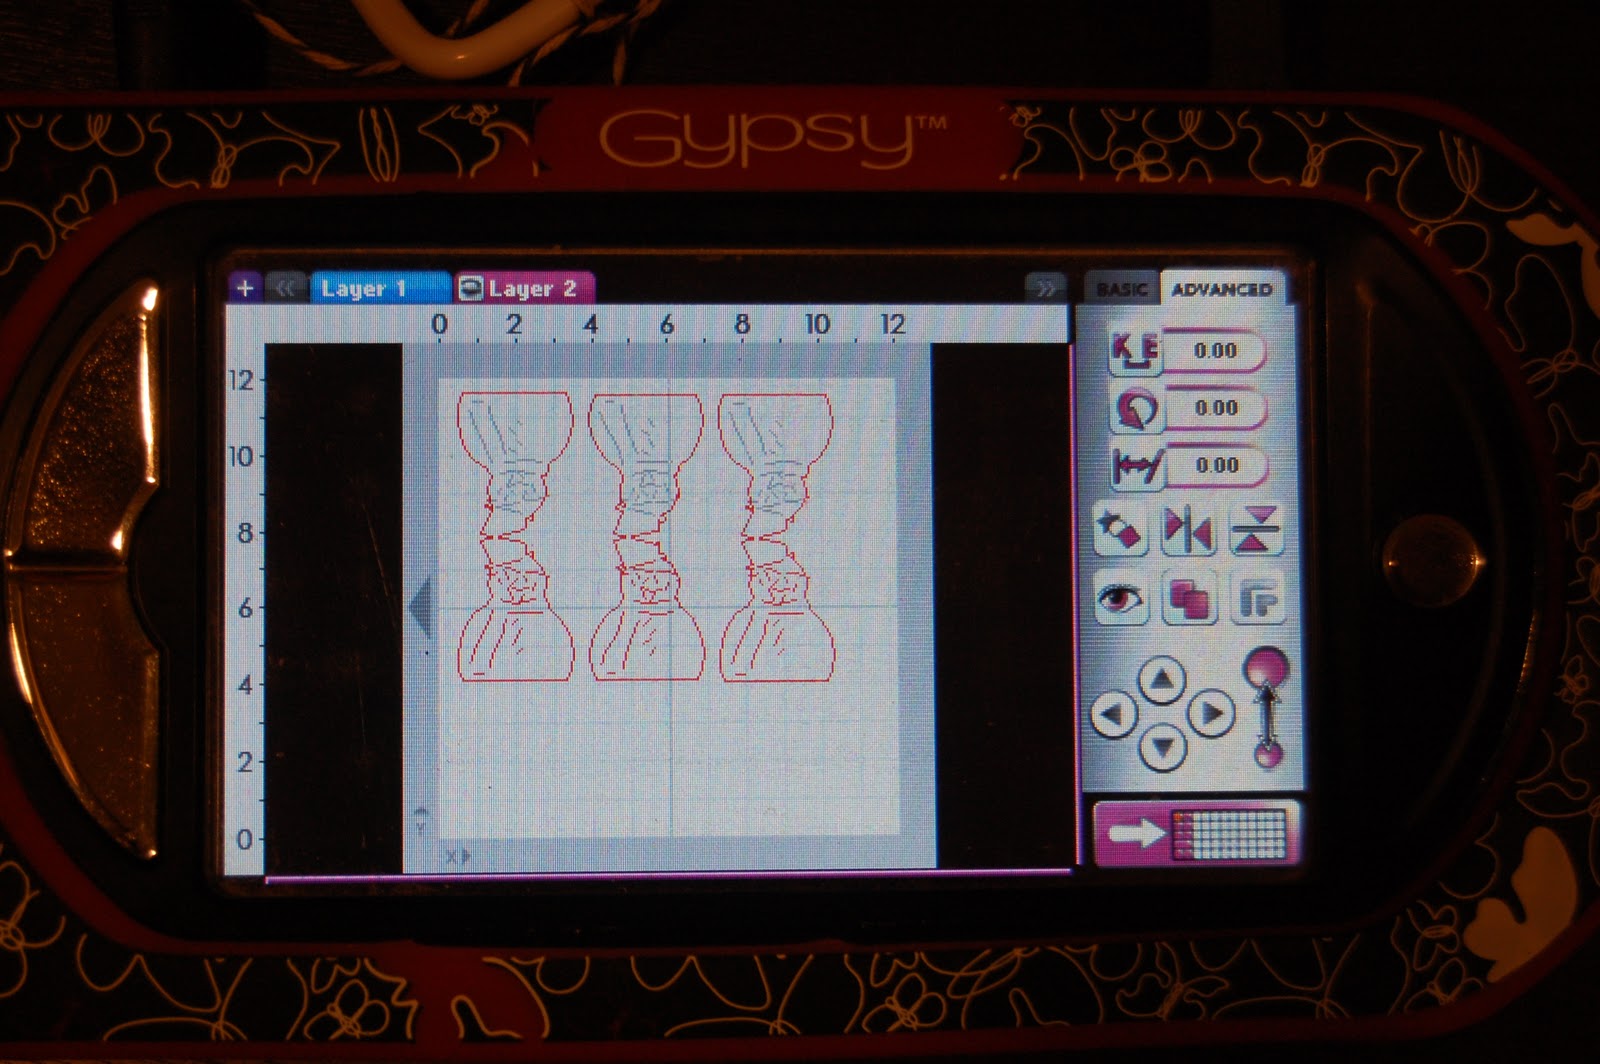
I moved the hats, mouth and scarves to layer 2. On Layer1, I copied the snowmen two times. This way I can cut out three from an 8 1/2 x 11 piece of white cardstock. I tend to make several cards at one time.
Here are my cards cut out. I folded them in half while the rest of the pieces were cutting out.
I copied enough pieces for six cards and grouped them into colors on my gypsy.
I used black, red, purple and blue cardstock for my pieces.
I put the adhesive on the card (not the hat) as the hat hangs off the card at the top. This way it won't stick to your envelope. I used my Xyron to adhere the other pieces to the snowman.
I added some stickles to the hat, scarf and the side of the snowman. I thought about adding a stickle nose, but decided I liked them better without a nose.
My 6 year old son Tanner helped me with the stickles on the snowman body ~ he is such a good helper!
I opted to leave the inside blank as the cards are not very big and I write big!!
****This just in!!! Sweet Sassy Diva is looking to add to her design team! If you are looking for an opportunity to guest design 2-3 times a month on her blog, please let her know HERE!!!
Tuesday, December 27, 2011
Friday, December 23, 2011
Painted Wine Bottle (Frosted Designs)
This week at Frosted Designs, our Fabulous Friday Challenge is to use Fabric in your project. I found some painted wine bottle projects on Pinterest and decided to create one.
I don't drink wine. I have not aquired a taste for it so I enlisted the help of my wine drinking friends to save their empty bottles for me! I sprayed the bottles with a coat of primer first. When that dried, I sprayed the bottle with purple Krylon paint.
While the bottle was drying, I made a fabric rose to attach to a denim pocket (saved from my too-big jeans). I cut a strip of purple fabric and punched a circle out of a scrap of cardstock.
Starting in the center, I hot glued the fabric around and around and trimmed off the extra tail.
I hot glued the flower to the pocket (the coin pocket from the front of a pair of jeans) and hot glued a pearl to the center of the flower.
In order to attach the pocket to the bottle, I punched two holes in the back of the pocket with my Crop-A-Dile.
I strung a denim and lace strip through the holes and tied it to the neck of the bottle.
I added some stick on pearls, a crocheted flower and some purple gems. I bought my crocheted flowers from my fellow Design Team member Debbie Bakk!
For a final touch, I cut out the word "love" in gold vinyl and adhered it to the bottle.
Wednesday, December 21, 2011
Bowling Raffle Items
It's that time of year again ~ my son's team is hosting a Bowling Tournament for High School Bowling. I usually make an item or two for the raffle. This year, I made these bowling projects. The bowling mini album is paired up with the scrapbook page (in a 12x12 frame). I used a rectangle chipboard mini album found at Michaels in the dollar bin.
Base Camp ~ Strike at 2.06 inches rotated at 90 degrees
Sports Mania ~ Discipline Strength Honor at 2.88 inches. I hid the inner cuts on the "o" and added three circles to mimic the bowling ball
Hello Kitty Greetings ~ suitcase (aka bowling bag) at 4.06 inches
Nifty Fifties ~ Bowling pin and ball at 7.24 inches and "bowl" at 3 inches and welded together
Create A Critter ~ turkey shadow layer at 2.18 inches (I hid the beak)
Cherry Limeaid ~ gutter ball at 1 inch welded together
Cuttin' Up ~ spare at 1.47 inches and welded together
Nifty Fifties ~ Split at 2.18 inches
George ~ bowling ball (4 circles grouped)
Lyrical Letters ~ it's all about the shoes .76 and 1.38 inches
Graphically Speaking ~ Trophy 2.25 inches
I cut it out of black vinyl and put it on a 12x12 tile.
You can see a link to one of my vinyl tutorials HERE!
I used George for the rectangles and circles, Varsity Letter for the font, and Paper Doll for the juggling pin (aka bowling pin). I save a file on my gypsy with the rectangles so I can easily add a title and some images. This is set for two horizontal 4x6 photos.
I also created this tile with images from:Base Camp ~ Strike at 2.06 inches rotated at 90 degrees
Sports Mania ~ Discipline Strength Honor at 2.88 inches. I hid the inner cuts on the "o" and added three circles to mimic the bowling ball
Hello Kitty Greetings ~ suitcase (aka bowling bag) at 4.06 inches
Nifty Fifties ~ Bowling pin and ball at 7.24 inches and "bowl" at 3 inches and welded together
Create A Critter ~ turkey shadow layer at 2.18 inches (I hid the beak)
Cherry Limeaid ~ gutter ball at 1 inch welded together
Cuttin' Up ~ spare at 1.47 inches and welded together
Nifty Fifties ~ Split at 2.18 inches
George ~ bowling ball (4 circles grouped)
Lyrical Letters ~ it's all about the shoes .76 and 1.38 inches
Graphically Speaking ~ Trophy 2.25 inches
I cut it out of black vinyl and put it on a 12x12 tile.
You can see a link to one of my vinyl tutorials HERE!
Monday, December 19, 2011
Vinyl on Tile ~ Gift for a Friend
Hi. Lori here from ScrappinMyStressAway with a great last minute Holiday gift you can make for a friend or family member. I am delighted to be a Guest Designer for my friend Shawn today. I use her MyCutSearch website all the time to find images and fonts on my cricut cartridges. It is much better than the search on my Gypsy ~ and those who know me know my Gypsy is pretty much attached to my wrist!!!
I saw something similar on Pinterest on a glass block and decided to modify it for my good friend. I used a lot of cartridges to create this look:
Smile is from Hello Kitty Font at 1.24 inches
Friends and Dream are from Hannah Montana at 1.24 and 1.31 inches
Faith is from Home Accents at 2.10 inches
Home is also from Home Accents at 1.78 inches
Journey is from Nate's ABCs at 1.46 inches rotated 90 degrees
Inspire is from Home Accents at 1.92 inches
Family is from Gypsy Wanderings at 2.38 inches
Love is from Home Accents at 4.58 inches
Forever is from Hello Kitty Font at 1.54 inches rotated at -90 degrees
Miller is welded from Quarter Note at 2.62 inches
I hid the dot on the i and replaced it with a heart from George at .45 inches
These measurements were a trial and error on size and font and can easily be switched with other fonts and sizes and words that are meaningful to you!
I cut this out from gold vinyl. When cutting vinyl, I set my Expression on 3, 3 & 3 (pressure, speed and blade depth) to cut through just the vinyl not the paper backing. This is called a kiss cut. When weeding away the extra pieces of vinyl, it is helpful to roll it so the extra vinyl does not stick to your project. Be careful of the dots from the i's as they sometimes like to get weeded away!
I smooth the clear contact paper over my vinyl and burnish it with my scraper.
Starting at one corner, I carefully peel up the contact paper. If part of the vinyl stays behind, I put the contact paper back down and burnish some more. Vinyl is very forgiving!!
Once the vinyl all on the contact paper, I place it over a 12x12 tile I purchased at Lowe's for around $1. I burnish it again and carefully peel up the contact paper.
All this tile needs is an easel and then it can be displayed on a shelf, table or counter. I saved my project in my Gypsy so I can easily change the name or some of the words to suit another friend (or even me)!! If you get brave, you can even use different colors of vinyl!!!
Thanks so much Shawn for having me over today to play!!! I hope you all have a wonderful Holiday Season and Happy 2012!!!
I saw something similar on Pinterest on a glass block and decided to modify it for my good friend. I used a lot of cartridges to create this look:
Smile is from Hello Kitty Font at 1.24 inches
Friends and Dream are from Hannah Montana at 1.24 and 1.31 inches
Faith is from Home Accents at 2.10 inches
Home is also from Home Accents at 1.78 inches
Journey is from Nate's ABCs at 1.46 inches rotated 90 degrees
Inspire is from Home Accents at 1.92 inches
Family is from Gypsy Wanderings at 2.38 inches
Love is from Home Accents at 4.58 inches
Forever is from Hello Kitty Font at 1.54 inches rotated at -90 degrees
Miller is welded from Quarter Note at 2.62 inches
I hid the dot on the i and replaced it with a heart from George at .45 inches
These measurements were a trial and error on size and font and can easily be switched with other fonts and sizes and words that are meaningful to you!
I cut this out from gold vinyl. When cutting vinyl, I set my Expression on 3, 3 & 3 (pressure, speed and blade depth) to cut through just the vinyl not the paper backing. This is called a kiss cut. When weeding away the extra pieces of vinyl, it is helpful to roll it so the extra vinyl does not stick to your project. Be careful of the dots from the i's as they sometimes like to get weeded away!
I use my dental tool to weed out the inner cuts.
I use clear contact paper as my transfer tape. It is super sticky, so I de-stick it a bit with my jeans.I smooth the clear contact paper over my vinyl and burnish it with my scraper.
Starting at one corner, I carefully peel up the contact paper. If part of the vinyl stays behind, I put the contact paper back down and burnish some more. Vinyl is very forgiving!!
Once the vinyl all on the contact paper, I place it over a 12x12 tile I purchased at Lowe's for around $1. I burnish it again and carefully peel up the contact paper.
All this tile needs is an easel and then it can be displayed on a shelf, table or counter. I saved my project in my Gypsy so I can easily change the name or some of the words to suit another friend (or even me)!! If you get brave, you can even use different colors of vinyl!!!
Thanks so much Shawn for having me over today to play!!! I hope you all have a wonderful Holiday Season and Happy 2012!!!
Saturday, December 17, 2011
Note Pads for my Kids!
I made personalized note pads for my daycare kids and their siblings who are in school. I personalized them by using several cricut cartridges and papers. Ayla loves cats and her sister Abby loves dogs.
William and Eli love trucks and trains.
McKenna and Elle love dance.
Luke and Tanner love baseball.
Mallory loves lady bugs and Sierra loves tie dye and soccer.
Sterling and Alex love football.
Colton loves soccer and Jadon just started karate. Jadon also loves orange!
I welded the names (using Don Juan) to the Sports Mania images.
Here is a link to a tutorial on how to make these notepads with a Bind-It-All HERE.
In addition to the note pads, I also gave the kids some "grown up" pens to use in them. My son has already filled up his note pad with drawings and words. I need to get busy with some more!!!
William and Eli love trucks and trains.
McKenna and Elle love dance.
Luke and Tanner love baseball.
Mallory loves lady bugs and Sierra loves tie dye and soccer.
Sterling and Alex love football.
Colton loves soccer and Jadon just started karate. Jadon also loves orange!
Max loves golf and Stone loves to wrestle.
Here is a screen shot of some of the cuts and layers.I welded the names (using Don Juan) to the Sports Mania images.
Here is a link to a tutorial on how to make these notepads with a Bind-It-All HERE.
In addition to the note pads, I also gave the kids some "grown up" pens to use in them. My son has already filled up his note pad with drawings and words. I need to get busy with some more!!!
Thursday, December 15, 2011
Secret Santa Circle Stocking Swap
If you are looking for the Memories in Tyme Merry Christmas Blog Hop, please go HERE!
I opened my Secret Sister Stocking Swap today from Toni Schiesz and she had the box super stuffed!!!! She made me a beautiful card, a Cricut ornament in my favorite color, and crammed the box full of so many embellishments it might take me a year to use them all!!!
I really love the sweet mini pig magnet!!
I spy stickles, cricut blades, twine, flower pins, magnets, stickers, a journal, a corner punch, some stamps and a lot more!!
I really love getting crafty supplies from another crafter!! Thanks so much Toni!!!!
I opened my Secret Sister Stocking Swap today from Toni Schiesz and she had the box super stuffed!!!! She made me a beautiful card, a Cricut ornament in my favorite color, and crammed the box full of so many embellishments it might take me a year to use them all!!!
I really love the sweet mini pig magnet!!
I spy stickles, cricut blades, twine, flower pins, magnets, stickers, a journal, a corner punch, some stamps and a lot more!!
I really love getting crafty supplies from another crafter!! Thanks so much Toni!!!!
Subscribe to:
Posts (Atom)