Copyright Information

Thank you for stopping by my blog! I hope you enjoy the things that I create and share! I do have a copyright on my original creations (see logo on my sidebar below).
If you create and post a creations based off of mine, please refer (with a link) back to my blog. Please do not use my ideas for files, profit or for contests. Thank you!


My Craft Goals for 2015

My Goals for 2015:

1. Update my goals for 2016 in January of 2016 :)
2. Maximize my crafting time!
3. Keep plugging away at scrapbooking photos!!
4. Learn how to Heat Press!!
5. Have fun!


Friday, October 18, 2013

It's All About ME!!!


Hello -  I am so excited to host my very first Challenge at Let's Scrap!!!  I am a new Design Team Member and my challenge is All About ME!

For this challenge, I want you to scrap YOU!!!  We always seem to scrap everyone else!!!  You can use a photo of yourself, or something (not another person though) that is super important to you.  This can be coffee, diet pop, gardening, crafting - something that represents YOU!!!  You can use this or another sketch from Let's Scrap found HERE.

If you have never been to Let's Scrap - it is a wonderful ning group of talented crafters from all over the world!!  Consider stopping in and checking it out!  I have created 7 layouts in 3 weeks!  It is a great motivator to get caught up!!


I chose this sketch because I wanted to use one large picture and several small ones.


I used these images from the Silhouette Online Store for my layout.  I switched the butterflies for flowers that I had on hand.


I started with this awesome Graphic 45 paper!

I printed my photo on Square 1 Masterpiece repositional adhesive fabric.  I love the way it prints photos from my computer!!

The 2x2 photos were printed from my Zink hAppy!

I have mini pictures of Diet Dr. Pepper, Pedicures with a friend, scrapbook convention with a friend, my two favorite vacations:  Mexico and Disney, and sitting at the pool!


I added these black flowers with clear gems.  A little washi tape shows my love of music and polka dots!


My name is my title - of course!

You can also see the tiny black and crystal flowers I used!


I had a lot of fun with this layout.  I did not have a lot of time (we were packing for Disney) and used my computer and Zink to help me with my photos!  I love the way it turned out!!

Thanks for joining me today ~ I hope you have a scrappy day!!!

Wednesday, October 16, 2013

All Star Game (LO)


Here is my take on the Sketch Challenge at Let's Scrap today.


This sketch was designed by Debby de Wilde.


I used Cherry Pie Dylusions Ink to spritz some background color on my paper.

I cut my title on my Cameo and added to look like the title of the article.


I cut these stars on my cameo for my background shapes.  I added a baseball lace cut (also from cameo) as a border across my layout.

This is a photo of the All Star Team.  Tanner was one of the few 7 year olds on the 8U All Star Team.  He played 8u Select Baseball last spring/summer.

How would you use this sketch?

Tuesday, October 15, 2013

Peace Bling Clipboard (The Buckle Boutique)


Today I am a Designer at The Buckle Boutique BLOG!  I have a fun little project that I hope inspires you!!!


I really like clipboards.  I am not sure why, as I don't typically use them but when I saw this mini clipboard at Michaels I had to get it!!


I added some blue Dazzling Diamonds to the metal.  The blue was a perfect match!  I tied a tulle bow to one side.


The front was pretty jazzed up, but the back was plain white.  I can fix that with my Gypsy and Cricut!!


I used the Peace Sign from Disney/Pixar Cars and sized it to 4.58 x 4.41 inches. 

I used my deep cut blade set to 6.  I did not multi cut.  I put the Dazzling Diamonds face down on my mat.  Note - I did not reverse the image as it is symmetrical.


Now the back is as pretty as the front!

My daycare kids love using little clipboards and the girls were drooling over this one!!!

The Buckle Boutique's Website . . . click HERE
The Buckle Boutique Blog . . . . clickHERE
Facebook Page . . . click HERE
Twitter Page . . . click HERE
Pinterest Page . . . clickHERE

Wednesday, October 9, 2013

Disney Top 10 Memories (Frosted Designs)


Today I am featured at Frosted Designs!

If you are looking for the Frosted Designs Store Grand Opening Blog Hop, please go HERE!!


We recently took a trip to Walt Disney World.  Before every Disney trip, I create an 8x8 scrapbook with pages decorated for Character Autographs and other planned events.

Tanner is almost 8 now and is not as "into" Characters as he is rides, so I customized some of the pages for those activities.

I created these pages for his Top 10!


I used my Cameo to cut out the title and the film strip borders.

I used the green arrow sticker from Frosted Designs.


The star, camera paper and Top 10 journaling card all came from Frosted Designs.  Tanner wrote out all of his favorite rides from each park on the way home from our trip.  I added them to this journaling card.


These pages make a great addition to his album!

Be sure to check out the awesome online store at Frosted Designs!!!


Monday, October 7, 2013

Broom Parking Sign


Today I am pulling double duty!!  I am Hosting She's A Sassy Lady's BLOG and participating in an exciting Blog Hop for Frosted Designs!  I am a Designer for both blogs!


Welcome to the Frosted Designs Grand Opening Blog Hop! We are so excited to share our love of creating with all of you and couldn't think of a better way to celebrate than by doing a blog hop! So... are you ready?!!!

The rules are simple this time.....

1. You are going to "hop" to each of the blogs on the list. Each of these designers will have a different word on their blog that you need to "collect".

2. Each designer is going to showcase a project they made using products from the Frosted Designs store as well as showcase some of their favorite products! They may also be giving away prizes of their own!!

3. Once you have "collected" the words, you will have a phrase. You are going to email this phrase to frosteddesigns@ymail.com. We will pick one random winner to receive a $20 Gift Certificate to the Frosted Designs Store! (Gift Certificate does not include shipping.)


That's it.... easy peasy!!!


I absolutely love Halloween.  I love decorating for Halloween, picking out costumes, planning my daycare party - everything about Halloween!!  I saw this image and just knew it would be a fun one to cut out!


I took an 8x8 flat canvas and sprayed Dirty Martini Dylusions Ink on it.

I have to say that I was hesitant to use Dylusions Ink.  I tried glimmer mist and even made some of my own, but the color was not very vibrant and it just wet and curled my paper.  My glimmer mist also got clogged a lot.  I was VERY happy with the Dylusions!!!  This is after just one "coat" of spray! 


I purchased this Broom Parking sign from the Silhouette online store and cut it out in black vinyl.


I used transfer tape to pull up the vinyl and position it on the canvas.  I added the Kaiser Craft rhinestones for a little sparkle!!


I removed the center vinyl oval and replaced it with a gem.


I found the Dylusions Ink and Keyser Craft rhinestones from the Frosted Designs brand new online store!!!

I have a special Discount Code that is valid October 7-13 for 30% off EVERYTHING in the store!!

This includes:
*The scrapbooking kit (link below)
*Pre-orders  (some are brand new releases)
*Already discounted items
*Mixed Media Items

My code is GRANDOPENINGLORI

You also need my word for the Frosted Designs sentence (last stop in the hop):  MEDIA

Here is the entire list of blogs in the hop:


Thank you so much for stopping by!  Us DT Members are having a contest to see who has the most sales with our Discount Codes.  I am giving away a little something fun.  Please leave me a comment AND follow me on Bloglovin' for one chance to win.  Leave a separate comment telling me what you ordered for a second chance to win.

Be sure to visit Rikki next!!!

In addition to the two linked items below, I really love the UmWow mini chipboard shapes!!!  I have three sets (so far)!!!


Sunday, October 6, 2013

Ice Cream Cone Card (KCC Blog Hop)


Welcome to the Krazy Crafting Crew's October blog hop:  To "DIE" For!

Many crafters today have die cutting machines and we thought it would be fun to let them show off some of the work they do with their machines and tell us what machine they own.  I can guarantee you will have a fun time looking at all of their creations and if you're in the mood for a new die cutting machine, their work might sway you on which one to buy.

Our hostess for this hop is Jearise from Loby's World and her blog is the place to start.  She will have a give away going on so make sure you check out how to get signed up for that while you're visiting her.

Now let the fun begin...


I have two cricut machines (an Expression and an Imagine) and a Silhouette Cameo.  I like all three for different reasons.  Since yesterday was World Card Making Day, I opted to create a card using my Expression.  I can design much easier using my Gypsy!


I grabbed my Gypsy and used Creative Memories Cheerful Seasons Cartridge.  I used the Ice Cream Cone image sized to 5.12 inches. 

I welded two of the shadow layers together.  I copied and flipped a second image and overlapped it a tiny bit before I welded them together.


I cut them out of white cardstock.


I put the rest of the layers on my Gypsy all sized to 5.12 inches.


I used paper from my scraps.


I did not have any more of the dark brown and I forgot about the cut outs of the ice cream cone.  If I left it alone, the pink layer would show through.   I opened a new layer and fit the ice cream cone so the inside cuts would fit on the rest of the paper already on my mat.

I adhered the brown pieces over the pink paper.


I used a stamp from Iron Gate Stamps for my sentiment.


I inked my cone and adhered the layers on the card base.  Here is my yummy birthday card!

I was once a die hard Gypsy and Cricut gal.  I also own a Cuttlebug but I use that mainly for embossing.  I recently got a Cameo.  I love things about my Cricut and I love things about my Cameo.  I will continue to use them both!!!

Your next stop in this hop is Cicily!

Here is the entire list of blogs in case you get lost along the way!!

Friday, October 4, 2013

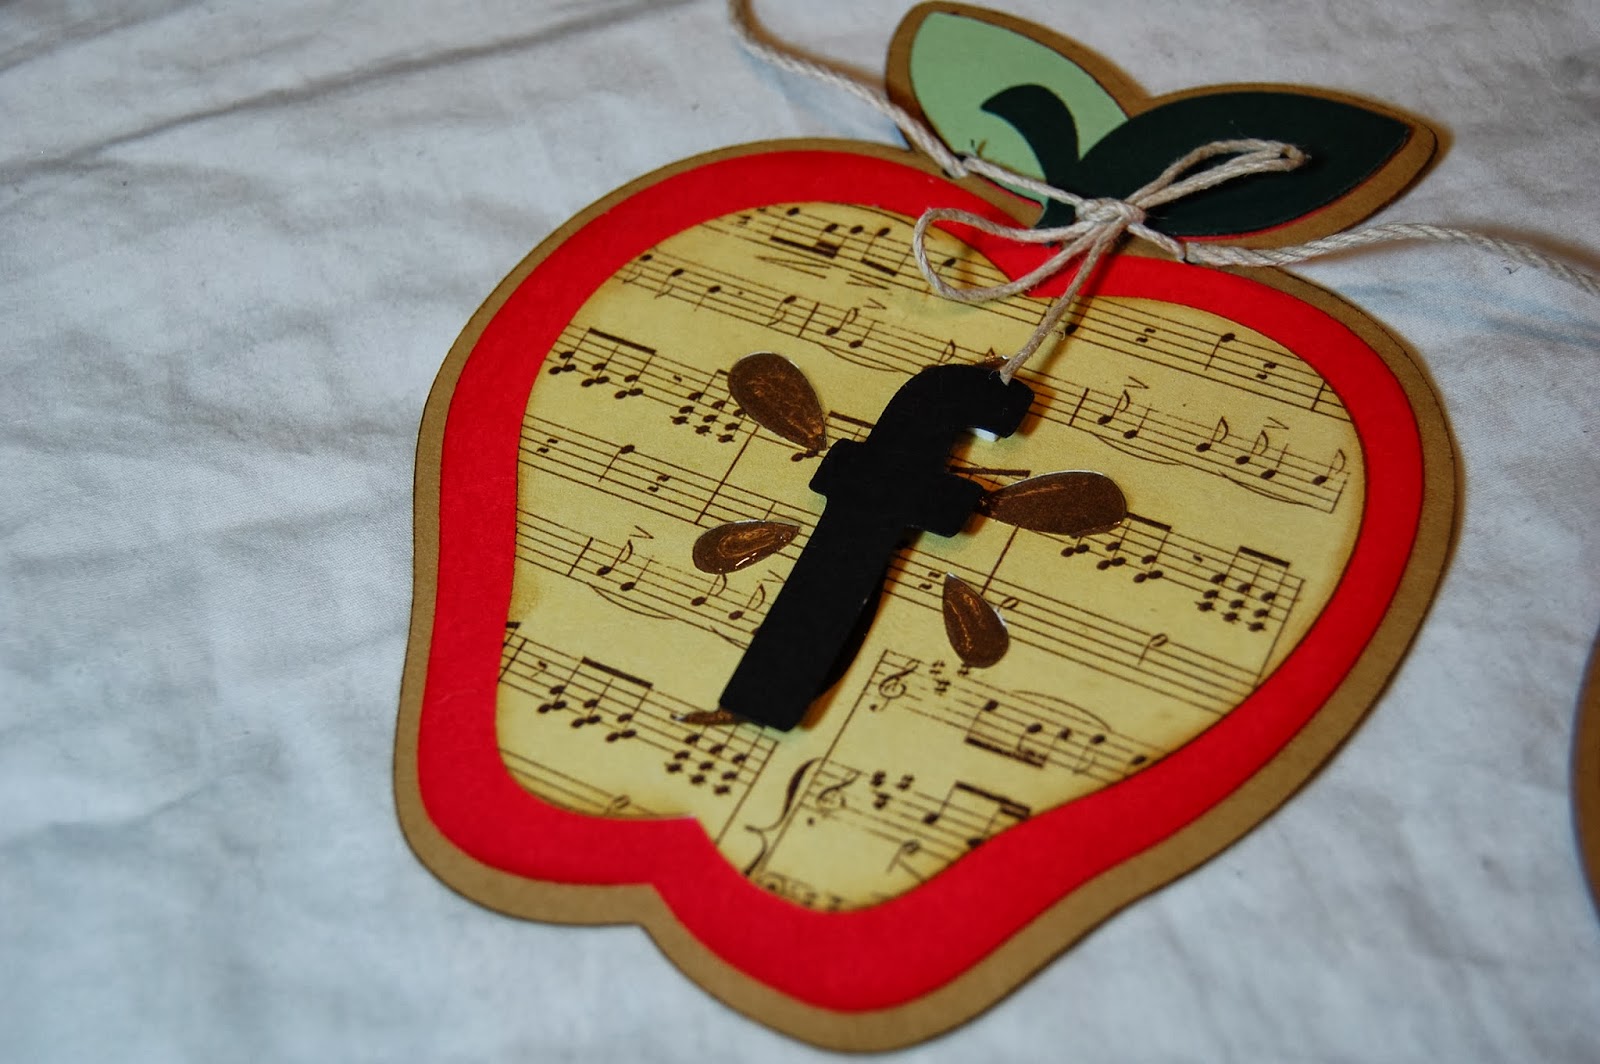
Fall Apple Banner


Hello and welcome to our Crazy for Cricut and Creative Memories Blog Hop!

This is a short and sweet Hop showcasing some projects made with Creative Memories Cricut Carts.  You should have arrived from Golden Goddess Designs.  If you found me first, please go to the BEGINNING so you don't miss a thing!!!

I picked Cheerful Seasons cartridge to use.  I made a fall banner using the apple and layers from this cartridge.

I cut out the apple and layers at 5 inches.

I cut the shadow layer out of kraft cardstock paper.

I cut the apple out of red cardstock.

I cut the inside apple layer out of Recollections music note paper.  I cut this layer a second time (after using Hide Contour to hide the seed and core cuts) out of brown cardstock.

I cut the leaf layers out of two shades of green cardstock.

I cut the word "fall" at 2 inches using black cardstock, 


I used glossy accents on the seed and core.

I inked the layers with brown, green and burgundy inks.


I pop-dotted the letters to the center of each apple.

I punched holes at the top of the apple with my Crop-A-Dile and strung the apples together with twine.


This banner will look great on my kitchen door!!  

I love apples and pumpkins in fall.  What is your favorite part about fall?

Your next and final stop in the hop is S.C.R.A.P. Guild of Northern IL.


Golden Goddess Designs at: http://goldengoddessdesigns.blogspot.com/
Scrappin' My Stress Away at: http://scrappinmystressaway.blogspot.com/ ****HERE
S.C.R.A.P. Guild of Northern IL at: http://scrapguildillinois.blogspot.com/ ****NEXT

Thanks for stopping by!!