Welcome to the My Calendar Blog Hop!
If you are looking for the FROSTED DESIGNS FALL BLOG HOP - go HERE.
In this hop, you will find several kinds of calendars that are NOT you typical "hang on the wall" calendars. I plan on using mine to keep me on track for my design team and blog hop schedules!
Here is a complete list of blogs in the hop just in case you get lost along the way (or find me first)!
Lissa Marie www.somanycrafts.com
Tianna http://www.alittlebitme.com
Lucy ~ http://love2createitall.com
Lori ~ http://www.scrappinmystressaway.blogspot.com/ ****HERE
Karon http://karonskraftykorner.blogspot.ca/ ***NEXT
Suzanne Roseberry (Zannie Berry) http://www.zannieberry.blogspot.com
Christine ~ http://hotberrydesigns.blogspot.com/
Now on to my project::
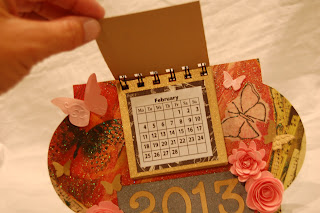
I made a fun desk calendar. Each month is on a separate page. I need to see the entire month at a glance so this words well for me. I am on 4 design teams and will color code them to highlight each square. Blog hops will have a separate color. I have a detailed journal with ideas, projects and status information that would NEVER fit onto any calendar :)
I started with this shape from Lacy Labels and sized it to 5 inches. I cut it out of chipboard using multi-cut 3 times.
I used paper from this 8x8 Colorful Life paper pad from DCWV.
I found a 2013 calendar online and printed it out on white cardstock. I trimmed each month into its own square.
I thought I would use these scalloped squares to mount the calendar squares on, but they ended up being too square and there was not enough room for the binding. I scrapped that idea and cut my own with my paper cutter.
I did use the 2013 from Cricut Alphabet sized to 1.35 inches. I cut the letters out of gold shimmer cardstock.
I used these 3D flowers from Art Philosophy sized from 3.29 to 4 inches. I cut them out of pink shimmer cardstock.
I used my tweezers to roll the flowers from the smallest end to the center and used liquid adhesive to glue the flower together.
I used my Bind-It-All to punch the holes and attach the calendar pages. I added some butterflies in gold and pink to match the paper I used. I used a Stampin' Up cut and embossing folder for them.
Thank you for stopping by today!! I hope I inspired you to create your own one of a kind calendar!!!
Your next stop in the hop is the fabulous KARON!


6 comments:
Oh My this is beautiful. Love the colours and the idea. Now why didn't I think of printing out the little calenders, I have been looking everywhere to buy them. Thanks for the neat idea. TFS
http://karonskraftykorner.blogspot.ca/
very cute calendar!!!
robin
http://cutonedesignsbyrobin.blogspot.com/
What a beautiful calendar!
What a fabulous gift this would make! i love it, and am glad for the tutorial. Thanks so much for sharing.
Very nice and love the flowers and colors.
kdnkdd
Very beautiful, unique & creative. TFS
Post a Comment