Copyright Information

Thank you for stopping by my blog! I hope you enjoy the things that I create and share! I do have a copyright on my original creations (see logo on my sidebar below).
If you create and post a creations based off of mine, please refer (with a link) back to my blog. Please do not use my ideas for files, profit or for contests. Thank you!


My Craft Goals for 2015

My Goals for 2015:

1. Update my goals for 2016 in January of 2016 :)
2. Maximize my crafting time!
3. Keep plugging away at scrapbooking photos!!
4. Learn how to Heat Press!!
5. Have fun!


Saturday, September 14, 2013

The Buckle Boutique Mini Purse


Welcome to The Buckle Boutique Blog Hop!  


This is a short and sweet hop featuring some very blingy projects!!

If you are looking for the All About Babies Blog Hop, please go HERE.


I made these adorable felt purses for some of my daycare girls for Christmas.


I started with the felted purses.  I bought mine at Michaels, but they also sell them at Hobby Lobby.  

They are a little plain, so I added some iron-on rhinestones from The Buckle Boutique!

I trimmed the sheet to fit the front of the purse flap.  I used an iron set to Medium.

I made a flower out of some lace and glue and adhered it to the front of the purse.


They are all a little different so the girls can tell them apart.  I am going to fill them with some lip gloss, hand lotion and a few other surprises!!


These purses went from boring to blingy in a few minutes!!!

We have some Buckle Boutique Blog Candy - the entry form is at our last stop in the hop!!


More information about The Buckle Boutique can be found here:
The Buckle Boutique site http://thebuckleboutique.com/
If you are a retailer and would like to carry the products from The Buckle Boutique in your store, feel free to contact me for wholesale pricing

Your next stop in our hop is my Blingy friend Ellen!!

Here is our line up:

Shawn - http://craftychicsblog.blogspot.com/

Lori - http://scrappinmystressaway.blogspot.com/

Ellen (CardMonkey) http://cardmonkeyspaperjungle.com/

The Buckle Boutique http://thebuckleboutique.wordpress.com/

Friday, September 13, 2013

All About Babies Blog Hop


Welcome to the “All About Babies” Blog Hop! So glad you can join us!

If you are looking for The Buckle Boutique Blog Hop, please go HERE.

If you are coming from SHAWN,
then you are in the right spot. If you just happened to stumble upon my
site or your reading this via e-mail, please start at MIRANDA'S BLOG so you don’t miss anyone’s amazing projects!


We will be showcasing anything BABY projects! In addition to seeing some
awesome projects, there is some blog candy available too!  Miranda will
be giving away a Michael's or Joann's gift card.  Winner's
choice!  To be eligible to win the blog candy, you must leave a comment
on each stop in the hop telling us what is your favorite summer time activity!  Be sure to leave a comment on each stop because the winner can be chosen from any of the participants blogs!


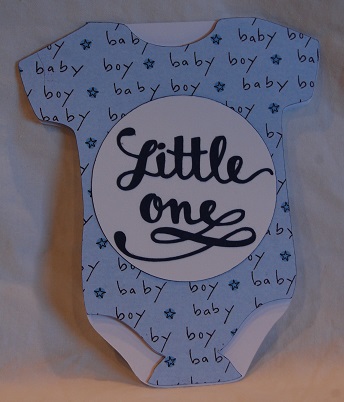
For my project today, I created a wall decor piece and a card for my friend who is expecting a boy. She is also a teacher, so I wanted to use this line from one of my favorite books!


For my canvas, I started with....

a flat 8x10 canvas painted cobalt blue.  I planned on putting white letters on the canvas but tried this pretty silver instead.

The silver was a bit translucent and did not show up very well....so onto plan B.


I painted over the entire canvas with 2 coats of white acrylic paint.  When completely dry, I peeled off the vinyl, I also painted the edges cobalt blue.

For the card I used a file from the Silhouette store:


I cut out the card shape in white cardstock AND baby boy paper from Hobby Lobby.

The Little One is cut from dark blue cardstock.


I cut a circle to fit behind the sentiment and still fit on the onesie.

Thanks so much for stopping by!!!


Wednesday, September 11, 2013

We Will Never Forget


We will never forget 9-11-01.

I was in my basement with my daycare kids when my friend called to say a plane hit the first tower.  My TV was on the Disney Channel, hers was on the news.

We were talking when the second plane hit.  We were still talking when the third plane went down.

The rest of the day she kept me up to date as I did not want my kids to hear or see anything.

I live about 20 minutes away from Offutt Air Force Base in Bellevue, NE.  Several of my neighbors are Air Force and were very busy that day - or they stopped by the schools to kiss their kids good bye as they were called to duty.

It was bone chilling when Air Force 1 flew the president over my house that afternoon.  I immediately felt vulnerable in a way I never had before.

My husband was in LA on business due to fly home that evening.  It was two days later that he and his co-workers were able to fly home.  They were lucky they had hotel rooms as many people slept in the lobby.  The news he saw in LA was much more graphic than the news we saw in Nebraska.  I was grateful that he arrived home safely as so many people did not.

It was a horrible day for so many people.

I did not know anyone personally who died that day, but a piece of America died that day.

I am sad for every one of those people (and their loved ones) who lost their lives that day.  I am grateful for the people who fight every day for our freedom!

We Will Never Forget!


Tuesday, September 10, 2013

Baseball Decal for My Car


I created a new vinyl decal for my car.  My son is a freshman at Briar Cliff University in Sioux City, IA and he is a catcher.

I wanted a car decal but did not see any at the bookstore.  No problem - I can fix that!!!


I found a thick font that would work.  I curved the text at the top and added a catcher image from my Cricut Baseball cartridge.

If you want to see the YouTube Video that taught me to curve my letters on my cameo, go HERE.

The original #15 was too thin, so I re-did it in the same thick font as the letters.

I cut this out of white vinyl.


Tyler's team played Sunday in the Alumni game.  It was great to see him behind the dish again!!


Very proud baseball mom!!  I had to make one for dad, grandma and grandpa too!!!


Monday, September 9, 2013

Halloween Decor


I know I am a wee bit early for Halloween, but Halloween is my very favorite holiday!!  I love to decorate - well everything Halloween!!!

Today I am excited and honored to be featured at The Bug Bytes!!!


I found these 8x8 metal tiles at Michaels in the Dollar Bin for $2.  They were 40% off and I was prepared to sand and paint over them.  To my great surprise, the design was a sticker that was super easy to remove!!!  I went back and picked up a couple more...well maybe more than a couple!!


I designed this myself on my Cameo.  I saw something similar on Pinterest, but I downloaded the font and stretched an image from the Silhouette store.  I always feel like I am cheating using someone else's designs from the Silhouette store as I love creating my own things.  I am just not as savvy yet on the cameo as I am on the Gypsy!!


I cut out my design in vinyl (for some reason I have a TON of lavender vinyl) using the vinyl settings on my cameo.  I also keep a separate blade for vinyl set to 2.  My cardstock blade is set to 3.  This extends the life of my vinyl blade.


After burnishing the vinyl, I peeled it up using transfer tape.


I did not take enough pictures of each project so excuse me as I jump back and forth with designs to keep the tutorial making sense.  My second project was made using an image I purchased from the Silhouette store (above) and I cut it in Square 1 Masterpiece (instead of vinyl this time but used the same settings and blade).


So, after burnishing and getting the vinyl (or square 1) on the transfer tape, I burnished it down onto the metal tile.


I painted over the vinyl with white acrylic paint.  I painted 2 light coats.  I wanted a streaky chalkboard look.


I peeled the square 1...


and vinyl off the metal.


I painted a bit of black on the edges.


I added some black dots to give movement to the witch.

I spray sealed them so the paint would not chip off and they are ready to go!!

Thanks Pam for having me over today!!!   I hope you have a wonderful fall!!!


Friday, September 6, 2013

Back to School Journals and Gift Bag


Welcome to Honeybearz Designs Back to School Blog Hop!!!


We are celebrating Back to School!!  You should have arrived from Lucy's Blog.  If you found me first, please go to the BEGINNING so you don't miss anything!!!

In case you get lost along the way, here is the Blog Line Up:
2. Haidee- http://created2bunique.blogspot.com/
3. Deb-http://debspaperpalooza.blogspot.com/
4. Carolyn-http://www.grandmacarol46580.blogspot.com/
5. Tabetha ~ http://tabethascreations.blogspot.com/
6. Shawnee ~ http://quiverofangels.blogspot.com/
7. Beth ~ http://thecraftyscrapyard.blogspot.com/
8. Kathy ~ http://kathyand3kids.blogspot.com/
9. An'Jenic- http://anjenicgibson.blogspot.com/
10. Melisa - http://melisascraftycreations.blogspot.com/
11. Alicia - http://goldengoddessdesigns.blogspot.com/
12. Lucy ~ http://love2createitall.com/
13. Lori - http://scrappinmystressaway.blogspot.com/ ****HERE
14. Jessica- http://craftinandstampin.blogspot.com/ ****NEXT
15. Jenny - http://crazyaboutcricut.blogspot.com/
13. Theresa - http://scrappinginheels.blogspot.com/


My son just started his first year of college.  We went to orientation a few weeks ago and met some of the PALs (upper classmen who are leaders).  Two of the PALs went above and beyond to answer our questions and give Tyler some great advice.  It really made this mom feel that much better about his college choice!!!

Both of these girls are seniors studying Elementary Education.  They started student teaching the week before college classes started.  I wanted to make them something special to show my appreciation for them!

I covered a journal for each:


I used paper from Michaels - a pack of 8 1/2 x 11 School Cardstock.  I traced and cut the front and back cover of the Composition Books.  I tied a little twine next to the binding.

I found these cuts from the Silhouette Online Store to embellish the covers and cut them out of solid color cardstock.


I added a little stickles to create apple seeds.

I used my labelmaker to add their names.


I used different paper to cover the second journal and the same die cuts.


For Jana, I covered a white gift back and added an apple and sentiment from Pink By Design.  I knew Jana love Cheese-Its so I added a box for her along with a pack of pencils.


For Kayla, I decorated a re-usable tote with glittered vinyl.


I included some pencils with her journal and the bag is re-usable.  You can see how I made this HERE if you are interested.


Tyler is adjusting well at college.  Mom is slowly adjusting to him being gone!!  He is our middle son, so we have been through this before.  It is different as Tyler is playing baseball in college (our oldest did not) and we are used to being at every game!!!

Your next stop in our Back To School Hop is JESSICA!


Monday, September 2, 2013

Instagram Photo Mini Album (Sassy)


I made this cute little Mini Album with Instagram Photos in mind.

Today is my Sassy Day - the day I post at She's A Sassy Lady!!

I purchased this 6x6 chipboard album at Michaels.  The album has burlap on one side of each page, which gives it a fun texture to work with.

The ABC sticker on the cover was something I purchased long ago on clearance at Michaels and was super excited when the heart fit right over the "u" as if to say Love You!!


I got the rest of my images from the Silhouette Online store.


I love these papers!  I found this one from a DCWV stack called Timeless Type.  I added "Caught on Film" to one page and pop dotted a heart on the other.

I trimmed my photo mats to 4.25 x 4.25 to fit 4x4 pictures.


I used this paper from Tim Holtz and added a photo mat as well as a pocket page.  Smile and Say Cheese just seemed to fit!


This last page is once again from The Timeless Type stack and I pop-dotted Snap Shot to the top of each photo mat.


And since I love photos so much I just had to add this to the last page!!

Thanks for having me over today Sheila!!!