Copyright Information

Thank you for stopping by my blog! I hope you enjoy the things that I create and share! I do have a copyright on my original creations (see logo on my sidebar below).
If you create and post a creations based off of mine, please refer (with a link) back to my blog. Please do not use my ideas for files, profit or for contests. Thank you!


My Craft Goals for 2015

My Goals for 2015:

1. Update my goals for 2016 in January of 2016 :)
2. Maximize my crafting time!
3. Keep plugging away at scrapbooking photos!!
4. Learn how to Heat Press!!
5. Have fun!


Friday, January 28, 2011

Monochromatic Purse Card (Frosted Designs)

Here is my project for this weeks Fabulous Friday Monochromatic Challenge at Frosted Designs.  I used a digi stamp from CocoDingo, one of our sponsors.  I am normally a scrapbooker, so this was a challenge for me in a couple of ways.  Normally, crafters use stamps with cards which was my first challenge.  Me being a little technically challenged could not figure out how to change the size of the digi stamp, so I just made it into the card.

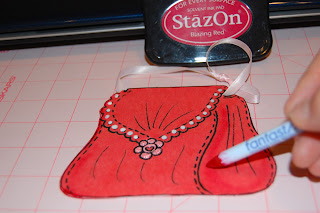
I used my Bamboo tablet to color in the red purse and pink flower.  After I printed it out, I cut out the purse except for the strap.  I traced and cut out a card the same shape as the purse out of white cardstock folded in half.

Before gluing the red purse to the cover of the card, I glued a pink ribbon handle to the top of the purse.

To add some shading, I used a Fantastyx and my red stamp pad.

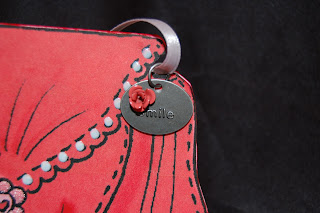
I put a purse charm through the ribbon.

I put pink stickles on the flower petal and white enamel accents on the dots.

I added a sentiment inside (in red of course).

And here is my purse once again.  The challenge this week is monochromatic and that can be a card, layout or other project.  Check it out HERE.

Thursday, January 27, 2011

Dig ~ Frosted Designs Sketch


Here is my take on this week's Sketch Along Tuesday over at Frosted Designs.

I used Dinosaur Tracks for the first time!!  I made a banner for the title.  I cut the letter tiles at 1.08 inches tall and strung them together with bakers twine.

I cut out the fossils of a three dinosaurs and inked the edges.

I welded the digging tools together using the tag feature at 1" tall.  I used my Xyron to stick the mesh down, then I added staples for the texture.

I used some strips of paper from my Tim Holtz stack for the background and the journaling.
I inked around the edge of the paper to dirty it up a bit.  This photo was taken in Disney at the Animal Kingdom.  Tanner got a little confused and was digging for dinosaur bones with his belly!

Tuesday, January 25, 2011

Baseball Cuts, paper cuts not team tryouts!!

It is hard to believe that with 8 inches of snow on the ground I am thinking about baseball!  My son is a sophomore and plays baseball.  He is a catcher and spends a lot of time at an indoor training facility catching during pitching lessons during the off season.  We received a catalog in the mail for t-shirts, which inspired me to create these scrapbook cuts.

I also have been testing the Gypsy/Imagine update and created these cuts.

Here is the page of the catalog that got my brain spinning!!

Here is the cover and the web address to give credit to for my project idea: http://www.protuffdecals.com/
They have some neat t-shirts!!

I used Base Camp font for this one.  I welded the verbs together, then the OUT to the side.

This was also Base Camp.  I added a baseball bat to the bottom to hold onto the H and E.  I played with font size to stretch out the "OTE" in protect.

I used Varsity Letter for this one.  I am often heard saying "No Excuses" to my son as he bats.  I know it really really helps him hit the ball!!!!  (actually it is out of my mouth before I realize it and then I get the death stare ~ I try to keep sunflower seeds in my mouth to prevent this)

This one is made with Word Builders 2: Garden of words.  I used Hide Contour to hide the bug body parts.  This font works well with a solid surface.  I am not sure this is "manly" enough though for the scrapbook, this one might not make the cut (pun intended).

Here is home plate flood filled with baseballs at 8" and the word Baseball flood filled with wood planks from Shapshot: Everyday Imagine cartridge.  If you look closely in the picture, you can see my Gypsy with the Imagine application on the screen.
Here are my four cuts once again.  Helpful hint:  Because I was welding quite a bit, I opened 4 different layers and put each cut on one layer.  When you weld and preview, each weld slows down the process a little bit.  By separating the projects into different layers, the preview time was a lot quicker!  

I also put each cut in a different quarter of the mat so I did not need to change paper.  Layer 1 was the top left quarter, Layer 2 was top right, etc.  I just changed the layer,  re-loaded my mat and cut.

Here is my baseball + Snapshot Everyday baseball cuts once again.

I will be using these cuts later on when I have some baseball photos to scrap!  Take me out to the ball game......

Monday, January 24, 2011

Cat Tails

I am working on a scrapbook for my friend Beth.  Her cat Flower passed away recently.  I asked her to write down some stories about Flower and then I created some cats to represent Flower.  I have to say I am having so much fun making this album for Beth and her family!

I used Storybook for the title.  I used Christmas for the window.  I cut the shadow out of a wall paperish kind of paper.  I cut the window out twice.  I pop dotted the second window on top of the first for a little dimension.

Some of you may have seen this sneak peek on facebook.  I wanted Beth to see what I was working on.  Flower loved to sit on Grandma's slippers and sleep on Beth's feet.  I took the cat from A Child's Year and welded the shadow image to a pair of slippers, then flipped the cat and welded one to a pair of shoes.

I used the laptop, books and notebook paper from Locker Talk, the cat from Paisley on top of the books. 
I welded two trees together from the Heritage cartridge and cut it out in two different greens to create the bush. I used the cat looking up at the bird from A child's Year.  I cut the cat out of white and green and just cut the green cat and shovel off the grass.  I glued the cat down first, then the bush.  I trimmed the extra bush parts off the edges of the paper.  I added a little brown ink to the grass and bushes.


Here they are again.  Since Beth did not have pictures to go with these particular stories, I created my own!

Watch for more pages to come!!

Sunday, January 23, 2011

We have a Short and Sweet Winner!!!

I really enjoyed reading all of your comments!!  I hope you were inspired by this fun blog hop!

I used Random.org to determine my winner #6 Katie who said:  I love your card:) The frame is so sweet! I plan on making my DH a steak dinner.

Katie ~ I need your address so I can mail out your candy!!!  My email is lapgar at cox dot net.

Congrats!!

Saturday, January 22, 2011

Short & Sweet Blog Hop


Welcome to the Short & Sweet Blog Hop!!  So happy to have you visit my blog!  You should have arrived from the uber-talented MYAMAGOO.  If this is your first stop, please go HERE to begin the hop (you don't want to miss out on any blog candy or project ideas)!

Here is a complete list of blogs in this hop:

>>YOU ARE HERE!<<

I have blog candy that I will share with you below!  Now let's get down to the "Sweet Spot"!

I was inspired to make the beaded hearts when I spotted a similar one in the Wedding aisle at Michaels.  Couldn't believe that someone would pay $5 for two of these.....

I purchased a package of white and irridescent beads and grabbed my Glossy Accents.  When I cut out the pieces of the card, I took the hearts from the layer to create my beaded hearts. 

I outlined the heart with Glossy Accents. 

Then I put the beads into the center.

Next, I put Glossy Accents all over the beads. 

Here is how they look before they dry. 

To make the card, I pulled out my Gypsy and opened up Lacy Labels.  I found a lacy label with hearts on it in the top row far right.

I welded the words from Nursery Rhyme and sized them to fit my card.  You can see the card in the layer behind.

Here are the pieces cut out.  The red paper is from the Imortal Love paper pad that I found at Joann's.
The finished card is 4 3/4 x 4 3/4.  I matted the front with the same metallic silver cardstock I cut the words out of.  I used Diamond Stickles to give the words some sparkle.  As you might have already guessed, this card is for my Valentine!!

Here is my blog candy!!!  In order to qualify, you need to be or become a follower and leave me a comment telling me what you plan to give to your sweetie (or friend) for Valentine's Day!

There is one last stop in our hop that you don't want to miss!!!  Click HERE to get to Sweet Sassy Diva's blog!

Have a Crafty Valentine's Day!

Friday, January 21, 2011

Blog Hop Tomorrow


Join me and 7 other talented ladies tomorrow for a Short and Sweet Blog Hop!!

I have been busy this week testing the new Gypsy/Imagine update so instead of posting my projects I have been playing!  I will have several new projects to show off next week!!

Monday, January 17, 2011

Gifford Farm layout

Tanner took a field trip with his preschool class last spring to Gifford Farm.  I am working on paring down the number of photos I put in his scrapbook as I tend to take way too many!!  Here are the top 7 photos!

I used Cherry Limeaid for the font.  I use Heritage for the windmill and the barn & tractor on the next page.  I used Old West for the wagon wheel.  In the photo, I put the wagon wheel right over the one on the cart.  I used it to ground the three photos together.  I cut out the windmill in red and silver with the intent of creating a layer, but ended up just gluing the silver on top of the red.  The boot and cowboy hat were cut out from scrapbook paper.

In this layout you can see the paper.  It came from a paper pad called All About Boys (I think) and I found it at Michaels.   
There was no shadow feature for the barn, so I cut out a second barn in black and used Hide Contour to hide all of the inside cuts.  In order to ground the barn with the photo mat, I used two different greens from my scrap pile to create this fringed grass.  I inked them with a brown stamp pad.
I am working hard at using some of my non-go to carts!!!

Saturday, January 15, 2011

Here Kitty Kitty

Here is a layout I made for my friend Beth.  Her cat Flower passed away last week.  I used a basic template that I keep on my Gypsy and added a few extra rectangles on it along with the cat, mouse and yarn.  You can see how I created the basic frame file HERE.

I found this cat on Cindy Lou and added Diamond Stickles.

This mouse came from My Community.

The yarn is from Create A Critter.  I found this cat paper pad at Michaels.

Here is the completed layout again just waiting for Beth's photos!