Copyright Information

Thank you for stopping by my blog! I hope you enjoy the things that I create and share! I do have a copyright on my original creations (see logo on my sidebar below).
If you create and post a creations based off of mine, please refer (with a link) back to my blog. Please do not use my ideas for files, profit or for contests. Thank you!


My Craft Goals for 2015

My Goals for 2015:

1. Update my goals for 2016 in January of 2016 :)
2. Maximize my crafting time!
3. Keep plugging away at scrapbooking photos!!
4. Learn how to Heat Press!!
5. Have fun!


Showing posts with label Beacon 527. Show all posts

Tuesday, March 17, 2015

I Do! Wine Glass

Today I am featured at The Buckle Boutique!  I am using some of the Glitzy Glitter Vinyl to decorate a wine glass.  I love this glitter vinyl - the glitter is embedded into the vinyl so it is smooth and easy to cut!  It is very sparkly!
I designed my "I DO" and welded a diamond to the "O" using my Silhouette Studio.  I used the Vinyl setting (and added a double cut) to cut out my design with silver glitter vinyl.
I pulled up the negative piece really easily!
I used my dental tool to weed out the extra pieces.
The last time I used glitter vinyl, I tried my usual transfer tape but the tape did not stick to the vinyl,  I ended up not using any transfer tape at all.  That is ok if you have one shape or image, but I love using transfer tape to keep my letters in place.  This time I used painter's tape and it worked like a charm!
I added some gems and seed beads to the bottom of the wine glass.  I used Beacon 527 glue to adhere the gems.
I added a bow.  This can be one of the bride's wedding colors or just her favorite color.  I should have used green for St. Patrick's Day today!!  

You can also see how the gems shine here!
The vinyl really shines too!  I just love this stuff!!!

Hand washing the glass is recommended!

RhinestoneBorder
Follow The Buckle Boutique at our Blog �// �Facebook �// �Twitter �// �Pinterest
Shop The Buckle Boutique at our Main Store and Etsy
Tips and videos for cutting our rhinestone sticker sheets can be found HERE
Are you a retailer who would like to carry The Buckle Boutique's products in your store?
Please contact us for wholesale pricing information.

Friday, November 7, 2014

JOY Wine Glass and Charm

Hello and Welcome to the Handmade Holidays Blog Hop 2014!

If you are looking for my the Frosted Designs Gift of Giving Blog Hop, please go HERE.
If you are looking for my layout for the Frosted Designs Friday Challenge (White Space), go HERE.

Lori here with a fun holiday gift project.  I decorated a wine glass and wine charm using Red Rhinestone Resin Self-Adhesive Sticker Sheets.

For a complete tutorial, please head over the The Buckle Boutique's BLOG.


Tuesday, September 16, 2014

Blinged Out Pumpkin

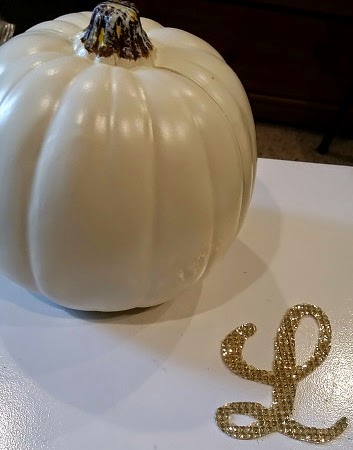
Halloween is my favorite holiday!!  I love the fall colors and decorating my house and daycare.  I found two different pumpkins on Pinterest that I loved - so I combined the two designs together.  I put my "L" on the front and gems on the top.

I purchased a 5 inch creamy white foam pumpkin from Michaels. 
My "L" was cut from a piece of gold Buckle Boutique Rhinestone Resin Self-Adhesive Sticker Sheet.  You can find these HERE (some colors are on sale right now too)!

I used my Gypsy with my cricut expression.  I got the "L" from Quarter Note.  I measured my pumpkin and determined the "L" should be around 3.5 inches.  I sized my "L" to 3.59 inches.  

I flipped the "L" to cut it out in reverse. 
The Rhinestone Sticker Sheets cut best face down on a sticky mat.  My mat is not as sticky as I would like, so I taped the edges down too.

Here are the instructions for cutting with a Cricut:

Cricut
  1. Use a deep cut blade
  2. Place your blade depth at 6
  3. Use a mulit-cut of 3 or 4 depending on how new your blade is
  4. Put your speed on slow
  5. Place the product face down on the Cricut cutting mat, making sure it is in a very sticky spot.  I usually run my hand over it to really make sure it is stuck down.
  6. Use Flip Mode on your Cricut  (since you have the product upside down, you need to flip the cut for the image to be correct when you flip it over)

Here is the "L" cut out.  I peeled the backing off and stuck the "L" on the flattest side of the pumpkin. 
It looks pretty, but I wanted a little more sparkle!! 
I purchased these gems from Michaels,  The pack includes clear, gold, dark grey and black crystals in 3 sizes.  I used Beacon 527 glue to adhere them to the top of the pumpkin.

I put 5 or so dots of glue on at a time and stuck the gems on. 
I am so happy with how this turned out!!

I hope you have a Blingy Fall!!


The Buckle Boutique's Link Listing
The Buckle Boutique's Website . . . click HERE
The Buckle Boutique Blog . . . . click HERE
Facebook Page . . . click HERE
Twitter Page . . . click HERE
Pinterest Page . . . clickHERE

Monday, September 1, 2014

Cheers!

Hello and Happy Labor Day!!

Today I am featured at my good friend Sheila's BLOG!

I made this set of wine glasses to donate to a very worthy cause.  I met a wonderful lady who organized a Women's Night at her children's elementary school where I was a vendor selling wine glasses last year.  Her friend recently was diagnosed with ALS.  They are having a Spaghetti Feed/Silent Auction on September 28th at the Fire Union Hall on 60th and Grover (Omaha) to help raise money for medical expenses.

For more information or to help, go HERE.

When I sell wine glasses, I do not use licensed images.  I made the exception since I am donating these glasses.   I used my cameo and vinyl to cut out Huskers.

I added some bling to the base of my glasses.  I used red, black and clear gems and clear tiny beads. 
 I put Beacon 527 on half of the base and put my bigger gems down first.
 I filled in with the smaller gems using a pair of tweezers to help.  I then put adhesive on the other side of the base and repeated.
 I put the small beads into a paper bowl and used my hand to press them into the empty spaces.

I let the glasses sit for 24 hours and then shook off the excess beads. 
I recommend hand washing only!! 
As a crafter, I love making things for other people whether I sell them or give them away.  I was very honored to be able to donate these!

The ice bucket challenge has been going around and I was challenged by 2 people.  My son Tanner was also challenged by 2 people.  My helper Kylie was challenged by one of our daycare moms (same lady who challenged me too)! 
We did our challenge together after school with the daycare cheering us on!!!