Copyright Information

Thank you for stopping by my blog! I hope you enjoy the things that I create and share! I do have a copyright on my original creations (see logo on my sidebar below).
If you create and post a creations based off of mine, please refer (with a link) back to my blog. Please do not use my ideas for files, profit or for contests. Thank you!


My Craft Goals for 2015

My Goals for 2015:

1. Update my goals for 2016 in January of 2016 :)
2. Maximize my crafting time!
3. Keep plugging away at scrapbooking photos!!
4. Learn how to Heat Press!!
5. Have fun!


Showing posts with label Disney/Mickey and Friends. Show all posts

Friday, May 3, 2013

Disney/Pixar Blog Hop - Autograph Book Pages


Hello and a Very Mickey Welcome to the Disney Pixar Blog Hop!!

I am the last stop of this Magical Hop today!!


Today we invite you to come check out this great  group of crafters who will be showcasing cards, layouts, or  projects featuring our favorite Disney Pixar Characters. 
Connie Can Crop is the first stop on this fun Blog Hop.
This is a one day blog hop and we appreciate  your leaving a comment to encourage all my fabulous crafty friends to continue  sharing their ideas and creations.  


We have an awesome sponsor and giveaway for this hop!
Original and hand-drawn, all images are unique and special, and inspired by her children. 
The Paper Nest Dolls will be giving away a $25 gift certificate to one lucky person. This gift certificate is redeemable at The Paper Nest Dolls  and may be used to purchase rubber stamps and digital stamps only.  
So what do you need to do to win? Easy...  become a follower of each of the fabulous blogs in this hop and leave each of us  a comment letting us know what you like best about our projects.  
Then come back to Connie Can Crop  and post that you followed  the rules.
You will have until 9:00 pm Sunday to finish the  hop and leave your comments. 
Be sure to follow everyone and leave a comment  along the way!
 Ready to join in the fun?


Here is a complete list of blogs in case you get lost along the way!


Now on to my project:

We are planning a trip to Walt Disney World this September.  Tanner will be almost 8 and this trip will be more about rides and attractions than standing in line for character autographs.

I am creating pages for our character meals and then decorating the rest for photos of our trip.


I LOVE re-using files on my Gypsy!!!

I re-used my Gypsy files from previous autograph books I made.  I changed up the designs and added some shadow images to create these pages.


I cut Disney from Mickey Font at 2.29 inches.  The banner flags are from Birthday Bash and sized to 2 inches.  The numbers are from Mickey Font and are sized to 1 inch.


I re-used the images from my 2010 album.  Here are the original pics:


Here is a shot of the pages with the autographs and pictures!


This time I wanted something different.  Note: I used stickers for the characters on these pages.  I find it very difficult to cut any Disney character smaller than 4 inches because the pieces get very tiny.  This time I went with silhouette shapes.


I used Pooh Font for the letters and sized them to 1.06 inches.

The pooh and friend images are from Pooh and Friends and are sized to 2.76 inches.

I cut them out in black cardstock.


I wanted to use the honey pots as banner flags.  I sized them to 1.32 inches in order to fit the letters.  I cut them out of yellow cardstock.


I used Crystal Palace - a previous welded design.  I welded a mickey head to the letters.  Inside the Mickey Head, I grouped (not welded) the C and P.  Mickey heads are 1.12 inches and the letters are .65 inches.

The rest of the letters will be used on another set of pages for our character meals at Chef Mickey and Tusker House.

Here are the updated pages:

My original design had giant honey pots in the center of the page.  This time, I made smaller honey pots and made banners with the character's names.  I added some hexagons behind pooh and color blocks behind piglet, tigger and eeyore.


I made tigger's banner bounce!

I used Tim Holtz Scattered Straw stickles to drip honey from the honey pots.  I pop-dotted the honey pots above the twine.


I pop-dotted the images on the pages.  I added an extra honey pot to Pooh's hand.


This may be our last trip to Disney for a while, so I am trying to use up my stash of Disney paper!!


I had this paper left over from our trip in 2011.  The back side was blue, so I re-used the 2011 papers to make the pages that will hold photos.


I re-used this file from my previous autograph books.  I welded 6 mickey heads ( 1.12 inches) together to make an 8 inch border.


I used the 2011 papers I had left over to make the following sets of pages.


These pages can be used for autographs or just photos.


The last time we went to Disney, Tanner surprised me by wanting to get autographs.  That was 2 years ago and I have a feeling he will be more interested in the rides this time!!  I am planning on more generic pages this time!!

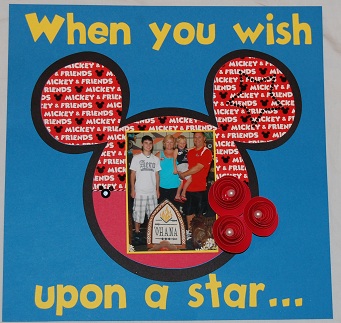
My last page in the album:

I cut out these Mickey and Minnie images on my Silhouette.  This is the paper after the cuts were made (the paper we typically toss).  I trimmed it to 7x7 and adhered it to a piece of red 8x8 cardstock.  I added the love to the bottom from a Silhouette image. 

This page will be the last page in the book.


In case you want to see them, my 2010 Autograph pages are HERE and HERE.

I hope you had a magical time here!!!


Sunday, November 18, 2012

When You Wish Upon a Star...

Today is Mickey Mouse Day at My Cricut Craft Room!

I made this layout from one of our recent trips to Walt Disney World.


I started out with this Mickey silhouette from Mickey Font sized to 8.76 inches.

I cut out the silhouette in black cardstock.  I hid the outer cut to cut out the Mickey head out of other paper (see below).

I opened another Layer on my Gypsy and put the words When you wish upon a star from Mickey Font sized to 1.24 inches.  I was able to see the Mickey head through the layer to make sure I had room for my words.

I thought I was going to use a star die cut, so I put one on my mat from Mickey and Friends sized to 3.12 inches.

I cut out the words and stars in yellow cardstock.  I wanted the ... not !!!, so I just used the dots.

I cut these swirls from Mickey and Friends (Icon key) sized to 5 inches and 5.35 inches

I cut them out of red cardstock.

I cut out two Mickey heads, one in solid red cardstock and one in Mickey paper.  I trimmed off the bottom half of the Mickey paper and adhered them together.

I used my tweezers to roll the swirls from the outside in to make the flowers.  I glued the flower to a 1/2"  circle (punched out from cardstock).  I used my Scotch glue to adhere the flower to the punch.
I stuck a pearl in the center of each flower.

I put this gem star on one ear.

Thanks for stopping by today!!  

To see more projects like this today please visit http://mycricutcraftroom.blogspot.com

Monday, June 18, 2012

Smash ~ All About Me

I just finished my second 2-page smashout.  I wanted a page all about me at the beginning of my smash book.

I started with a couple of my favorite photos and my 2 favorite colors:  purple and lime green!

I journaled with the help of my computer as my right hand is still in a cast.

I love taking pictures and creating scrapbooks!

I love Disney and my family :) not always in that order!!

I found this quote on facebook.
I used the following Cricut Carts:
Sophisticated for the font
MS Seasonal Art Cake for the banner
Cricut Everyday for the Scrapbook Queen and Cricut symbol
Graphically Speaking for got kids?
Art Philosophy for the doily, tag and parenthesies


Friday, November 18, 2011

Disney Pixar Blog Hop


Welcome to the Official Disney Pixar Blog Hop!!  You should have arrived here from Cindy.  If you found me first, please go to the BEGINNING so you don't miss out on the Grand Prize!!


We have a GRAND PRIZE for this Blog Hop donated by ContainYa Crafts! You can have YOUR CHOICE of a Scrap'n Tote or a Scrap'n Easel!  Each blog in this two day hop has a special letter, and when all of the letters are put together they spell out a secret phrase.


My letter is . . . . "r"


Once you have stopped at each blog in the hop and collected all of the letters, simply email the phrase they create to bloghopcontests at gmail dot com. All entries must be in by Midnight on Monday, November 21st. The winner will be announced on Tuesday, November 22nd at http://craftychicsblog.blogspot.com/

Here is a complete list of blogs in the hop:
Shawn http://craftychicsblog.blogspot.com/
Melissa http://www.disneydreamerdesigns.blogspot.com/
Tami http://tamiscraftconnection.blogspot.com/
Ellen http://cardmonkey-business.blogspot.com/
Madison http://www.funkycards.blogspot.com/
Cathie http://www.creativecutter.org/
Cindy http://www.snoflaks.blogspot.com/
Lori http://scrappinmystressaway.blogspot.com/****HERE****
Amy Chomas http://amychomas.blogspot.com/2011/11/disneypixar-blog-hop.html
Kathy http://kathyscozies.blogspot.com/
Amy Voltz http://www.lovetocrop.com/ 
 
 
We just took our Dream Vacation on board the Disney Dream Cruise Ship!  This photo was taken once we boarded the ship.  We went with Mike's parents and our three boys.  To say we had a great time was an understatement!

I wanted to make a special layout that I could display for a while in a 12x12 frame.  I started with some paper from the Disney Cruise kit I purchased on board and my Gypsy.


I used my Gypsy to set up my shot.  On Layer 2, I put a rectangle from George and Basic Shapes on my mat at 10x8 to represent the photo.  This makes placing the title and embellishments easier (not to mention I can get the right size).  

On Layer 1, I place my title and embellishments.  I usually change my mind a little as I create....as you can see here I initially had Dream Vacation on the bottom of the page. 

I welded the anchor borders (from Mickey and Friends) together so they would string across the entire page.
I then copy the images onto a separate Layer and arrange them on the mat in sections so I can place the paper colors where I need them.  I cut out two of the borders because I planned on layering them with pop dots.  The one Mickey Head was not doing much for me, so on a whim I cut out two more.

I cut out the anchors in silver cardstock ~ they are hard to see in this photo.

I used one Mickey head for the word Disney and tucked the other two heads behind the photo.  I put the title on the top.  I used Disney font and Pooh font for my title.  I used my negative paper to line up my words "Dream Vacation" on my page.
I tucked the second anchor border behind the one Mickey head and wrapped twine around both borders.  The Mickey in the lower left corner was printed on the photo.

I have some additional projects to share with you.


My Peace, Love and Mickey Hat:
I used vinyl to mask off where I painted my hat.  I adhered crystals on once the paint dried.

My Pirate Mickey T-Shirts:
I welded mickey ears to the skull and cross bones and cut out a template from freezer paper.  I ironed the freezer paper onto the shirts and painted with black fabric paint.
Here are my oldest boys and my in-laws at the Pirate Party.

My Autograph Pillow Cases:
I took these pillow cases on our cruise with us.  The wonderful cast members will take your items and have them autographed for you.  They deliver them to your room the last evening of the cruise.  I had our Hostess Suzana autograph them too.  She was stunned that I asked.  After asking me for the third time if I was sure, she grabbed the pen and signed before I could change my mind!  It was sweet!  We really liked Suzana!!
You can see how I made these pillow cases HERE.

Luggage Tags:

I also made luggage tags and used my YourStory to laminate them.  I was inspired by Sherri.  Ours are plain compared to Sherri's, but my family refused anything blingier!!!

My last Disney project to share is a digital layout.
I recently was asked to review My Memories Suite scrapbook software and once I got the hang of it I have surprised myself at how much fun I am having!!  If you are interested in this software, you can use this coupon code (STMMMS39803) for $10.00 off the program ($39.99 regular price) as well as $10.00 off your first purchase of additional pages and/or embellishments.  There is a ton of included pages and embellies, as well as a library of free downloads!!


Thank you so much for stopping by ~ this is one of my favorite blog hops!!!  Your next stop in the hop is the Awesome Amy!