Copyright Information

Thank you for stopping by my blog! I hope you enjoy the things that I create and share! I do have a copyright on my original creations (see logo on my sidebar below).
If you create and post a creations based off of mine, please refer (with a link) back to my blog. Please do not use my ideas for files, profit or for contests. Thank you!


My Craft Goals for 2015

My Goals for 2015:

1. Update my goals for 2016 in January of 2016 :)
2. Maximize my crafting time!
3. Keep plugging away at scrapbooking photos!!
4. Learn how to Heat Press!!
5. Have fun!


Showing posts with label Designer's Calendar. Show all posts

Wednesday, June 13, 2012

Cricut in the Daycare

Many of you know I have an in-home daycare in my basement.  I love using my Gypsy and Cricut in my daycare and here are some of my most-used (or still hanging up) projects.

This first one is a clock face from My Quiet Book.  I cut out the pieces at 10 inches.  I adhered the numbers to the circles and the circles to the clock face.  I poked a hole in the center with my dental tool (cricut tool kit).  Then I used my 9" Xyron to laminate it.  I punched a hole in the clock hands and laminated them too.  I used a brad to connect them together.

This will hang in the Kitchen Area but can also be used during Table Time.


I painted a piece of canvas red and cut out different letters from Cuttin' Up! in yellow and white cardstock to make my Alphabet Soup!  This was a PG project (Pre-Gypsy) so I was just cutting random sizes using capital and lowercase letters.  My son was the first to tell me which letters I missed!

We are teaching the children the months of the year.  I took 6 pieces of white cardstock (8 1/2 x 11) and cut them in half.  I took the months from Designer's Calendar and saw that November was the widest word.  I sized November to 11" wide.  I sized the other months to the same HEIGHT as November and cut them out.

For now, we use them in this pocket chart, but they could easily be made into a book.

Birthday Train!

This is another PG project!  I cut all of these pieces from Going Places and laminated them.  I used my computer to label the months.  I have had this train in my daycare for over 5 years!  I trim a photo of each child and place them in the proper car.

I am re-doing my Family board.  I have a lot of teacher kids who are gone over the summer, so I take the time to freshen things up.  I cut out 2" letters from 3 Birds on Parade for my title.  I used a piece of black foam core board and we hang photos of family members on the board.  This is good for the children to see mommy or daddy as well as their friends.

I use my cricut a lot with my daycare and will be better at sharing those projects with you in the future!!!

Please come back on Friday to see what my crafty space looks like clean AND dirty, as well as some of my organizational tips!!


Thursday, March 8, 2012

I Am Lucky

Today is my turn to Design at SweetSassyDiva's. 

If you are looking for my Spring Clean Craft Room post, go HERE.

Our theme is Luck of the Irish.  One of my students found a project on Pinterest and asked me to help her create it with the Gypsy.  I used her idea as a springboard for my own.

I started with this shamrock from Designer's Calendar sized at 11 inches and cut it out of green cardstock.

Next, I found Lucky from Sophisticated and sized it to 2.08 inches.  I cut out the shadow layer in gold cardstock and the top layer in green cardstock.  I cut out two sets.

There is a 1" square in the center of the shamrock that needs to be covered up, so I cut a heart from George sized to 1.82 inches.  I cut it out of gold cardstock.  I also cut out the words "I am" from Base Camp sized to .73 inches.  I cut them out of black cardstock.
I used the negative piece to cover up my photo collage.  
These photos represent why I feel lucky this year ~ my family and the vacations we took this past year.
I took the inner cut and the extra "Lucky" to create a second layout.

Here is the gold heart I cut to cover the square of the photo collage.  I taped it to the negative piece of black cardstock  in order to line up the words "I am".

I adhered the letters down and peeled the black cardstock away.

My letters are straight and evenly spaced!

I used foam squares to pop dot the word "Lucky" to my layout.


 I needed a page to go along with Tanner's St. Pat's Day layout from last year, so I used shamrock and the extra word "Lucky".
Here is my 2012 layout for how Lucky I feel!  Thanks for having me over today!!


Sunday, February 19, 2012

Mardi Gras Banner (Frosted Designs Tutorial)

This week our Fabulous Friday challenge at Frosted Designs is to use brads in your project.  I have been making banners lately.....a lot of banners.  They are just so fun to display.  Mardi Gras is coming up so I thought that would be a great banner!

When I think of Mardi Gras, I think of jazz music, masks, hats and the colors purple, yellow and green.  I grabbed my Gypsy and got to work.

I started with these banner flags from Birthday Bash.  I sized them to 4 inches.  Birthday Bash is a great cartridge for banners, it has several different banner flag shapes.

I got the Jester's hat from Don Juan and sized it to 1.59 inches and Mardi Gras sized to 1.94 inches.  I got the filagre from Don Juan and sized it to 2.76 inches.

I wanted a multi-colored jester hat and filagre, so I cut them out in three colors (also one in black for the jester hat) and trimmed them apart.

I pieced them together and added some gold stickles.


In order to create a layer for the phrase Mardi Gras, I copied another on on my mat and used Hide Contour to hide the inside cuts.
I needed more, so I found the mask on Designer's Calendar and sized it to 3.12 inches.  I cut it out in purple and white, and trimmed the white mask for a layer.  

I cut out the saxophone and trumpet from Quarter note and sized them to 3.12 inches and 1 inch.

My measurements seem odd if you just look at the measurements.  I start with the background piece (in this case the banner flag) and size the pieces to best fit the space.  If I intend on placing an image on an angle, I will rotate the image on my Gypsy screen before I size it.


I added some purple, green and gold stickles to my mask.
I needed a little something between the image and the banner flag, so I grabbed a diamond shape from George and sized it to 3.24 inches.  I cut them out in yellow.

I ended up using only 4 of the diamond shapes because the jester hat and filagre had too much yellow and blended in.

I poked the brads through the green ribbon to attach the banner flags.  I tied on some purple and green ribbons for added pizzaz.


And here is my completed banner.  I hope I inspired you to create a project with brads or eyelets and join our challenge!!


Saturday, February 11, 2012

World Wide Marriage Day Blog Hop

Welcome to the World Wide Marriage Day Blog Hop.  Today we are celebrating Marriage.  You should have arrived from Enjoli's BLOG.  


  1. Tina- http://craftyandgreen.blogspot.com ***BEGINNING
  2. Gill - http://scrappincreationsbygillm.blogspot.com
  3. Jamie - http://myamusinglife.blogspot.com
  4. Anita- http://www.anitaandbugs.blogspot.com
  5. Susan - http://susanascorner.blogspot.com/
  6. Janet N- http://www.createatdreamscrapbooks.blogspot.com/
  7. Kimberly ~ http://scrappingrookie.blogspot.com/
  8. Barbara -http://barbarab3.blogspot.com
  9. Shannon Myiow http://my-o-scrappin.blogspot.com/
  10. Enjoli- http://mississippihippycrafts.blogspot.com/
  11. Lori-http://www.scrappinmystressaway.blogspot.com/ ***HERE
  12. Charity Adams http://adamsacres.com****NEXT
  13. Amy- http://lv2scrapandfibrofacts.blogspot.com/
  14. Jearise - http://lorbysworld.blogspot.com
  15. Shannon Magee -- http://purplelionpaper.com/blog
  16. Shawnee- http://www.blessedonthebrightside.com


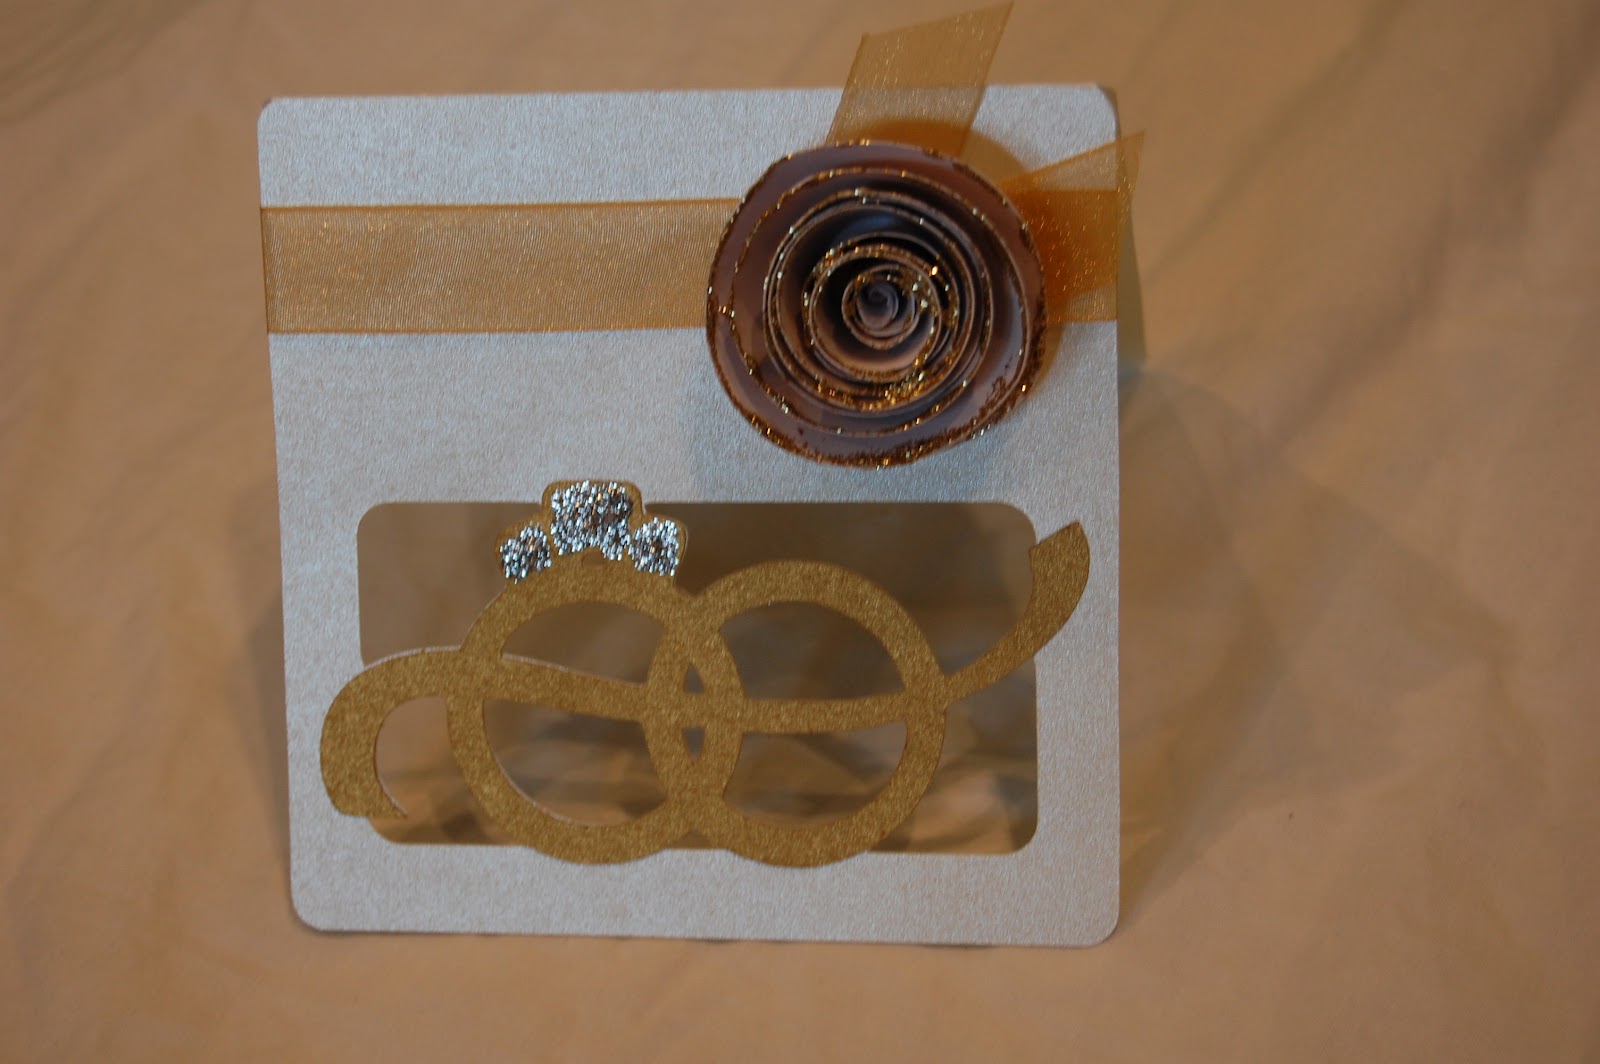
This September, my husband and I will celebrate our 20th anniversary.  Marriage is not just a wedding, it (like the commercial says) is a lot of little promises.  He has kept a lot of little promises in the past 20+ years!

I created a window card using the Decor Tag (shift) from Gypsy Wanderings.  I put two tags on my Gypsy mat at 4.66w x 4.50h.  I used Hide Contour to hide the inside cut on one of the tags.  I welded the two tags together to create my card base.

I took this ring image from Designer Calendar sized to 4.26w x 2.06h and welded it inside the window.  I copied a second ring image to use as my layer.

I used a shimmery white cardstock for my card.  I used a gold metallic cardstock for the rings.

I adhered the rings to the front of the card.

I created some bling with my stickles.


I used some gold sheer ribbon and a paper flower (left over from another project) that I cut from Art Philosophy with gold stickles on the edges.  So glad you stopped by!!

Your next stop is CHARITY!

Friday, August 19, 2011

Interactive Card Hop ~ Easel Card

Hi there and welcome to the Interactive Card Hop!!


You should have arrived from Ashley's Blog!  If not, be sure to go to the BEGINNING so you don't miss anything!  I am a scrapbooker most of the time, so I took one of the easy cards!!!  I made this card for my husband for our 19th anniversary next month. 

Here is a complete list of the cards you will see in this hop:

TENT CARD - MONICA http://scraps2treasure.blogspot.com/
STAIR STEP - RACHELLE LARSEN http://creationsbyrachelle.blogspot.com/
LADDER - SHAWNEE PENKACIK -http://www.blessedonthebrightside.com
SHAKER – PATRICIA -http://pattyandcharlie.blogspot.com/
SHADOW BOX - ASHLEY SCRAPPINPINKPIGLET
EASEL - LORI ***you are here
SINGLE/DBL/TRIPLE TWISTED EASEL - SUZANNE http://www.cricutcraftingrammyblogspot.com/
T-Slider - Stephanie - http://www.alwayscrafting.com/
DBL SLIDER - Brittany http://www.britkdesigns.blogspot.com/
POPUP TWIRL - HEATHER http://www.operationcricutdesign.blogspot.com/
DIAMOND POPUP – ANGIE http://atuttletime.blogspot.com/
SIDE LADDER - BLUE CRAYONS http://craftingwithblue.blogspot.com/
POPUP ACCORDIAN -CHRISTEL - http://onescrappinsista.blogspot.com/
WATERFALL - RACHELLE LARSEN
http://creationsbyrachelle.blogspot.com/
WIPER CARD - TERESA

I don't know about you, but I can't wait to see these cards!!


I had a little help with the design thanks to Splitcoast Stampers (LOVE THEM)!!  Click HERE for a link to Splitcoast Stampers Easel Card Instructions.

If you want to see my very first Easel Card, you can go HERE!

I started out with a 4x4 square on Layer2 because that is the size of the card face that I wanted to fill up.  I closed the "eye" on Layer2 so it would not show in this photo and confuse anyone (especially me)!!

Next, I went back to Layer1 and added this bride and groom from Wild Card sized at 2.36w x 7.48h on my Gypsy.  I copied a second couple.  I found the rings on Designer's Calendar sized at 1.50w x .72h.  I found the numbers on Base Camp and sized them to .61inches.  I welded the numbers and rings and rotated them 90 degrees.

I welded the numbers and rings first, then rotated them to see if they fit my 4x4 square.  I sized them to fit the space. 


Here is the years welded to the rings.

After I cut out the bride and grooms, I realized that if I layered the black paper groom on top of the white one it would look better to see the white shirt through.  So I copied the couple on another layer and used the Hide Contour button to hide two inner cuts on the groom's chest/stomach area.


Much better!!

I cut off the bride in black.  If you want to get more detailed, you can cut out an additional bride in the color of your hair (mine would be yellow) and then layer that on.

I ran my groom and the dates/rings through my 1" Xyron.  I always try to remember to rub the images to cut down on glue buggers (extra balls of adhesive).

Here are the bride and groom.

Next, I score my 4 1/4 x 8 1/2 piece of cardstock at 4 1/4 and 6 3/8 and fold with the bone folder.

I used a piece of paper from this awesome 8x8 paper pad by DCWV.

I put a strip of paper on the bottom of the card and added some diamonds (sticky back crystals) to the ring.

I used pop dots for my bride and groom.

I added a little silver ribbon, some mini paper flowers (found in the $1 bin at Michaels) and some silver and pearl flowers from my stash.

I cut some pieces of a pearl border and added some crystals for fun.  The big pearl acts as a stopper for the card.

Here is a side view.  We are laid back people (he he).

Here is my anniversary card for my wonderful husband Mike who lets me craft just about any time I want to!!

No blog hop is complete without a little candy along the way!!!


All you need to do to qualify is #1 be or become a follower or email subscriber, #2 share a favorite anniversary (of any kind) memory or gift you gave or receive.

Thank you for your kind words ~ they keep me crafting!!!  Your next stop on this hop is HERE!!