Copyright Information

Thank you for stopping by my blog! I hope you enjoy the things that I create and share! I do have a copyright on my original creations (see logo on my sidebar below).
If you create and post a creations based off of mine, please refer (with a link) back to my blog. Please do not use my ideas for files, profit or for contests. Thank you!


My Craft Goals for 2015

My Goals for 2015:

1. Update my goals for 2016 in January of 2016 :)
2. Maximize my crafting time!
3. Keep plugging away at scrapbooking photos!!
4. Learn how to Heat Press!!
5. Have fun!


Showing posts with label Home Decor. Show all posts

Monday, November 3, 2014

Fun with Burlap - Home Decor

Hello!!  Today I am excited to be featured at She's A Sassy Lady today.  I am a clearance shopper - how about you?  I found some wood signs on clearance for a dollar each at Hobby Lobby.  I used Goo Gone to remove the decorative paper that was glued on the wood.  I spray painted the wood black and then printed some fun sayings from Silhouette onto laminated canvas sheets.

I found the images on Pinterest and traced them on my Silhouette Studio Designer Edition.  I filled in the words and shapes with black or red and printed them out.
I inked the edges with Tim Holtz Vintage Photo ink and a sponge triangle. 
I glued tiny rhinestones to the little stars on the burlap. 
These look great in my family room, but will also make great gifts!

Here is a TUTORIAL to print burlap laminated sheets in your printer.

Thanks for having me on your blog today Sheila!!

Saturday, November 30, 2013

KCC Blog Hop - Gift Giving Ideas


decblogbutton

Fair well to 2013 soon it will be 2014. It is that time of year gifts are being purchased and made, and it is always wonderful to receive a handmade gift, there are so many great things to give. Some can be expensive some may not. We all are here to give you ideas for all occasions that you may be giving to another.
I am your host today, Lissa here at So Many Crafts, So Litte Time. I hope you enjoy our hop we will go out with a bang and bring you new things next year.

Today I am showing some different gifts you can make using vinyl.


The first two metal signs were purchased at Hobby Lobby.  I simply added the phrases from the Silhouette Online Store that I cut out in black vinyl.  I tied a tulle bow to the wire on top.

These make great gifts especially to young couples who may not have a lot of decorations yet.  You can also personalize them with their names.

My third project today is:


I took a 12 x 12 black metal frame from Michaels and added a Christmas piece of scrapbook paper inside.  I cut the image (also from the Silhouette Online Store) and cut it out of black vinyl.  I applied the vinyl to the glass of the frame.

I love using these 12x12 frames for home decor!  Sometimes, I remove the backing and hot glue the glass to the inside of the frame.  I put the vinyl on the glass and the wall shows through.

And now, onto the Blog Candy!!!

For today's blog candy Lissa is giving away a $10.00 Gift certificate to anywhere you choose that she can purchase online and send the gift card to you online. Preferably you will choose Close to My Heart for a Studio J layout but this is the time to give and she would like to give what you like to receive so good luck to every new and old email follower (required to win the certificate) and commenter who comments on the hop, hoping you make an effort on all the blogs.

Here is your line up for your convenience
Your Host..
Robin Lane ~ Create~a~Latte
Lori ~ Scrappin' my Stress Away****HERE
Christina ~ Crazy about Scrappin'****NEXT
Robin ~ Scrap n' Chat

Thursday, October 24, 2013

Halloween Charger Plate with The Buckle Boutique


I made this fun Halloween Charger Plate using Dazzling Diamonds from The Buckle Boutique and some vinyl.

I had orange Dazzling Diamonds and I really love Halloween - so it was natural for me to make a pumpkin!!

I grabbed my Gypsy and MyCutSearch.com and found a pumpkin I liked.


I put a circle on my mat to represent the inside of the charger plate.  This pumpkin is from Gypsy Wandering and is sized to 5 inches.  I cut this out of my Dazzling Diamonds orange sheet!!


The spider web is from October 31 and is sized to 5.82 inches.  I cut this out of white vinyl.


I used this flourish from Home Decor sized to 1.69 inches for my pumpkin vine.

I used this leaf border from Wall Decor and More.  I hid the inside cuts with Hide Contour and sized them to 1.59 inches.

I cut both borders out of green viny.


Here you can see how I layered the leaves and vine.


I grabbed the spider and the font Frightmares (from dafont.com) from my Cameo and cut them out in purple vinyl.


You put it all together and have a fun Halloween home decor item!


For more information on the Dazzling Diamond Sheets, check out:
The Buckle Boutique's Website . . . click HERE
The Buckle Boutique Blog . . . . clickHERE
Facebook Page . . . click HERE
Twitter Page . . . click HERE
Pinterest Page . . . clickHERE


Friday, February 1, 2013

Love (One Word Challenge)


I am starting another term at Frosted Designs and could not be more excited about it!!!  I LOVE being on this Design Team!  The sisterhood is so supportive and I have made several online friends!!

This week at Frosted Designs, our challenge is One Word - Love.  I thought this paper and photo made a great combination for the theme!

I found this Carte Bella paper pack "Devoted" at Archivers - LOVE it!!!

This photo was taken in August at my cousin's wedding using my cell phone.  It is rare that all five of us are together and DRESSED UP!!  The lighting wasn't the best, but I love this photo.


I wanted a big heart back drop cut out of the paper with words all over it.

I put a 5x7 rectangle on my gypsy mat Layer 1 to represent the 5x7 photo.

I opened up Layer 2 and sized this heart from George to 7.71 inches.

I opened up Layer 3 and added "love" from Home Decor.  By looking at the previous Layers I sized my title to 2.41 inches.

I added some hearts (George again) and sized them from 1 - 2 inches.

I cut out some hearts and flowers from Mother's Day Bouquet.

I used the paper below!

I LOVE this page from the paper pack too!!

I trimmed the blue paper 1/8" off of each side and adhered the reverse side of the paper used for the heart.  You can see just a tiny bit of the grey and cream pattern around the edges.

I inked the heart and white photo mat with maroon ink.

I used my glue pen to adhere LOVE to my layout.

I cut the paper strips from the "tag" along the front of the paper.   You know the part you cut off before you use it and if it is 2 sided it has a strip of the back side on it.  I trimmed out three of those and inked the edges to make these strips.

I anchored the paper strips with a heart and flower.


Join us at Frosted Designs for our Friday Challenge: One Word - LOVE!  You now have 2 weeks to enter our challenge for some awesome prizes!!!


Saturday, November 10, 2012

Christmas/Holiday Banners for Special Needs Kids (Day 2)

If you are looking for the FROSTED DESIGNS BLOG HOP - go HERE!!

If you are looking for the MY CALENDAR BLOG HOP - go HERE!!


Welcome to the Christmas Banners for Special Needs Kids!!  Today is Day 2 of a 3 day hop.  If you missed Day 1, please hop over to Ellen's BLOG to see some fabulous banners!  Ellen is also the beginning of today's hop and tomorrow's hop!

"In the eyes of children, we find the joy of Christmas. In their hearts, we find its meaning."

As joyous as Christmas is for most families, for some, their holidays are filled with worry, medical treatments and tests, and pain -- for their child must be hospitalized or she or he needs long-term care rather than being home with their families. 

For these kids, Santa doesn't slip down a chimney but rather, often comes in the guise of community volunteers who help make the season bright.  


This is the second Christmas season that our own band of dedicated and loving paper crafters have come together to make Holiday banners for children who are too sick to be home for the holidays.  Welcome to the Christmas Banners for Special Needs Kids blog hop!

I am especially pleased that this year, not only have our numbers of generous crafters swelled so our Hop is over three full days, but also, that we have partnered with another great cause and recipient of our banners!


By teaming up with Madison Womack's I FEEL THE LOVE PROJECT, the banners our crafters have handmade will be going to the hospitalized children at Children's Hospital Central California


Our wonderful sponsors are:


These sponsors have already agreed to contribute to our CHRISTMAS/WINTER HOLIDAY Blog Hop (November 10-17). Please patronize these vendors as our way of saying thanks!

  1. Susan Bermudez, Independent Consultant for Creative Memories, donating a $20 gift certificate for Creative Memories products from her catalog (http://www.mycmsite.com/sites/susanbermudez/).
  2. Lucy Kelleher, Independent Consultant for Close to My Heart, donating a $20 gift certificate for CTMH products.
  3. Scrappin' Madge: $25 Gift Certificate to The Scrappin Lounge Shoppe.
  4. Fresh Brewed Designs: Two prizes - One prize is a rubber stamp, Item #497 "Cutie Pie Ice Skating" (http://www.freshbreweddesigns.com/item_497/Cutie-Pie-Ice-Skating.htm), and the other is a $15 Digital Stamp gift card.
  5. The Paper Temptress (www.papertemptress.com) - Owner Patricia Dunbar will donate a $25 Gift Certificate to her online store, the Paper Temptress.
  6. The Pinque Peacock (www.pinquepeacock.com) - Owners Jessica Shelton will donate a gift certificate to her NEW store (products are being added daily -- watch as she grows!)


Here is a complete list of blogs in case you get lost along the way:


  1. Ellen ♥ CardMonkey - http://cardmonkey-business.blogspot.com/
  2. Jessica S - http://jessicascraftshaque.blogspot.com/
  3. Lezlye - http://lezlyes.blogspot.com/
  4. Lori - http://www.scrappinmystressaway.blogspot.com/
  5. Jenny D - http://www.yogimemories.blogspot.com/
  6. Lissa Marie - http://somanycrafts.com/
  7. Robin - http://scrapandchat.blogspot.com/
  8. Scrappin Madge - http://thescrappinlounge.com/
  9. Jeannie - http://polkacabana.wordpress.com/
  10. Rebecca T. - http://craftingwithrebecca.blogspot.com/
  11. Lisa T. - http://bitbythecricutbug.blogspot.com
  12. Kimi ~ http://lovebugcreations3.blogspot.com
  13. Beth~ http://motherandaughterdesigns.blogspot.com
  14. Dena ~ http://missdjones.blogspot.com/
  15. Patricia ~ http://blogs.papertemptress.com/
  16. Robin L - http://create-a-latte.blogspot.com/
  17. Jenny - http://crazyaboutcricut.blogspot.com/


First, let me show you the banner I made for today's post. I'll be sending this to Madison and the children at CHCC who are benefiting from the I Feel the Love project in December:

I started with this simple banner cut from train cars.
I found these train cars on Pop-Up Neighborhood and sized them to 4 inches.


I cut out the train cars with watercolor paper.  I used multi cut 2 times.

I also cut out the train cars in Christmas paper from K and Company.
Faith is from Home Accents sized to 2.76 inches.

Hope is from Home Decor sized to 2.65 inches.

Miracle is from Home Decor sized to 1.82.

Believe is from Gypsy Wandering sized to 2.06 inches.

I cut them out of black shimmer cardstock.


I added a little black stickles on the wheels and strung the cars together with tulle.


My second banner is what I call the Bonus Banner.  I used leftover pieces from another project that took on a life of its own and totally changed.  The only new part was the word Christmas!
I took these tags from Teresa Collins Christmas Sentiments (CCR Exclusive) cut out at 6 inches on Kraft cardstock. I stamped them with PinkByDesign's Distressed Music background stamp.  I used Walnut Stain ink for the stamp and to ink the edges.

The Trees were cut from Teresa Collins Christmas Collage (CCR Exclusive) and are sized to 5.35 inches.  I used chevron paper from Hobby Lobby to cut them out.

I used Storybook for the letters.  I sized them to  1.71 inches and cut them out of maroon cardstock.

I used some ribbon to string the banner pieces together.


It is such an amazing feeling to create these banners to help brighten the day of a child and his or her family.

Your next stop in this hop is my friend JENNY.


Monday, September 3, 2012

Nieces Are Nice Layout

Happy Labor Day!!  Today I am the Guest Designer over at She's A Sassy Lady with a spunky layout of my nieces.

****If you are looking for the Halloween Spooktacular Banner Blog Hop, please go HERE!

I love welding with my Gypsy and really wanted to make a unique background for this picture of Sophie and Sabryna.  I took random words that describe these two sisters and used a variety of fonts and cartridges to create my background.

I am not sure if this is subway art or not, but I have fun making backgrounds like this.  I added some hearts (George) and ready made words (Giggle, Whatever, Splish Splash, Dance and Diva) and created the rest.  Sophie shows horses and Sabryna has always loved piggies.  I think they are beautiful and made sure the picture was just under that word!

Here are the carts I used:  A Child's Year, Birthday Bash, George, Graphically Speaking, Hannah Montana, Home Accent, Home Decor, Mother's Day Bouquet, Rock Princess, Shall We Dance, Varsity Letter and Wall Decor and More.

I usually open a 12x24 mat and put all of my words on the right side initially.  I size them and place them on the left side until all the spaces are filled.  Then I re-size my mat (from the main menu) back to 12x12.  I weld everything together and cut.  I used blue cardstock and carefully mounted it to a light blue cardstock trimmed to 11.75" square.  I mounted the light blue cardstock to the same color blue cardstock I used for the word mesh.


I used Mother's Day Bouquet to make these flowers.  I sized the small ones at 0.73 inches and the bigger ones at 1.12 inches.  I cut them out of pink cardstock and added a pearl to the center.

My sister-in-law took this photo of the girls on picture day last year.  I used mostly blue to match their clothes, but if you look closely you can see the pink flowers in the bush behind them.  That was all I needed for my accent color.

What a fun layout of my nieces.  This one just might be going in a frame for a while!!

Thank you for stopping by today!!


Thursday, April 26, 2012

Rolled Paper Challenge - Mini Flowers

This week at Frosted Designs, our challenge is rolled paper.  I have wanted to make these tiny flowers for a while now and decided to give them a whirl this week!

I took 4 different flowers from Art Philosophy and sized them to 1 inch.  I put them into groups of 5 each in each 1/4 of my mat.  I loaded four colors of cardstock:  yellow, pink, red and purple.

I cut out the flowers but had a little trouble with the reds.  Luckily I cut out way more than I needed for this project!  Originally I planned on putting the flowers all around the square cut out, but later changed my mind.

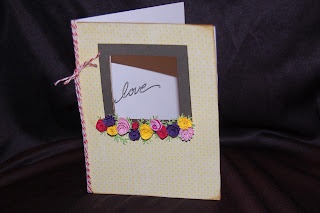
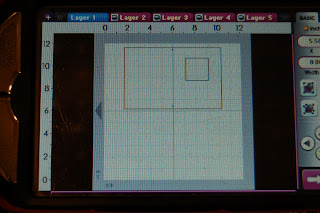
I found this card on Wild Card and sized it to 5.5 inches.


I flipped the card when I realized I wanted to draw the word "love" inside the card, showing through the opening.
I used this "love" from Home Decor sized to 0.61 inches.

First, I drew in "love" using my Chomas Gel Pen Holder and a black pen.  Then I returned to the design, changed layers to the card and put my blade back in.  I cut out the card.

I folded it over so the love shows through.
I borrowed this MS Branch punch from my friend Jenny and created my greenery.  Love this little punch but it has been discontinued :(

I used my paper quilling tool to roll up the flowers.  I glued them with Scotch liquid glue.

I decided to create a window flower box look.  First, I cut out another card in this yellow patterned cardstock, inked and adhered it to the front of the card.  Then I cut out the frame layer of the card in brown.  I trimmed the sides and top by 1/8" and inked it in brown.  I adhered the branches along the bottom and then used the liquid glue to adhere the flowers on.

I finished with a bit of twine along the spine (I am a poet)!

Here is my LOVE-ly window card!  I hope you join us at Frosted Designs with a rolled paper project of your own!