Copyright Information

Thank you for stopping by my blog! I hope you enjoy the things that I create and share! I do have a copyright on my original creations (see logo on my sidebar below).
If you create and post a creations based off of mine, please refer (with a link) back to my blog. Please do not use my ideas for files, profit or for contests. Thank you!


My Craft Goals for 2015

My Goals for 2015:

1. Update my goals for 2016 in January of 2016 :)
2. Maximize my crafting time!
3. Keep plugging away at scrapbooking photos!!
4. Learn how to Heat Press!!
5. Have fun!


Showing posts with label Martha Stewart Branches punch. Show all posts

Friday, July 26, 2013

Sled Card & Tag (Christmas in July Blog Hop)


Welcome to the Christmas in July Blog Hop!!

Hello All!!
And welcome to the Christmas In July Blog Hop!
We have some VERY talented ladies here today to show off some in the spirit Christmas projects for you today! Hopefully once you see the inspiration from this amazing group of women, you will not be worrying last minute about what projects you will make this upcoming holiday!
So sit back, relax, and enjoy the hop!!


You should have arrived from ANITA's blog, if not, please start HERE!!
We are SO excited to share our projects with you today, and as a little bit of added fun, we even have some prizes for you!!! Be sure to visit EVERY blog, post a comment, and follow them! That way you have a chance to win one of these prizes below:


$10 PAYPAL credit
Will be added to your paypal account for any crafty goodies you so desire

1 Smash Book Mini

I SVG of your choice from Craftin' and Stampin' Etsy Store


And now on to my project:

I made a card and matching tag set.  I really like the red runner sled and found one in the silhouette store.

I cut out a few sleds and tags.


I used my Martha Stewart Branch Punch to create the wreath for the sleds.  I added some stickles berries and a twine bow.

Behind the sled, I used washi tape to create a border.


Here is the front of the card.


I used a sentiment from Cardz TV stamps "Christmas Joy" on the inside of the card as well as the front of the tag.


I tied a red striped ribbon to the tag.


My card with matching tag are all ready for a special gift!

Thanks for stopping by today - I hope I inspired you to create a little Christmas in July!!!

Your next stop in the hop is HERE.


Here is the lineup if you get lost along the way!!!


Happy Christmas In July!!!
Thanks for stopping by!!!

Friday, May 11, 2012

Cricut Imagine Blog Hop Day 1 ~ Spring/Summer

 Welcome to the Spring Summer Imagine Blog hop! Our sponsor for the hop is Erica's Craft Room, you can find Erica's Craft Room shop here: http://shop.ericascraftroom.com/
Erica is offering a $25.00 gift certificate grand prize for the hop! To be entered in the drawing, please leave a comment on all the blogs with your name and a way to contact you. To help prevent spam, please leave your email address in a safe manner, ie. ssmith at hotmail dot com is best. The winner will be drawn on May 20, 2012. Please check back at any of the blogs on that day. You do NOT need to follow the blogs to be entered, just leave a comment please. Some of the blogs are also offering blog candy and you can check out the details as you hop.


You should have arrived here from My Bug and Me Create's blog. And if you are just dropping by and want to start the hop from the begining please start at Robin's blog here:  http://custom-comforts.blogspot.com/


Here is a complete list of blogs in this hop:


  • custom-comforts at http://custom-comforts.blogspot.com/ 
  • LauraLeesDream at www.lauraleesdream.blogspot.com
  • Cricut Crafty Clare at http://www.cricutcraftyclare.blogspot.com/
  • Scrappin Nanapuddin at http://scrappin-nanapuddin.blogspot.com/ 
  • Janet's Creative World at http://janetscreativeworld.blogspot.com/ 
  • LadyLuvBug at http://www.ladyluvbug.blogspot.com/
  • My Bug and Me Create - http://mybugandmecreate.blogspot.com  
  • ScrappinMyStressAway - http://scrappinmystressaway.blogspot.com/ ***HERE
  • Nana's Scrap Spot - http://www.nanasscrapspot.com/ ***NEXT
  • Scrappin' With Chriss and Lou - http://chrissandlou.blogspot.com/ 


  •  We have three birthdays in our family plus Mother's Day in the month of May, so I used my Imagine to create cards for everyone!!  Well not everyone, as my birthday is in there too!  

    Here are the rest of the cards I made:


    I used Enjoy the Seasons for the first three cards:

    I used the basket of flowers and the bunch of flowers for Mother's Day cards for my sisters-in-law.  My brother's birthday is the day before mine and he loves to grill, so I used the grill.  Bonus it is a charcoal grill which is what he uses!  I printed and cut out all three images.

    For the basket of flowers, I used some 1" flowers from Art Philosophy and my Martha Steward Branches Punch.

    I rolled my flowers with my brand new McGill tweezer and stylus set from my friend Jenny!!!  It was an early birthday present as she was afraid I would go buy it myself!!!
    I glued the branches down first and then the flowers on top.  I tied a purple ribbon around the basket and assembled the card.  Amie likes a little sparkle, so I added some purple gems to the card.
    My brother Kurt is pretty low maintenance but he loves to grill!  I thought this image was perfect for him!

    I inked the edges and layered it on the red mat.  I tied a piece of jute around the red mat and inked that too. I used some Glossy Accents on the smoke for some dimension.  BAM - great birthday card for Kurt (my brother who loves to grill on a charcoal grill)!
    My other sister-in-law is not girlie at all.  I thought the green background was too much so I decided to add a little pink....

    I used my Martha Steward lace punch on one edge and ran some twine across the pink paper.  I turned the card horizontal and pop-dotted the image over the top of the pink paper.  I left off the bling and glitter because I was afraid I would over do it and that is not Windy's style.

     
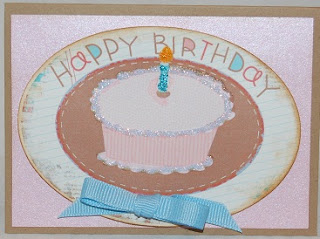
    Windy also has a birthday this week.  I used Imagine More Cards for the Happy Birthday cake image.

    I printed and cut out the cake.  I found some pink shimmer cardstock from my stash.

    I inked the edges with vintage ink and added a blue bow as blue is her favorite color.  I did add some glitter frosting on the cake.  I used stickles on the candle and flame also.
    I do have a Mother's Day card that I made from my Imagine for my step-mom HERE if you want to see yet another card!!

    Be sure to come back tomorrow to see a fun note pad I embellished with my Imagine!!


    Thanks so much for stopping by!!  Your next stop is Nana's Scrap Spot!

    Thursday, April 26, 2012

    Rolled Paper Challenge - Mini Flowers

    This week at Frosted Designs, our challenge is rolled paper.  I have wanted to make these tiny flowers for a while now and decided to give them a whirl this week!

    I took 4 different flowers from Art Philosophy and sized them to 1 inch.  I put them into groups of 5 each in each 1/4 of my mat.  I loaded four colors of cardstock:  yellow, pink, red and purple.

    I cut out the flowers but had a little trouble with the reds.  Luckily I cut out way more than I needed for this project!  Originally I planned on putting the flowers all around the square cut out, but later changed my mind.

    I found this card on Wild Card and sized it to 5.5 inches.


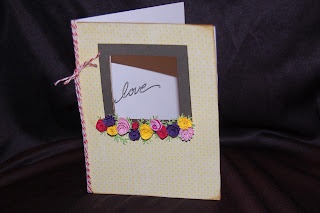
    I flipped the card when I realized I wanted to draw the word "love" inside the card, showing through the opening.
    I used this "love" from Home Decor sized to 0.61 inches.

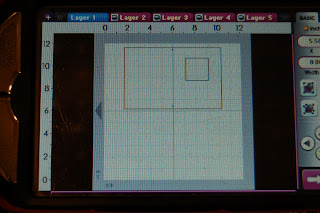
    First, I drew in "love" using my Chomas Gel Pen Holder and a black pen.  Then I returned to the design, changed layers to the card and put my blade back in.  I cut out the card.

    I folded it over so the love shows through.
    I borrowed this MS Branch punch from my friend Jenny and created my greenery.  Love this little punch but it has been discontinued :(

    I used my paper quilling tool to roll up the flowers.  I glued them with Scotch liquid glue.

    I decided to create a window flower box look.  First, I cut out another card in this yellow patterned cardstock, inked and adhered it to the front of the card.  Then I cut out the frame layer of the card in brown.  I trimmed the sides and top by 1/8" and inked it in brown.  I adhered the branches along the bottom and then used the liquid glue to adhere the flowers on.

    I finished with a bit of twine along the spine (I am a poet)!

    Here is my LOVE-ly window card!  I hope you join us at Frosted Designs with a rolled paper project of your own!