Copyright Information

Thank you for stopping by my blog! I hope you enjoy the things that I create and share! I do have a copyright on my original creations (see logo on my sidebar below).
If you create and post a creations based off of mine, please refer (with a link) back to my blog. Please do not use my ideas for files, profit or for contests. Thank you!


My Craft Goals for 2015

My Goals for 2015:

1. Update my goals for 2016 in January of 2016 :)
2. Maximize my crafting time!
3. Keep plugging away at scrapbooking photos!!
4. Learn how to Heat Press!!
5. Have fun!


Showing posts with label Bugbytes. Show all posts

Monday, December 9, 2013

Hair Stylist Snowflake Ornament


Hello and Happy December!!  

Today is my last Guest Designer Post over at The Bug Bytes

Today I am saying thanks to two very special people!

First, I am thankful for Pam for featuring my projects on her blog for over 4 years.  I first met Pam on the Cricut Message Board (Gypsy Forum) shortly after the Gypsy was released.  We had challenges each week to use different features on our Gypsy - which really forced us to learn the machine and share what we learned.  I started my blog back then after gaining confidence as a Gypsy Girl.

Not long after that, Sheila and Pam invited some of us to Guest Design on their blogs - what an honor!  I was so nervous back then!!!  Fun Fact - she taught me how to auto post my blog posts!!  This was HUGE for me!!!

Pam is very generous and shares her knowledge and advice when asked.  She also is very supportive and gives us plenty of encouragement and blog love!

As you may know, Pam is moving in a different direction and will no longer feature her Guest Designers on a regular basis.  I am hopeful to pop in every now and then!  I wish Pam the best as she re-focuses her crafty energy in 2014!!

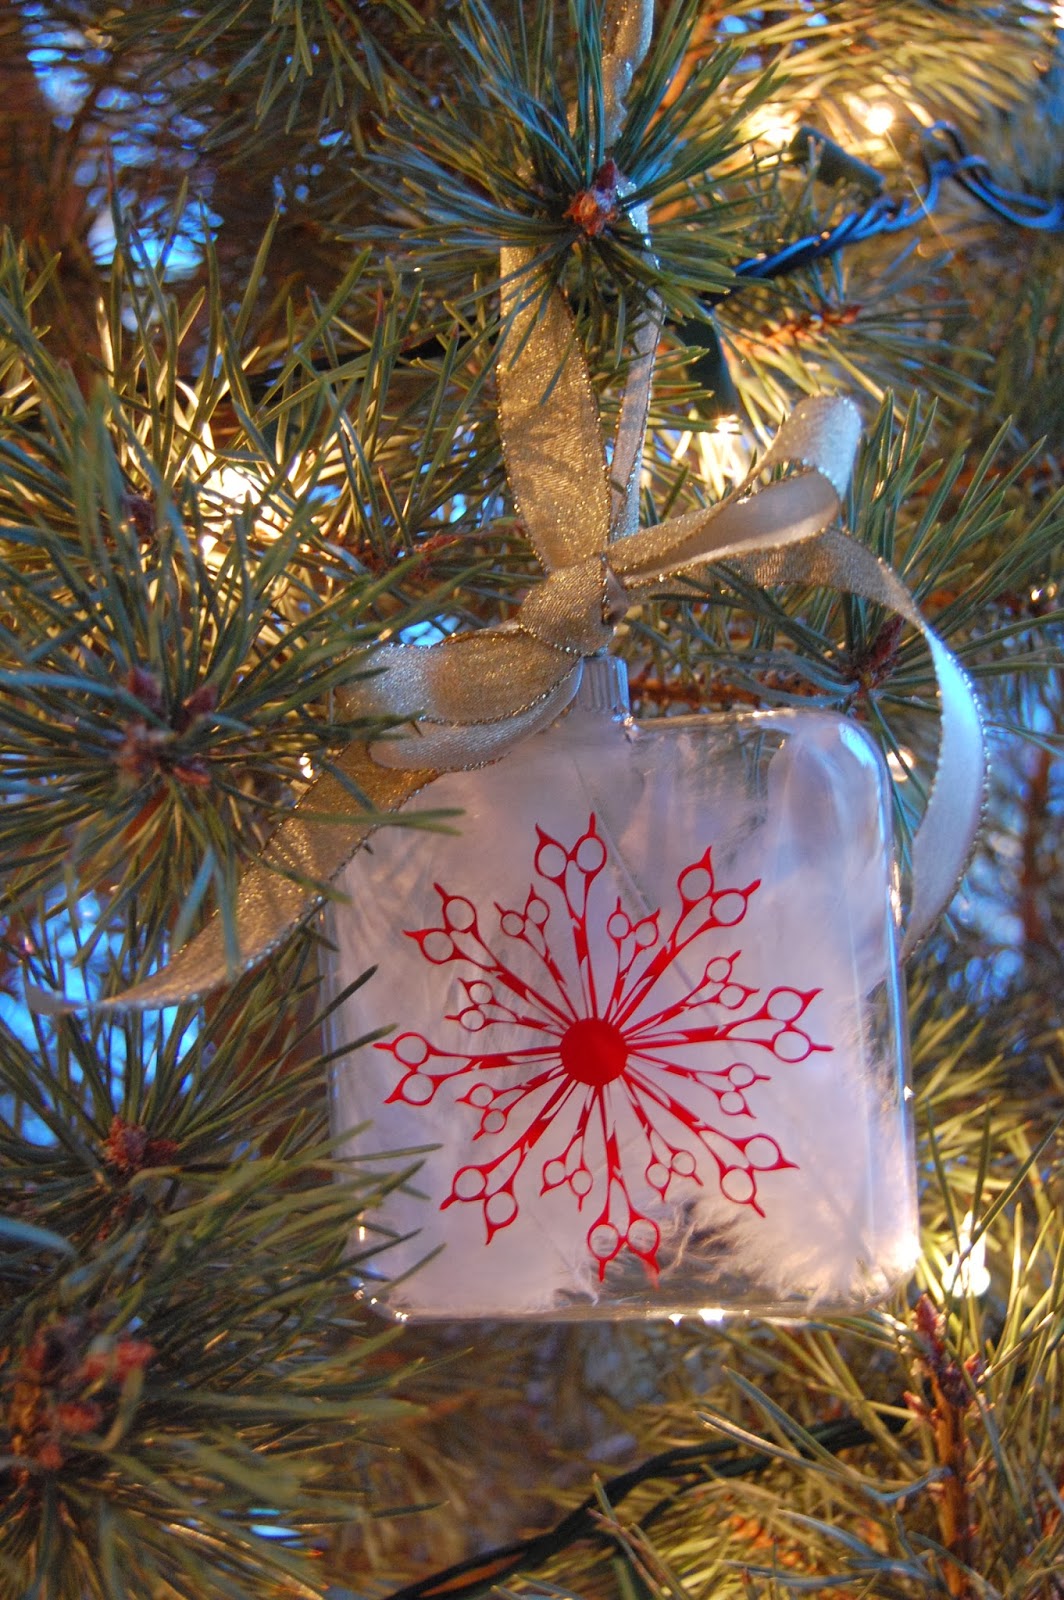
Second, I am thankful for my friend Karyn who makes my hair beautiful.  I made an ornament for her:


I now have a Cameo and am using Gypsy less and less.  I belong to a couple of Silhouette/Cameo groups on FaceBook who share files.  This file has been shared in one group and it is DARLING!!!  Someone designed a snowflake out of scissors!  My friend Karyn makes my hair look way better than I ever do!!!  I wanted to make her an ornanent with this snowflake.

I chose red vinyl because she loves red!


I wanted the snowflake to show up so I tucked a couple of white feathers inside this square glass ornament.  They remind me of angle wings!!

Thank you Pam for showcasing my ornament today!!  I hope you have a wonderful holiday!!

If you want to be added to the group in order to download this file, you need to be my friend on FaceBook.  If you are on FaceBook but not one of my friends, scroll down my blog and my facebook badge is in the sidebar.  Click it and you will go to FB.  You can friend request me (Lori Johnson Apgar) and leave me a message here so I know to add you!


Monday, November 11, 2013

Shadow Box Gift (Sewing)

Hello and Happy Veteran's Day!  I want to say thank you to the vets and their families who fight (and support those who fight) for the freedoms that we enjoy!!

This is Lori from Scrappin' My Stress Away and I am excited to be on The Bug Bytes blog today!!

I have been working on some Christmas gifts for family and friends.  I saw an idea on facebook that was perfect for my step-mom who loves to quilt.
I purchased this phrase from the Online Silhouette Store.  Using the vinyl settings, I cut it out in red vinyl.

I purchased an 8x10 shadow box at Michaels.  I transferred the vinyl to the glass of the shadow box.

I found this image online:
I printed it on a piece of Square 1 Masterpiece 8 1/2 x 11 printable adhesive back fabric.  I trimmed it to 8x10 and adhered it to the back of the shadow box.  Good thing it is repositionable since I put it on upside down (so the hooks on the back would not work if she wanted to hang it).  I was able to peel it off and put it on the right way!!

This product is a safe alternative to vinyl and easy to work with.  If you want more information on it or want to order some, just go HERE.
I used glue dots to adhere some spools of thread from my grandmother's sewing kit on the inside. 
I included a card of buttons and a green wrapper from a needle along with another spool.  Since this gift is staying in the family, I did not mind using my grandmother's pieces.  Similar items can be found at flea markets.
I was really happy with the way it turned out.  I like the red because it will match her sewing room.

Thanks for stopping by today and I hope I have inspired you a little!


Monday, September 9, 2013

Halloween Decor


I know I am a wee bit early for Halloween, but Halloween is my very favorite holiday!!  I love to decorate - well everything Halloween!!!

Today I am excited and honored to be featured at The Bug Bytes!!!


I found these 8x8 metal tiles at Michaels in the Dollar Bin for $2.  They were 40% off and I was prepared to sand and paint over them.  To my great surprise, the design was a sticker that was super easy to remove!!!  I went back and picked up a couple more...well maybe more than a couple!!


I designed this myself on my Cameo.  I saw something similar on Pinterest, but I downloaded the font and stretched an image from the Silhouette store.  I always feel like I am cheating using someone else's designs from the Silhouette store as I love creating my own things.  I am just not as savvy yet on the cameo as I am on the Gypsy!!


I cut out my design in vinyl (for some reason I have a TON of lavender vinyl) using the vinyl settings on my cameo.  I also keep a separate blade for vinyl set to 2.  My cardstock blade is set to 3.  This extends the life of my vinyl blade.


After burnishing the vinyl, I peeled it up using transfer tape.


I did not take enough pictures of each project so excuse me as I jump back and forth with designs to keep the tutorial making sense.  My second project was made using an image I purchased from the Silhouette store (above) and I cut it in Square 1 Masterpiece (instead of vinyl this time but used the same settings and blade).


So, after burnishing and getting the vinyl (or square 1) on the transfer tape, I burnished it down onto the metal tile.


I painted over the vinyl with white acrylic paint.  I painted 2 light coats.  I wanted a streaky chalkboard look.


I peeled the square 1...


and vinyl off the metal.


I painted a bit of black on the edges.


I added some black dots to give movement to the witch.

I spray sealed them so the paint would not chip off and they are ready to go!!

Thanks Pam for having me over today!!!   I hope you have a wonderful fall!!!


Monday, August 12, 2013

Princess Gracie Banner


I am super excited to be on The Bug Bytes today!!

I made this princess banner for a very special little girl's 3rd birthday.  I am using my cameo a little more each week!!


I used a dress that I purchased at the Silhouette Online Store and created an offset layer.

On the left, you can see the card that I made by welding two of the offset layers together.  I cut out the pieces for the invitations for mom to make.  I accidentally cut too many glittery princess dresses and decided to make a banner out of them!


I cut out the offset layer in light blue since Cinderella is her very favorite princess (Princess Sophia is a close second)!

I have 8 dresses and only need 6 for her name, so I cut two of these princess crowns out of hot pink cardstock.  This cut came from a princess crown card layer that I purchased from the Silhouette Online Store as well.

I added pink gems to the crown.


I used one of my fonts from my computer to cut out her name.  I added clear gems to her name.


Last month, I won a very cool prize from The Buckle Boutique.  These rhinestones are actually an iron on product, but I used liquid glue to adhere them to my paper dress.  I loved that they were multi colored!!


Here is another shot of the dress.


I used my Crop-A-Dile to punch holes in the sleeves and strung the banner together with white tulle.


The camera does not do this banner justice!!  It is very sparkly!!


Happy 3rd Birthday Gracie!!!

Thanks for having me over today Pam!!!

Monday, July 8, 2013

Brothers Layout


Happy July!!  Today I am sharing my project over at The Bug Bytes.  

I get to catch up scrapbooking a bit in the summer and I recently posted a layout of my two younger brothers - you can see this HERE if you wish.  This page is my oldest (Kramer) and my youngest (Tanner).  These two are so much alike and Tanner really looks up to Kramer.


I am still a newbie with my Cameo and really haven't designed much (like I can on my Gypsy) but I am trying to use it more and more!!!  I used some cuts from the Silhouette Store for this layout.


Kramer is Tanner's hero so this phrase was perfect!!  I used some green gear paper to mat the phrase.  I pop-dotted it over the photo as I had extra couch showing on the left side!

I tucked some gears underneath.


I added some gears to the corners as well.


I love this font - very casual and fun.  I wanted "Brothers" for the title.


I like the "And Best Buddies" at the bottom of the page.

These two are super close.  Kramer recently moved out into his own apartment and Tanner misses him so much!!

Pam - thank you for having me on your blog today!!!


Monday, June 10, 2013

Easy Money Layout (Pinterest Inspired LO)


Hello!  Tanner finally lost his first tooth on December 30th.  He was 7 years old and one of the very last kids in his grade to lose a tooth!!

I saw the layout below on Pinterest a while ago and was finally able to scrap lift it!!

I really liked the title - substituting the tooth for the letter "o" - and wanted to copy that.


I used the font LD Mon Cherie from the Silhouette Store.  I left a space where the "o" would go.

I bought the tooth set also from the Silhouette Store and sized the tooth to fit the space of the "o".  I did cut the word Smile as well, but not the scary dental tools :)


Once I got the tooth the correct size, I moved it to another spot on the mat.


I cut out the letters in red cardstock.  I saved the negative piece so I could use it as a template.  I ran my letters through my Xyron.


I put my template at the top of my page and adhered the letters on.


I carefully lifted up the template and my title was perfect - just missing a tooth!!


I cut out the tooth and smile in white cardstock.

It is hard to see here, but I inked the tooth with a little bit of blue before I pop-dotted it down.


I used some white DMC floss to make dental floss and glued it down.


I added a little stickle sparkle to the dot of the "i" and as I did I was thinking of the gum commercial "Dirty mouth, clean it up {ding}"


I wound some white DMC floss under my title so my title was not just floating on the top of the page.  It was a bonus that it resembled dental floss.

This layout was difficult for me because I usually draw the colors of the photo out onto my page.  I did not have much to work with here, but I think it turned out just fine.

I journaled across the top of the photos.

I am excited to share this layout with my friends at The Bug Bytes today as well!!


Monday, May 13, 2013

Baby Boy Mini


I hope all of my mom and grandma friends had a wonderful Mother's Day yesterday!!!

A friend recently had a baby boy and I made this mini for her.

I started out with a chipboard album from Michaels that was burlap on one side of each page.  I flipped every other page over to have a burlap cover and back, as well as the middle two pages both burlap.

I cut out the boy pieces from my Cricut Imagine Nursery Tails cart at 2-3 inches each.

I painted the edges of the book pages with a bright blue and inked the images with the same color blue ink pad.


I covered these pages with a green leaf paper from my stash.  I cut out a star from George and trimmed off the pieces that hung a little over.  I included a photo mat on the next page for a crib photo right next to the key information (height, weight, length and date).  I included a little twine.


I used a brown patterned paper for photo mats and pop dotted these baby boy images to the edges.


I like to make a pocket in all of my mini albums and add tags and small pieces of matching papers for additional photos and notes.  I used my ATG gun to adhere the sides and bottom of the pocket to the page.

I added another photo mat and image to the last page.


I put some brown paper on the back of the album and tied ribbons to the rings.


This mini album can be used as a brag book for mom or grandma!!

I am sharing this project over at The Bug Bytes today also!!