Copyright Information

Thank you for stopping by my blog! I hope you enjoy the things that I create and share! I do have a copyright on my original creations (see logo on my sidebar below).
If you create and post a creations based off of mine, please refer (with a link) back to my blog. Please do not use my ideas for files, profit or for contests. Thank you!


My Craft Goals for 2015

My Goals for 2015:

1. Update my goals for 2016 in January of 2016 :)
2. Maximize my crafting time!
3. Keep plugging away at scrapbooking photos!!
4. Learn how to Heat Press!!
5. Have fun!


Showing posts with label Snow Friends. Show all posts

Friday, December 21, 2012

Note Pads for the Teacher and Staff


I made these note pads for Tanner's Teacher for Christmas.

I used scrap paper and black and red cardstock.  The paper is 3x5 blank note cards as my paper and my Bind-It-All to bind them together.

I used Nate's ABCs for the font sized to 0.85 inches.

I used Fabulous Finds for the background rectangle sized to 6.20 (Actual size).

I cut them out in red and black cardstock.

I tend to make my note pads in bulk!!  I trim my pretty paper scraps to 3x5 or a tad bit larger than 3x5 to use as covers.  I use watercolor paper or chipboard to back my scrapbook paper.

And for the support staff:
I used Snow Friends and some scrap paper to create these notepads for the support staff.

I cut the snowmen to 4 inches and used stickles to color in the details.

Tune in tomorrow to see the gift bags I decorated to put them in!

Sunday, December 12, 2010

Thank You Gift Blog Hop

Welcome to the Thank You Gift Blog Hop!  You should have arrived here from Julie.  If not, please hop on over to Joy to start at the beginning.

Just in case you get lost looking at all of these gorgeous gift ideas, here is a complete blog hop list for you.


Jen 
Lori ~YOU ARE HERE!! 

I made some quick and easy note pads to use as Thank You Gifts.  I love using my Bind-It-All to make note pads. I created these snowman note pads that can be used all winter long.  I cut the covers out of watercolor paper 3 1/8 inch by 5 1/8 inch using my paper trimmer.  I used 40 sheets of 3x5 blank notecards for my pages.  Because I make these frequently, I cut scraps of patterned papers into 3x5 rectangles so I always have some ready to go!

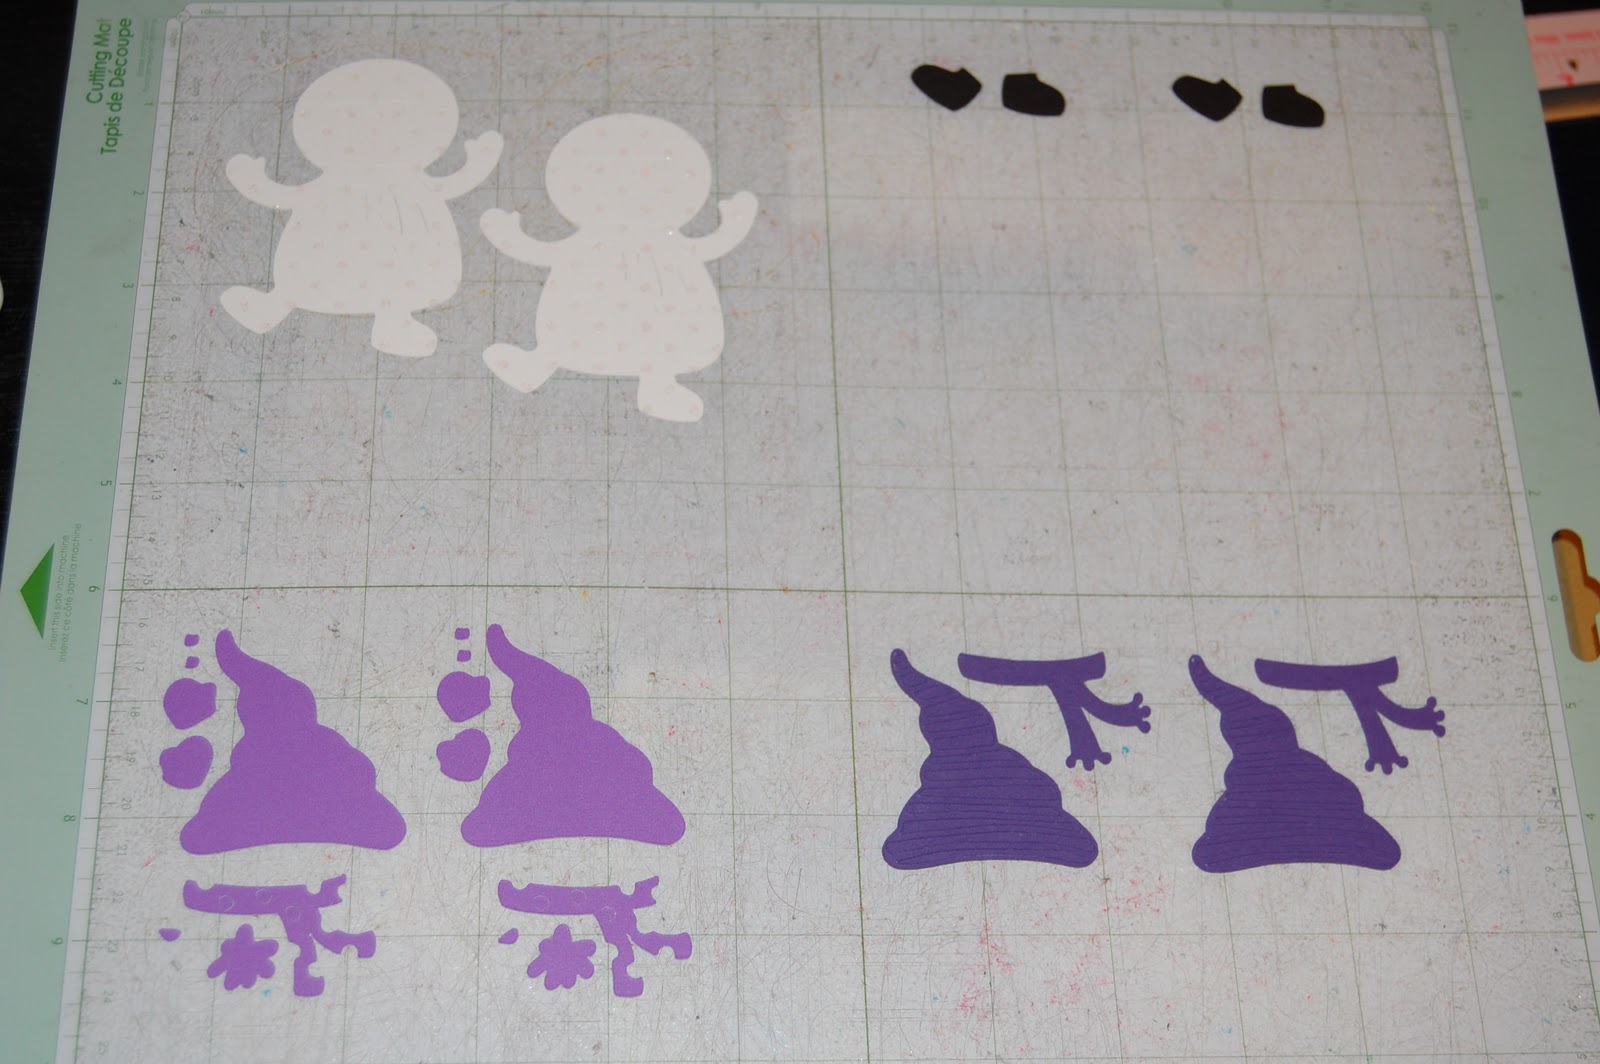
I found my snowman from the Snow Friends cartridge.  I put two snowmen and two of each of the layers on the mat.

On Layer 2, I placed a 3x5 rectangle so I could size the snowman.  I sized the snowman when it was grouped with all of the layers so they would all size together.  Then I duplicated it and separated the pieces on the mat by color of paper needed to cut.

I loaded my paper on the mat....

and cut out all of the pieces.

I did not use the face pieces or buttons.

Instead I used Black Diamond, Orange Peel and Crystal Stickles.

Here is the snowman after the Stickles dried.  I found some blue and white dotted paper in my scraps to use as a background.  I took one of the extra note cards and tore it into a snow hill for the background.

I used my ATG gun to adhere the snowman to the cover.  I put a piece of blue paper on the back cover as well.

I put the covers together.

I put them in the Bind-It-All together and pushed down the handle to punch the holes.


To assemble, take the back cover and flip it over and on top of the front cover.  Then feed the O Wire through the holes.

The seam of the wire should be resting on the inside of the back cover.

Place the notepad in the Bind-It-All and push down the handle to close the wire.

Flip the back cover up and over to the back where it belongs.

And here you have a binded note pad.

I added some ribbon to finish it off.  One of these note pads is going to my husband's secret santa person at work.  The other is a thank you gift for my blog candy winner.

Yes, you heard right ~ I have blog candy!!  In order to qualify for this candy, you need to be or become a follower on my blog AND leave me a comment telling me what you would use this note pad for.


I am so glad you hopped by today!  Your next stop is Mari

Saturday, February 6, 2010

Snow Day


This LO is based on the SOUS (Stuck On Us Sketches) sketch. I spent waaaay too much time on this layout! This was difficult for me for several reasons: First ~ I have all boys and I REALLY wanted to use purple on this LO. I struggled with the shade of purple, how much purple, how to tone it down...you name it! Then, I had to stretch it into a 2 page LO because I could never match purple with any other boy page!! I am also a 2 page scrapper 99% of the time. Finally, I agonized over the title ~ what to use as a title, could I stick a snowman in the title in place of a letter, do I need to title both pages, what color (originally I wanted purple but then black shadow with white and finally just black). I decided to spread the title over both pages.

I had to bling it up just a notch just because I could get away with it on a purple LO!!

I can't believe I spent half of the weekend on this!!! I could have completed a small album in the amount of time I agonized over this!! Oh well, each page is worth it once it is completed!

From my cricut library, I used Snow Friends for the snowmen, gloves, hat and snowflake. I used Winter Wonderland for the square snowflake. I used Ashlyn's Alphabet for the title.