Copyright Information

Thank you for stopping by my blog! I hope you enjoy the things that I create and share! I do have a copyright on my original creations (see logo on my sidebar below).
If you create and post a creations based off of mine, please refer (with a link) back to my blog. Please do not use my ideas for files, profit or for contests. Thank you!


My Craft Goals for 2015

My Goals for 2015:

1. Update my goals for 2016 in January of 2016 :)
2. Maximize my crafting time!
3. Keep plugging away at scrapbooking photos!!
4. Learn how to Heat Press!!
5. Have fun!


Showing posts with label Boys Will Be Boys. Show all posts

Saturday, April 20, 2013

Baseball Wreath (Green is Good Blog Hop)


Hello and welcome to the Green is Good Blog Hop!!!


We are creating projects out of something recycled or re-purposed.  There are tons of ways to get greener in everyday life and today we are showing off our creations to celebrate Earth Day 2013.

If you found me first, please head over to the BEGINNING so you don't miss anything (especially her blog candy)!!  

Here is a complete list of blogs in the hop in case you get lost along the way:


Now for my project:


My husband has coached baseball for 17 years so far.  We have several (and I mean a LOT) of baseballs in our garage.  I was able to get him to let me use 14 of them for a wreath project that I saw on Pinterest.  He grumbled something about "wasting perfectly good baseballs" as he collected them :)

He drilled a hole in each ball.  Look what came out of the middle!!


I untwisted a wire hanger and strung the balls on it.


I twisted the ends together using pliers.


I found this baseball glove on Boys Will Be Boys and sized it to 3.50 inches.


I re-used this banner flag.  It was an extra piece from another banner.  Both of my boys are playing on baseball teams and wearing blue.  

The red and white twine is from a Christmas candle.  It was tied around the top as decor and I kept it.


I inked the glove and layered the pieces.  I glued on some knots from leather cording to make the glove look real.


Here is a close up of the glove.


I strung the banner with the twine and a couple of strands from the burlap ribbon.  I tied the banner to the sides of the wreath.


I tied a bow out of burlap ribbon and attached it to the top of the wreath.

This wreath hangs on my front door!

Thanks for stopping by!!  Your next (and final) stop is Holli!


Monday, April 15, 2013

Baseball Pennant


Hi!!!  I am so excited to share my very first CricutDIVA post with you today!!  It is official - I am a DIVA!!!


My middle son is graduating from High School in just over a month (sniff, sniff).  He is also a baseball player (catcher) and I have been working very hard at making his graduation party decorations.

I was inspired by a post on Pinterest to create my centerpiece.


I started with my Gypsy Girl and opened a 12x24 mat.


I used the shadow of this pennant from Locker Talk sized to width 15.24 x height 7.12.

Once I sized the shadow layer to 7.12 inches, I put all of the pieces for the banner on layers of my Gyspy all sized to 7.12 inches.


I used watercolor paper to cut out the base of my pennant.  Watercolor paper is very sturdy and it cuts well on the cricut.  I use it for banner flags and mini album pages too.


I used multi-cut of 2 and the blade depth at 5 (which is the depth I use for cardstock). 


I put the pennant in the next layer of my Gypsy, sized the same.  I wanted the pennant to be white and the tassles to be blue, so I hung the tassles off the mats.


I cut out two in white cardstock, one for each side.  I trimmed off the edges and adhered one piece to each side of the watercolor paper layer.


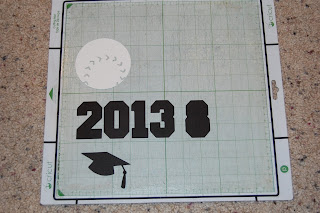
In Gypsy Layer 3, I put the tassels, borders and the numbers from Varsity Letter sized to 2.28 inches.


I cut them out in blue paper (I call this shade Titan Blue for my son's high school).


In Gypsy Layer 4, I put the baseball layer from Boys Will Be Boys sized to 6.15 inches.  

On the bottom half of the mat, I put the numbers from Varsity Letter sized to 2.28 inches.

I also put the graduation cap from Recess sized to 1.82 inches.


I cut out the baseball in white cardstock and the rest in black cardstock.


I decided later I wanted a second graduation cap so I copied and pasted one to the next Gypsy layer along with the base of the baseball.  I cut them out in black cadstock.


I opened a final Gypsy layer and kept the eyeball open on the tab so I could see the baseball base (shown in grey).  I copied the baseball onto this layer and sized it to 6.74 inches to create a shadow.  I cut the layer out in blue cardstock.


I adhered the blue tassels on the pennant.  I cut several strands of twine and tied a knot in the center.  I used my ATG gun to adhere them to the blue tassels.  Once adhered, I trimmed the edges of the twine.


I used my Sew Easy to punch holes in the border piece.  I used the red and white twine to stitch around the edges. 

I pop-dotted the border piece to the pennant.


I adhered the baseball layers and pop-dotted the number 8 (Tyler's jersey number) and the graduation cap to the pennant.

I used a liquid glue pen to adhere blue and white twine to the edges of the pennant.


Here you can see the dimension.


On the other side of the pendant, I adhered the numbers and pop-dotted the second graduation cap.

Before I adhered the border to the pennant, I used ATG to adhere a wilton cookie/cake pop stick to the pennant.  I reinforced the stick with some tape.  

I pop-dotted the border on with an extra layer of pop dots to account for the height of the stick.


Here is the reverse side of the pennant.


This will be a center piece for one of the food tables at Tyler's graduation party.

Thanks for joining me today!!


Monday, July 2, 2012

Baseball Glove Window Card


I am so excited to be the Guest Designer today at ShesASassyLady!!  Lori here from ScrappinMyStressAway with a fun window card.

Tanner's Coach Pitch Baseball season ended Friday night.  He got to play in the All-Star game which he called The All-Star World Serious!  Yes, serious ~ he has called the world series the world serious for years!!  This is the title of a near future layout!!!

***Side note:  we live near Omaha, Nebraska and get to visit the College World Series every year even if it is just to see the tents and shop.  We usually have baseball our own boys' baseball games to go to and can't always get tickets.  This year, we got to watch South Carolina's batting practice and Tanner got a baseball!*** 

  Back to Tanner:  He had a great year thanks to our two wonderful coaches.  He enjoyed playing catcher, first base, short stop and outfield the most!

I wanted to make a card for the coaches to say thanks.


I got out my Gypsy and got to work!
I found this window card base from Calligraphy Collection and sized it to 7.55w x 4.76h.

The glove is from Boys Will Be Boys and sized to 1.97w x 1.86h.  I hid the inside cuts and welded it inside the window. 

In another layer, I copied the glove and ball.  I added the baseball bat border (also from Boys Will Be Boys) sized to 3.39w x 1.16h.

I used the font from Varsity Letter and sized them to .88 inches.

I used cardstock to cut out all of the pieces.  I cut out the letters in red since we were the Reds!
I inked the glove, ball and bats with Vintage Photo ink.

I added a touch of red with the twine to finish it off.

This card is modified from a file I created last year.  My wrist is getting better - I can now cut simple cuts with a scissors YAY!!!  I have 5 more weeks of PT!!!  So grateful I can do some crafting, and so grateful that Sheila has me over today!!!


Friday, June 22, 2012

Soccer Card

Tanner got invited to a soccer-themed Birthday Party this weekend.  I wanted to make a fun soccer card.

I grabbed my Gypsy and got to work.

I grabbed the layers of this soccer cut from Boys Will Be Boys and sized the pieces to 4 inches.

To make the card base, I copy and pasted the shadow layer, flipped it and welded it together.

I positioned the pieces on the mat, separated by colors.

I used solid color cardstock from my scrap file and cut the pieces out.

I adhered the layers together and the card is ready to go!  I stamped Happy Birthday on the inside.

Monday, March 5, 2012

Look Mom....No Worms LO

Lori here from ScrappinMyStressAway.  I am scrapping Tanner's pictures from our annual Ozark vacation.  One of his favorite activities is fishing.  Mike and I are not big into fishing, but my brothers are and Tanner loves spending time with them.  He was very proud that he caught two fish without a "worm" on his hook.  He was using a rubber worm.
When I work on several pages that all go together, I will sketch them out.  Once my sketch is complete, I grab my Gypsy and get to work!!

I started out with this circle frame from Doodletype and sized it to 10.65w x 10.18h.

I cut it out of blue cardstock and placed it on a piece of Kraft Brown cardstock.

Here are my photos. 

I opened another Layer on my Gypsy and put my title on the mat.  I used Batman font and shadow.  The capital letters are sized to 1 inch and the lower case letters are sized to .76 inch.  

I added the waves from Going Places.  The image is a waterskiier on the waves, but I used Hide Contour to hide the skiier.  I sized the waves to 6.23w x 4.99h.  I copied and welded the waves to create a border (total size is 11.5w x 5.84h).  I copied a second border.

I used black cardstock for the shadow letters.  I used red cardstock for LOOK MOM and orange cardstock for no worms!  I went back later and added three more exclamation points so I could use the periods in red in the title.

I cut out the waves in silver metallic cardstock.  I have a hard time matching the color of the water so lately I have been using silver and really like the look.

I inked the edge of the paper and the edge of the photo mats with Vintage Photo Distress Ink.

I saved the cut out piece from my shadow letters and used it as a template to line up my words.  I ran my letters through my 1 inch Xyron and stuck them down.

I gently pulled up my "template" and my title was perfect!  This is one of my favorite things about using my Gypsy!!

I grabbed some worms from Boys Will Be Boys and sized them to 1.35 inches.  I found the fish from Paper Dolls for Everyday, Life is a Beach and Boys Will Be Boys.  I sized them at 2.29 - 2.65.

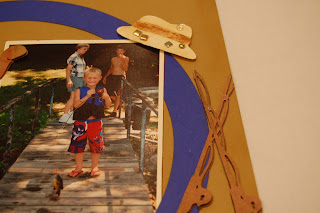
I found fishing poles from Boys Will Be Boys and Paper Dolls for Everyday.  I ended up using the ones from Paper Dolls for Everyday sized to 4.99w x 4.37h.  I thought the fishing vest from Paper Dolls for Everyday would look like Tanner's life jacket, but it did not so I did not use it.  I did use the fishing hat from Paper Dolls for Everyday sized to 2.48w x 4.86h.

I used inks and makeup sponges to color my cardstock.


Here you can see the green, blue and pink in the fish.  They are cut out of the same paper as the waves but look different.  I pop dotted some of them on my page and adhered the rest flat.  This gives dimension.

I added some metal brads and a clip to the hat to resemble pins and a fish hook.  I inked and cris crossed the fishing poles.

I love to handwrite my journaling so I cut out a larger worm (4.04w x 2.53h) in cream cardstock and journaled on it.  I tucked it behind my photo.

The other worms are peeking out from behind the photos too!  I tied knots in some twine and ran it across my page.

Here is my completed layout.


I included a shot of the layout that will go on the page next to it.  Thanks so much Sheila for having me over today!