Copyright Information

Thank you for stopping by my blog! I hope you enjoy the things that I create and share! I do have a copyright on my original creations (see logo on my sidebar below).
If you create and post a creations based off of mine, please refer (with a link) back to my blog. Please do not use my ideas for files, profit or for contests. Thank you!


My Craft Goals for 2015

My Goals for 2015:

1. Update my goals for 2016 in January of 2016 :)
2. Maximize my crafting time!
3. Keep plugging away at scrapbooking photos!!
4. Learn how to Heat Press!!
5. Have fun!


Showing posts with label Storybook. Show all posts

Monday, June 17, 2013

Nest Mini Album


I am a Cricut DIVA today!!!


I took a chipboard/burlap mini album from Michaels, a 6x6 American Crafts Color Crush paper pad (also from Michaels) and added my Gypsy to create this fun mini album.  

I flipped every other page so I would have two pages with the same papers together, then two pages with burlap.  Doing this makes the pages more bulky, so I purchased bigger rings.

I made this album with my friend Robin in mind.  She just opened a shop in March called Robin's Nest where she sells re-purposed items.  She is quite talented and her shop is doing very well!!


I used a bird from Sophie for the cover.  I sized it to 13.53 inches (2.42 inches using Real Size as this cuts with a bird cage).

I used Storybook for the font and sized NEST at 1.13 inches.


I used a piece of paper from the paper pad that was all different shades of green with a watercolor pattern.

I added the linen lace to the bottom and some gems.  It still needed a little something that I found a little later....


I found the sentiment "this nest is blessed" on 3 Birds on Parade for the first page of the album.
I sized it to 1.59 inches and cut it out of pink (light and bright) cardstock.


I pop-dotted it to the bottom of the photo mat so you can slide a photo behind it.


I added a bird from Sophie (shown two photos below) and I also pop-dotted it on the corner.


The next pages showcase birdies from Straight From the Nest sized to 1.25 inches.

I made a pocket using my ATG gun to put tags for journaling.  You can also tuck in extra photos and momentos.


I found the leaf wreath with bird on Lacy Labels and sized it to 6.35 inches.  I cut the wreath out of green patterned paper and the birds out of hot pink and dark blue-green papers to match the patterned papers in the album.

The word "Family" is from Letter Envy and I sized one for the cover at 1 inch and one for the inside page at 1.47 inches.


I like how the wreath frames the photo mat.


This tree came from the Heritage cartridge.  I sized it to 5 inches and cut it out of the dark blue-green cardstock.


The tree was perfect for the back cover!


Here you can see the bird is pop-dotted on the cover.


I added the word Family to the cover.  I have a theme with each mini album I make.  Even though many people get that a Nest is like a House for a family, I did not want people to assume I lived with all birds!!

I tied some ribbon to the rings to finish it off.

Thanks for being a DIVA with me today!!


Saturday, November 10, 2012

Christmas/Holiday Banners for Special Needs Kids (Day 2)

If you are looking for the FROSTED DESIGNS BLOG HOP - go HERE!!

If you are looking for the MY CALENDAR BLOG HOP - go HERE!!


Welcome to the Christmas Banners for Special Needs Kids!!  Today is Day 2 of a 3 day hop.  If you missed Day 1, please hop over to Ellen's BLOG to see some fabulous banners!  Ellen is also the beginning of today's hop and tomorrow's hop!

"In the eyes of children, we find the joy of Christmas. In their hearts, we find its meaning."

As joyous as Christmas is for most families, for some, their holidays are filled with worry, medical treatments and tests, and pain -- for their child must be hospitalized or she or he needs long-term care rather than being home with their families. 

For these kids, Santa doesn't slip down a chimney but rather, often comes in the guise of community volunteers who help make the season bright.  


This is the second Christmas season that our own band of dedicated and loving paper crafters have come together to make Holiday banners for children who are too sick to be home for the holidays.  Welcome to the Christmas Banners for Special Needs Kids blog hop!

I am especially pleased that this year, not only have our numbers of generous crafters swelled so our Hop is over three full days, but also, that we have partnered with another great cause and recipient of our banners!


By teaming up with Madison Womack's I FEEL THE LOVE PROJECT, the banners our crafters have handmade will be going to the hospitalized children at Children's Hospital Central California


Our wonderful sponsors are:


These sponsors have already agreed to contribute to our CHRISTMAS/WINTER HOLIDAY Blog Hop (November 10-17). Please patronize these vendors as our way of saying thanks!

  1. Susan Bermudez, Independent Consultant for Creative Memories, donating a $20 gift certificate for Creative Memories products from her catalog (http://www.mycmsite.com/sites/susanbermudez/).
  2. Lucy Kelleher, Independent Consultant for Close to My Heart, donating a $20 gift certificate for CTMH products.
  3. Scrappin' Madge: $25 Gift Certificate to The Scrappin Lounge Shoppe.
  4. Fresh Brewed Designs: Two prizes - One prize is a rubber stamp, Item #497 "Cutie Pie Ice Skating" (http://www.freshbreweddesigns.com/item_497/Cutie-Pie-Ice-Skating.htm), and the other is a $15 Digital Stamp gift card.
  5. The Paper Temptress (www.papertemptress.com) - Owner Patricia Dunbar will donate a $25 Gift Certificate to her online store, the Paper Temptress.
  6. The Pinque Peacock (www.pinquepeacock.com) - Owners Jessica Shelton will donate a gift certificate to her NEW store (products are being added daily -- watch as she grows!)


Here is a complete list of blogs in case you get lost along the way:


  1. Ellen ♥ CardMonkey - http://cardmonkey-business.blogspot.com/
  2. Jessica S - http://jessicascraftshaque.blogspot.com/
  3. Lezlye - http://lezlyes.blogspot.com/
  4. Lori - http://www.scrappinmystressaway.blogspot.com/
  5. Jenny D - http://www.yogimemories.blogspot.com/
  6. Lissa Marie - http://somanycrafts.com/
  7. Robin - http://scrapandchat.blogspot.com/
  8. Scrappin Madge - http://thescrappinlounge.com/
  9. Jeannie - http://polkacabana.wordpress.com/
  10. Rebecca T. - http://craftingwithrebecca.blogspot.com/
  11. Lisa T. - http://bitbythecricutbug.blogspot.com
  12. Kimi ~ http://lovebugcreations3.blogspot.com
  13. Beth~ http://motherandaughterdesigns.blogspot.com
  14. Dena ~ http://missdjones.blogspot.com/
  15. Patricia ~ http://blogs.papertemptress.com/
  16. Robin L - http://create-a-latte.blogspot.com/
  17. Jenny - http://crazyaboutcricut.blogspot.com/


First, let me show you the banner I made for today's post. I'll be sending this to Madison and the children at CHCC who are benefiting from the I Feel the Love project in December:

I started with this simple banner cut from train cars.
I found these train cars on Pop-Up Neighborhood and sized them to 4 inches.


I cut out the train cars with watercolor paper.  I used multi cut 2 times.

I also cut out the train cars in Christmas paper from K and Company.
Faith is from Home Accents sized to 2.76 inches.

Hope is from Home Decor sized to 2.65 inches.

Miracle is from Home Decor sized to 1.82.

Believe is from Gypsy Wandering sized to 2.06 inches.

I cut them out of black shimmer cardstock.


I added a little black stickles on the wheels and strung the cars together with tulle.


My second banner is what I call the Bonus Banner.  I used leftover pieces from another project that took on a life of its own and totally changed.  The only new part was the word Christmas!
I took these tags from Teresa Collins Christmas Sentiments (CCR Exclusive) cut out at 6 inches on Kraft cardstock. I stamped them with PinkByDesign's Distressed Music background stamp.  I used Walnut Stain ink for the stamp and to ink the edges.

The Trees were cut from Teresa Collins Christmas Collage (CCR Exclusive) and are sized to 5.35 inches.  I used chevron paper from Hobby Lobby to cut them out.

I used Storybook for the letters.  I sized them to  1.71 inches and cut them out of maroon cardstock.

I used some ribbon to string the banner pieces together.


It is such an amazing feeling to create these banners to help brighten the day of a child and his or her family.

Your next stop in this hop is my friend JENNY.


Monday, August 6, 2012

Glass Etching Makes a Great Gift

I am excited to be at She's A Sassy Lady today with a fun project.  My cousin is getting married.  I was 19 when she was born and she is just starting out fresh from college.

We had a "Shower in an Hour" themed shower for her and my assigned time was 9:00 am.  I decided to create a breakfast themed gift complete with handwritten recipe cards, some measuring spoons, and a baking dish for baked French Toast.  I wanted to personalize her dish.

I bought this glass 9x13 pan not realizing there was a glass stamp (if you will) in the center.  I should have bought the Pyrex brand.....
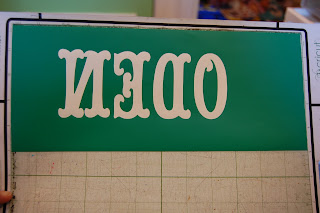
I put her married name-to-be on my Gypsy using Storybook sized to 4 inches.  I flipped it over and cut it out in vinyl.

When I cut in vinyl, I use 3-3-3 (speed, pressure and blade depth) to cut it out.


I used transfer tape to adhere the outline of her name onto the glass dish.  My friend Jenny stressed the importance of burnishing the vinyl on the glass to avoid any little bubbles or folds where the etching creme might sneak in.


Here is the Etching Cream I used.  I bought it at Michaels.  I put a thick coat on and waited 5 minutes.

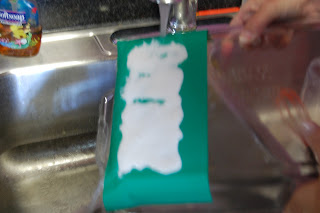
I rinsed it off in the sink.

I was so worried that it did not work!!

I dried it off still worried that it did not work....

but it did!!  Why was I so worried?!?

I really like how it turned out!  Thanks Sheila for your words of wisdom on etching!!!

I can't believe I forgot to take a photo of the card I made and the recipe cards!!!  Here are the cards I printed and cut out on my Imagine from Kate's Kitchen.  I included my mom's famous Banana Bread recipe, my Chocolate Chip mini muffin recipe, Baked French Toast, S'More Pancakes, and a couple more.

Now I am hungry for breakfast!!!

Thanks for having me over Sheila!


Friday, September 30, 2011

Royal Treatment Makeover ~ Frosted Designs Fussy Cutting

This week's Fabulous Friday Challenge at Frosted Designs is to use a "fussy cut" in your project.

One of my friends nominated me for a Makeover at our local outdoor mall.  There were three of us who won!  We got to model clothes (mine were from Coldwater Creek) and have our hair and make up done at Ulta.  I was so nervous, but had so much fun!!
I love this paper from K&Co. and had to work it into my layout!!
Here was my original sketch.  I knew I wanted to hide some photos, but I changed the background a little bit.

I opened a 12 x 24 mat on my Gypsy and started my layout.  I put a fancy page from Elegant Edges on my mat at 12.01w x 11.46h and rotated it -90 degrees so the flourish/swirl was on the side.  I put the border on the mat at 11.06w x 2.38h and rotated it -90 degrees.  I moved both of these items to Layer 3.
I found this flourish on Home Decor sized at 9.11w x 3.09h.  I copied a second one on, flipped it and welded it together to create this corner.  My good friend Sheila from ShesASassyLady first did this on a project a while back and I love the look!  I also copied a second border, sized it to 6w x 1.29h and welded a rectangle to it so I could sandwich it between a photo and photo mat.
Here is a close up.  I cut these pieces out in light blue shimmer cardstock.

I took a piece of 8x6 cardstock and folded it in half at the 4 inch mark.  I opened it up and adhered the two pictures I wanted hidden inside.  I sandwiched the blue border piece between the top photo and the cardstock to create a flap.
This is the photo I put on the top.  This young lady did a great job on my make up.  She graduated a year after my oldest son!
Here are the two inner pictures.


I found my title on Storybook and sized the letters to 2.23 inches and cut them out in silver paper.  I also found the word "beautiful" from Home Decor and cut it out at 1 inch.
I saved the negative piece of paper and used it as a template to adhere my letters down.
I accidentally threw this piece away and had to dig it back out!!!

I added some gems and flowers to my flourish.
I tucked in a few flowers by my photo.
I adhered the word beautiful right on my photo of the "after" shot.


Here is my before shot on the stage.  We went on stage before the concert started.

Here is my after shot after an hour of pampering.
Here is my fussy-cut layout all together.  Join us this week at Frosted Designs with a fussy-cut layout, card or project this week ~ we would love to see you!!