Copyright Information

Thank you for stopping by my blog! I hope you enjoy the things that I create and share! I do have a copyright on my original creations (see logo on my sidebar below).
If you create and post a creations based off of mine, please refer (with a link) back to my blog. Please do not use my ideas for files, profit or for contests. Thank you!


My Craft Goals for 2015

My Goals for 2015:

1. Update my goals for 2016 in January of 2016 :)
2. Maximize my crafting time!
3. Keep plugging away at scrapbooking photos!!
4. Learn how to Heat Press!!
5. Have fun!


Showing posts with label Lacy Labels. Show all posts

Monday, June 17, 2013

Nest Mini Album


I am a Cricut DIVA today!!!


I took a chipboard/burlap mini album from Michaels, a 6x6 American Crafts Color Crush paper pad (also from Michaels) and added my Gypsy to create this fun mini album.  

I flipped every other page so I would have two pages with the same papers together, then two pages with burlap.  Doing this makes the pages more bulky, so I purchased bigger rings.

I made this album with my friend Robin in mind.  She just opened a shop in March called Robin's Nest where she sells re-purposed items.  She is quite talented and her shop is doing very well!!


I used a bird from Sophie for the cover.  I sized it to 13.53 inches (2.42 inches using Real Size as this cuts with a bird cage).

I used Storybook for the font and sized NEST at 1.13 inches.


I used a piece of paper from the paper pad that was all different shades of green with a watercolor pattern.

I added the linen lace to the bottom and some gems.  It still needed a little something that I found a little later....


I found the sentiment "this nest is blessed" on 3 Birds on Parade for the first page of the album.
I sized it to 1.59 inches and cut it out of pink (light and bright) cardstock.


I pop-dotted it to the bottom of the photo mat so you can slide a photo behind it.


I added a bird from Sophie (shown two photos below) and I also pop-dotted it on the corner.


The next pages showcase birdies from Straight From the Nest sized to 1.25 inches.

I made a pocket using my ATG gun to put tags for journaling.  You can also tuck in extra photos and momentos.


I found the leaf wreath with bird on Lacy Labels and sized it to 6.35 inches.  I cut the wreath out of green patterned paper and the birds out of hot pink and dark blue-green papers to match the patterned papers in the album.

The word "Family" is from Letter Envy and I sized one for the cover at 1 inch and one for the inside page at 1.47 inches.


I like how the wreath frames the photo mat.


This tree came from the Heritage cartridge.  I sized it to 5 inches and cut it out of the dark blue-green cardstock.


The tree was perfect for the back cover!


Here you can see the bird is pop-dotted on the cover.


I added the word Family to the cover.  I have a theme with each mini album I make.  Even though many people get that a Nest is like a House for a family, I did not want people to assume I lived with all birds!!

I tied some ribbon to the rings to finish it off.

Thanks for being a DIVA with me today!!


Tuesday, March 12, 2013

Make Your Own Glue Dot Tutorial (Frosted Designs)


Hello Crafters!!!  Lori here from Scrappin'MyStressAway with a tutorial I have been wanting to do for a while.  My husband's grandma recently passed away at the age of 97.  When I met her, she was 75.  My mother-in-law is not a picture person (gasp!!) and I just recently saw some of grandma's photos from her youth when I was putting the picture boards together.  

She was a beautiful lady!!

I knew that this was a great opportunity for me to honor Grandma Kelly along with my tutorial!

Many of us use Glue Dots a lot for various projects.  A friend of mine shared her Glue Dot secret with me and I thought I would share it with you!! This will save you money (something Grandma Kelly loved to do) as well as give you more options than the store-bought dots do. 


You need 2 things: 

Aleene's Tack-It over and over glue.  I found mine at Michael's and used a 40% off coupon.

Wax paper or leftover sticker sheets.


I am using a leftover Glue Dots sheet.  I probably should have used something wider, but this worked!!

Simply squeeze the glue into the size dot you need.  You can also make lines of glue.

Let it dry.  

The smaller dots dry within an hour.  My large dots dried in about 24 hours.  The key is to plan ahead if you need a large dot.  

I knew I was making a flower out of ribbon, so I made my dot the size I wanted the flower to be.


The biggest dot was made on a sticker cellophane wrapper.  It is still a little white in the center a couple of days later, but dry enough to use.

These glue dots are much stickier than the Glue Dots from the store (which can be good or bad).

For my ribbon flower, I started in the center and wound the 3Girl Jam ribbon around and around.


I used my Cricut spatula to get the glue dot off the cellophane and positioned on my layout.


I like the ribbon flowers better than the 3D paper flowers I make with my cricut if I am putting the layout into an album.  The ribbon is more flexible (aka squishy when you close the page)!!

You can't see here, but I used a small glue dot to glue a pearl in the center.  I did not intend to, but the glue backing came off the pearl (hate when that happens) so it is good to have options!!


I used the medium sized glue dots to adhere the paper flowers on my layout, as well as the pearls in the centers.


I added some ribbon, metal flowers and gem flourishes.


For my smaller flower, I used my tweezers to position the glue dot on my page.  Then I wound the ribbon on it.


The tweezers also helped tuck in the end of the ribbon.


Grandma Kelly wrote on the front of a lot of her pictures!!  Yikes!!  In the corner of the photo you can see "Louise 1934" written in ink.  

I thought that would make the best title for my layout.


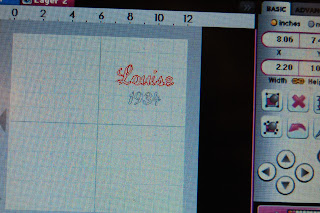
I used Quarter Note and my Gypsy to weld Louise.

I cut out Louise sized to 1.48 inches.  I cut out 1934 sized to 1 inch.

I used a label from Lacy Labels sized to 3.12 inches to adhere the title to.


I cut the letters and numbers and shadow tag out of red cardstock and the tag out of the reverse side of the patterned paper.


I slid the tag under the photo mat.


I love this photo of Louise, her eyes follow you!  She was 18 years old in this picture - her whole life was ahead of her.

I love creating glue dots in the perfect size for my projects.  I hope my Make Your Own Glue Dot Tutorial was helpful!

I am also linking up today at Pink Cricut!


Thursday, February 28, 2013

Sweet Birdie Gift Bag


Our Challenge for March 1-14 at Frosted Designs is Chevrons.

I dusted off my Cricut Imagine and my Lori's Garden cartridge to create a decorated gift bag.

I printed a chevron page with pinks and oranges.  I first tried to print an 8x10 rectangle, but it was going to print the rectangle horizontally, and I wanted to use it vertically.  My solution was to print the entire page.


My paper went from white to chevron - super cool!


I printed and cut this bird image at 8 inches.  The small bird was printed and cut at 2 inches.  The butterflies are for another project.


Here are my cuts!

I needed something to mat my bird.  I grabbed Gypsy girl and cut out a scalloped oval from Lacy Labels and sized to 8.35 inches.

The tag is also from Lacy Labels and is sized to 3 inches.

Both were cut out of cream colored cardstock.

I added a kraft brown gift bag purchased in bulk at Michaels and got out my glue and ink! 

I used inked the pieces with Vintage Photo ink from Tim Holtz.

I used a strip of paper on the tag to coordinate. 

I adhered the bird and swing on the oval, and the oval on the chevron paper.

I have a darling gift bag and matching tag set!

Be sure to join us at Frosted Designs and link up your Chevron project!!


Monday, January 7, 2013

Good Times in 2013 Jar

I am excited to be back today at She's A Sassy Lady.  I was a day off and posted last Tuesday (because I thought it was the first Monday of the month).  Lucky for me, Sheila did not have anything else scheduled so we left it posted.

  I don't know about you, but 2012 was a rough year.  At the end of the year, I had a hard time remembering the good things that happened (and there were some great things) because the bad things were really bad.  

My uncle passed away, my college-aged son had ACL surgery, my mother-in-law had rotator cuff surgery, my husband had kidney surgery, I broke my right wrist were the big things.

Please - I don't need sympathy - that is not the point.  The point is I want to remember the GOOD things that happen at the end of each year instead of dwelling on the bad things.

I saw one of these jars on facebook and had to create one for 2013!
I took a Mason Jar that was left over from my cousin's wedding (good thing in 2012) that I got to co-host the shower and make decorations (great thing in 2012).  

I wrapped some butterfly scrapbook paper around the jar.  I cut the paper to 2 x 12 inches.  I tied some white crinkle ribbon from 3 Girl Jam around the top and added some butterfly charms and a charm that says "inspire" because I was inspired to focus on the positive.

I used my Sizzix butterfly emboss and cut die that I got from Stampin' Up to cut out a page from an old book.

I used this image from Lacy Labels sized to 2.65 inches.  I cut it out of purple cardstock.

I inked one of the butterflies green and used a mini glue dot to adhere it to my label shape.

I used Hello Kitty Font sized to .65 inches (.53 inches for "in") for my title.  I cut them out of black cardstock.  My cricut was being naughty and did not cut out all of my letters, so I ditched the letters and kept the numbers.

I wrote "Good Times in" and added a purple gem to the butterfly.

Every time something good happens in 2013, I am going to write it down on a slip of paper and put it in the jar.  On New Year's Eve this year, I am going to read them all!!!

I am really trying to focus on the positive in 2013 and my One Word is SMILE.  When I smile, everything seems better :)

I hope you have a wonderful 2013!!!  I plan on it!!

Saturday, December 15, 2012

Gift Card Holder ~ Bug Bytes Holiday Blog Hop


Hello and Welcome to the Holiday Blog Hop!!!  Today's hop is a collection of Holiday (Christmas or New Year) crafts designed by the Bug Bytes Design Team Members.  We all take a turn designing at The Bug Bytes one day each month (I am on the second Monday each month).

You should have arrived from Denine!  If you found me first, please start at the beginning with our hostess with the mostest Pam

My DT Sisters are very talented so be sure to enjoy each project along the hop!  It is a short hop (only 10 stops) so be sure to check us all out!!

Here is a complete list of blogs in case you found me first:


And now on to my project:

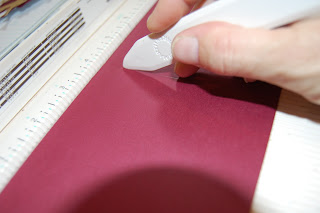
I designed my card to be a 4 1/4" square card.  The inside pages are sized to 4" x 6".  I scored one page at 4 inches.

The other page I scored at 2 inches.

After folding the two scored lines, the pages meet up like so to make a pocket for the gift card.

I cut a piece of cardstock 4 1/4 x 8 1/2 inches.  I scored it in half at 4 1/4 inches.

I used my ATG gun to adhere the inside page to the left side....

and then the right side, making sure my flaps lined up.

I adhered only the ends of the flaps to create a pocket.

I used my corner rounder to soften the look of the pocket.

Because this card was not going in the mail, I adhered ribbon under the front and back mat.  For the cards I made for my husband's employees that had to be mailed, I skipped this step.

I used Lacy Labels to create a layered label for a stamp and signature.

I sized these labels to 1.57 and 1.33 inches.

I cut them out of maroon and cream cardstock.

For the front of the cards, I used this gorgeous reindeer image from the Christmas Cartridge.  I sized them to 3 inches.

I used maroon and gold shimmer cardstock (hard to see the shimmer here though) to cut them out.
I used a stamp from Cardz TV Stamps for the sentiment.

I like how the layers look together - kind of like nestabilities.

I realized later that I should have made the signature area a bit bigger - but my husband writes small so it was ok.

I added the gift card and tied up the card I am using for my son's teacher,

All tied up!!  You can see the gold reindeer shimmer here!

Here are the cards for my husband to mail out.  I am very happy with how they turned out.

Thanks for stopping by today.  I hope I have inspired you!!!

Your next stop in the hop is my Awesome friend Adele!!