Copyright Information

Thank you for stopping by my blog! I hope you enjoy the things that I create and share! I do have a copyright on my original creations (see logo on my sidebar below).
If you create and post a creations based off of mine, please refer (with a link) back to my blog. Please do not use my ideas for files, profit or for contests. Thank you!


My Craft Goals for 2015

My Goals for 2015:

1. Update my goals for 2016 in January of 2016 :)
2. Maximize my crafting time!
3. Keep plugging away at scrapbooking photos!!
4. Learn how to Heat Press!!
5. Have fun!


Showing posts with label Paper Trimmings. Show all posts

Friday, February 15, 2013

Beach Bum - Bold Color Challenge


Today at Frosted Designs, our challenge is to Be Bold!  You can be bold in your colors, title or subject matter.

I took these pictures from our Mexico trip and scrapped them in bright bold colors.  We had so much fun in Mexico and I hope to return before my passport expires!!!  This page is for Tyler's album so the title is singular even though all three boys are in one of the shots.


I grabbed my Gypsy and found this image from Paper Trimmings.  I sized it to 11 inches to use as a backdrop for my photos.

I cut out this layer in orange cardstock.


I cut out the shadow of the image (also at 11 inches) and cut it out in bright polka dotted paper from Hobby Lobby.


For the title, I wanted Beach Bum but not the board shorts.  I grabbed this image from Life is a Beach and sized it to 2.65 inches.  I cut it out of blue cardstock (the same cardstock I used to mat my photos).


I trimmed off the board shorts.


I needed a bright embellishment and used my Epiphany Crafts square punch and punched a tag from Quick Quotes.

I ended up using the square of the larger flower.  I adhered it to the square charm settings (also Epiphany Crafts) and put a bubble cap on top.

I tied a bit of blue twine to the top.
I added some blue stickles to the title.


I stuck a little tissue tape below the yellow ribbon for a little bit of fun!


Here are my beach bums - the older two are burying the youngest one in the sand.  Bliss indeed!

What is your favorite vacation spot?


Monday, January 14, 2013

We Three Trees

Today I am sharing this 2 page layout at The Bug Bytes!

Each year I photograph our Christmas Trees and make sure to scrapbook them.  To say we love decorating for Christmas is an understatement!!  In addition to these three trees, I have one in the basement for the daycare and a white tree we did not put up this year.  That one holds my snowman ornament collection.

The gold tree was my mother's parents tree.  My mom was born in Chicago, Illinois and my grandfather was transferred to Omaha, Nebraska when my mom was a junior in high school.  Grandpa came to Omaha before Christmas to start working and Grandma and the kids stayed in Chicago until the house sold.  Grandpa saw this tree on display at Brandeis (a clothing store that eventually was bought out by Younkers) and had to have it.  They were sold out, so they sold him the display from the window and he took it on the train to Chicago with him.

My mom passed away in 1989.  When her parents (my grandparents) passed away in 2002, my Aunts were going to throw this tree away.  I jumped at the chance to take it home!  This tree has a rotating base, plays music (one song over and over) and has two large spotlights.  I don't use the spotlights because I prefer white lights on the tree.  This tree has such good memories of my childhood Christmas celebrations at my Grandparents house.

This was my original idea.  I saw a layout on facebook that used ornaments to create a Christmas tree and had some branches on the other side with a couple more ornaments.  

When I cut out the ornaments, I really did not like them.  They were the wrong colors, too small - just looked wrong, so I went back to Gypsy and searched some more.

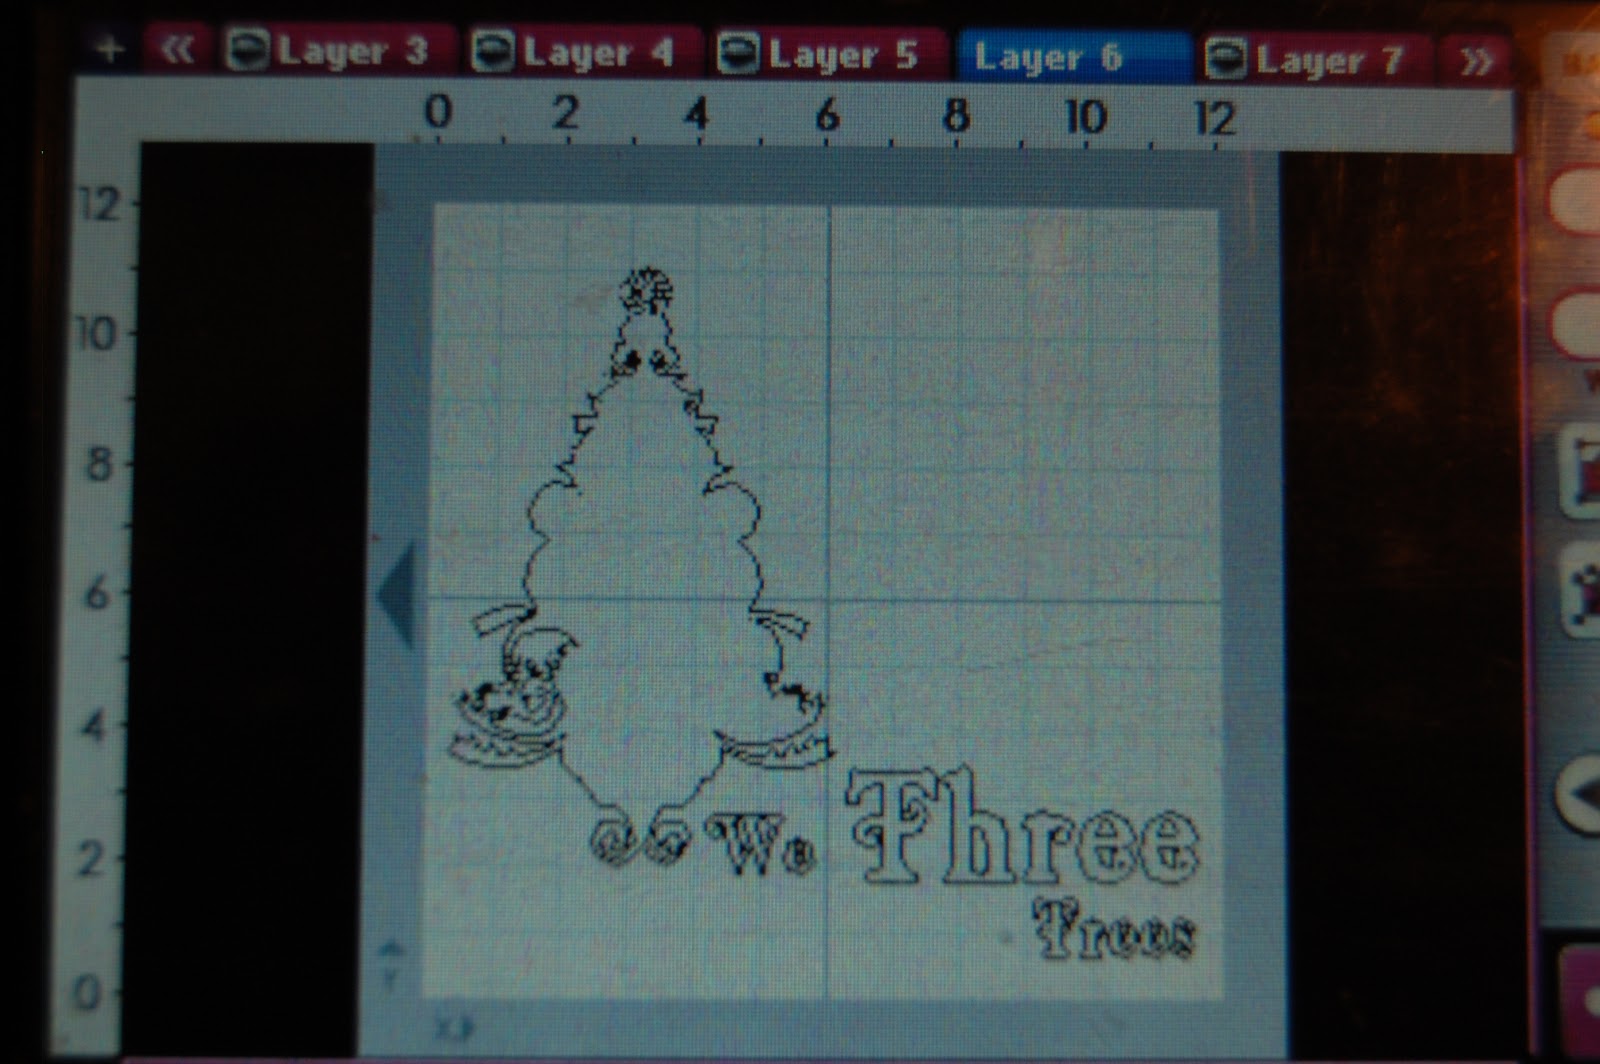
I found this tree in the Trim the Tree cartridge.  I sized it to 9 inches. 

We Three Trees came from Winter Woodland (love this font) and sized the letters 1" and 2".
Here are they layers to the tree and letters.

 
I cut out the layers in two shades of green.  I wrapped crinkle ribbon around the shadow of the tree and pop-dotted the top layer on.

I wanted to add something on the right page below the photos of trees.  My original thought was to put some presents, but like the ornaments, the papers I had did not really look good on the layout.  The patterns were too busy.

I opted for a gold ornament border that I found on Winter Frolic.  It is a border option and I welded three of them together and sized them to 11" wide.

I adhered them below the photos.

This tag came on a candle that I received in a Christmas gift basket.  I was so excited to see it was a Santa's Key!!  I had to use it in a layout!!!
I borrowed a branch die cut from my good friend Jenny.  She cut out these branches for me and I adhered them under the tag.

I journaled on the mat about each tree and where we placed them.

I added red stickle dots to the top layer of the tree cut. 

I cut two borders from Paper trimmings in red cardstock sized to 1".  I put the borders under the photo mats.

The left page showcases my Grandparents gold tinsel tree.

The right page showcases the entryway 12' tree and the live tree.
The layout all together.

Do you scrapbook your Christmas Trees?


Friday, June 15, 2012

Smash It Summer Fun!

I found some inspiration and decided to enter a Smash Challenge.  Smash books have been so ~ well scary to me!  I am great at collecting things but not great at Smashing....yet!

Karin from Smash Addicts posted a 2-page Summer challenge and I wanted to give it a try! 
I use my Gypsy most of the time so naturally I grabbed her and got designing.  Most of you know I broke my right wrist and I am right handed.  I can not easily sketch my layouts right now, but I can size up the pieces on my Gypsy!!

I used the font from Cherry Limeade and sized the letters to 1.5".
The pool is from H2O sized to 3.3"
The sun is from H2O sized to 1.5"
Home plate is from Baseball sized to 2.53"
The ball players, also from Baseball, are sized to 1.82"
I cut everything out from cardstock scraps.
I used Paper trimmimgs to cut out this 12" border of daisies.

Journaling is difficult for me right now, so I typed:
Soccer Mom
Baseball, Baseball, Baseball
In the pool
Vacation Fun
Flower Lust
I Love Summer
6-15-12, 22nd day in my cast

Everything else is from my stash.

Thanks for the inspiration!!

Tuesday, February 21, 2012

Slider Invitation

You are invited!!!!  Hi ~ Lori here from ScrappinMyStressAway with a super fun invitation for you!

I saw a slider invitation in Hobby Lobby's  Scrapbooking Magazine (1st Quarter 2012) and thought it looked like fun to make.


As usual, I grabbed my Gypsy and got started.

I lined up all of my elements on separate Layers.  I started with a 6x6 square.  I put a circle at 5 inches on the next layer.  
I put the doily from Easter 2010 on the next layer at 3.13 inches.
I put a scalloped oval from Art Philosophy on the next layer at 2.57 inches.
I put the fancy oval tag on the next layer at 1.25 inches (the size of the coordinating stamp).

I welded two butterfly borders from Paper Trimmings at 1 inch and put them on the next layer.

I opened yet another layer and copied all of the pieces onto one mat to cut them out.

I used white card stock for my doily, orange cardstock for my circle, and scrap paper for the rest.

I cut a 6 1/4 x 6 1/4 square from light blue cards tock.  I cut my striped paper 6x6 and adhered it to the blue card stock.

The blue scalloped oval is cut on 2-sided paper.  I don't like the blue side as much as I thought I would.


I flipped it over!  Much better.

I used the You're Invited stamp from CTMH ~ these stamps come with the Art Philosophy Bundle.

I cut out this butterfly (2.24 inches) from Hannah Montana to attach to the slide.

I only glued the center of the butterfly layer and bent the wings up just a bit.
Here is the closed invitation.  I hope you can come!!

Tuesday, January 17, 2012

Thank Ewe Card

This week at SweetSassyDiva's our theme is a Sketchy Card.
This is the sketch.


I saw these little sheep on Winter Frolic and wanted to make a card for my Aunt Chris.  She collects sheep.  I cut the sheep out at 1 inch.  I found the Square and Circle from Paper Trimmings.   I sized the square at 2.73 inches and the circle at 2.06 inches.  

I used black and white cardstock for the sheep.  I used a piece of  double sided cardstock from my stash for the square and circle.

I did not use the shadow of  the sheep because I flipped over the double sided cardstock.  I trimmed some strips from the double sided cardstock.  I weaved the green one throught the loops on the square.  This gave the illusion of grass.  I pop-dotted the sheep on for dimension.

My collection of stamps is very limited, so I used my computer for the sentiment.

'
I printed out my sentiment onto white cardstock and used the same burgundy cardstock from the front of the card to mat it.

Thank Ewe Bobbi Jo for having me over today!!!