Copyright Information

Thank you for stopping by my blog! I hope you enjoy the things that I create and share! I do have a copyright on my original creations (see logo on my sidebar below).
If you create and post a creations based off of mine, please refer (with a link) back to my blog. Please do not use my ideas for files, profit or for contests. Thank you!


My Craft Goals for 2015

My Goals for 2015:

1. Update my goals for 2016 in January of 2016 :)
2. Maximize my crafting time!
3. Keep plugging away at scrapbooking photos!!
4. Learn how to Heat Press!!
5. Have fun!


Showing posts with label Baseball Cartridge. Show all posts

Wednesday, January 22, 2014

Baseball Love


Hello!!  Today my layout is featured at Let's Scrap for our current challenge.  The sketch (below) is actually a card sketch, but I used it for my layout.


Tanner plays for the Papillion Storm Chasers select baseball team, which is partially sponsored by the Omaha Storm Chasers minor league baseball team.  Each select team had the opportunity to go on the field during the Star Spangled Banner with the Omaha Storm Chasers.  Mike and I were not able to go to the game since he was recovering from surgery in the hospital.  Tyler took Tanner for us and lucky for me another baseball mom took this picture.  I just love his smile!!


The boys really felt important being out on the field with the team!


I am looking forward to seeing Tanner on the field next year!!

Thanks for stopping by!!

Friday, October 19, 2012

Under the Lights Baseball LO

This week the challenge at Frosted Designs is Sports.  As a mom of three boys who all play (or have played) baseball, it is no surprise that I chose to create a baseball layout.

Tanner made the All-Star Team at the end of his coach pitch season last summer and got to play Under the Lights.


I used the lights from Baseball Cartridge sized to 12.37 inches to frame the 2 page layout.  I opened up a 12x24 mat on my Gypsy to set it up.

I used the All Star and Swish sized to 1.46 and 3.31 inches.  I used Lyrical Letters for UNDER THE sized to 1 inch and GAME sized to .88 inches.  I used Varsity Letter for LIGHTS sized to 1.77 inches.

I cut out the letters in white and red cardstock.

I cut out the lights in brown cardstock.

I used my cut page as a template to adhere my letters.


I pop-dotted the center photo to the page to give it a little dimension.

I tucked in some cardstock stickers.

I used yellow stickles to light up the lights.


Tanner had so much fun playing under the lights!!


Tuesday, October 4, 2011

Zombie Crossing


I saw a Zombie X-ing sign in a Halloween Costume flyer and thought "how fun" and decided to make one.  I wanted mine to be in the shape of the School Crossing signs.  I have the Street Sign cartridge, but the sign shape I wanted is not on the cart.  As a baseball  mom, I found a solution.

I put 2 home plates from Baseball on my Gypsy mat and welded them together.

I opened a new layer and copied my welded image onto it.  I enlarged it to create a shadow layer.

j
I opened a new layer and put the characters and words on my mat to fit inside the sign shape.  The Frankenstein and his bride are sized to 3.70 inches.  The words are sized to 1 inch.

In order to place my images where I want them, I copied and pasted the sign base onto my layer.  NOTE ~ I did not weld the sign I just grouped it with the characters.  Welding images inside a solid shape (the sign) will hide all of the inner cuts.

I cut out the smaller sign in yellow cardstock.  Notice I have the signs upside down so they look like home plate ~ oops!
I cut out the larger sign in black cardstock.
I cut out the characters and letters in black cardstock.  I adhered the yellow sign onto the black sign.  Then I placed the template cut over the sign.
I adhered the characters and words on the sign using the template as a guide.  I peeled the template off.
I hung this sign on the door to my home daycare for fun!

Tuesday, August 16, 2011

Baseball Coach Gift Idea

I made three of these for our baseball coaches as a Thank You gift.  I made a 4th one in different colors for our Team Mom.  Hers was made with blue paper instead of black, the background paper was white sparkly baseball paper (too girly for me to use in my son's book) and the team signed a pink piece of card stock instead of white. 

The team photo was from our 1st place finish at Districts.  We took 2nd at state, but that picture was not as "happy" as this one!

I did not do a tutorial for this one, but I do have a LINK to a previous tutorial.  All of my overlays are very similar.  I have three different versions saved in my Gypsy and they are easy to adapt with flipping and rotating.

Saturday, June 4, 2011

All About Dads ~ Blog Hop

Welcome to the All About Dads blog hop.  If you are just getting started, please to HERE to begin the hop.  If you arrived from Kathy's Blog, you are in the right place!

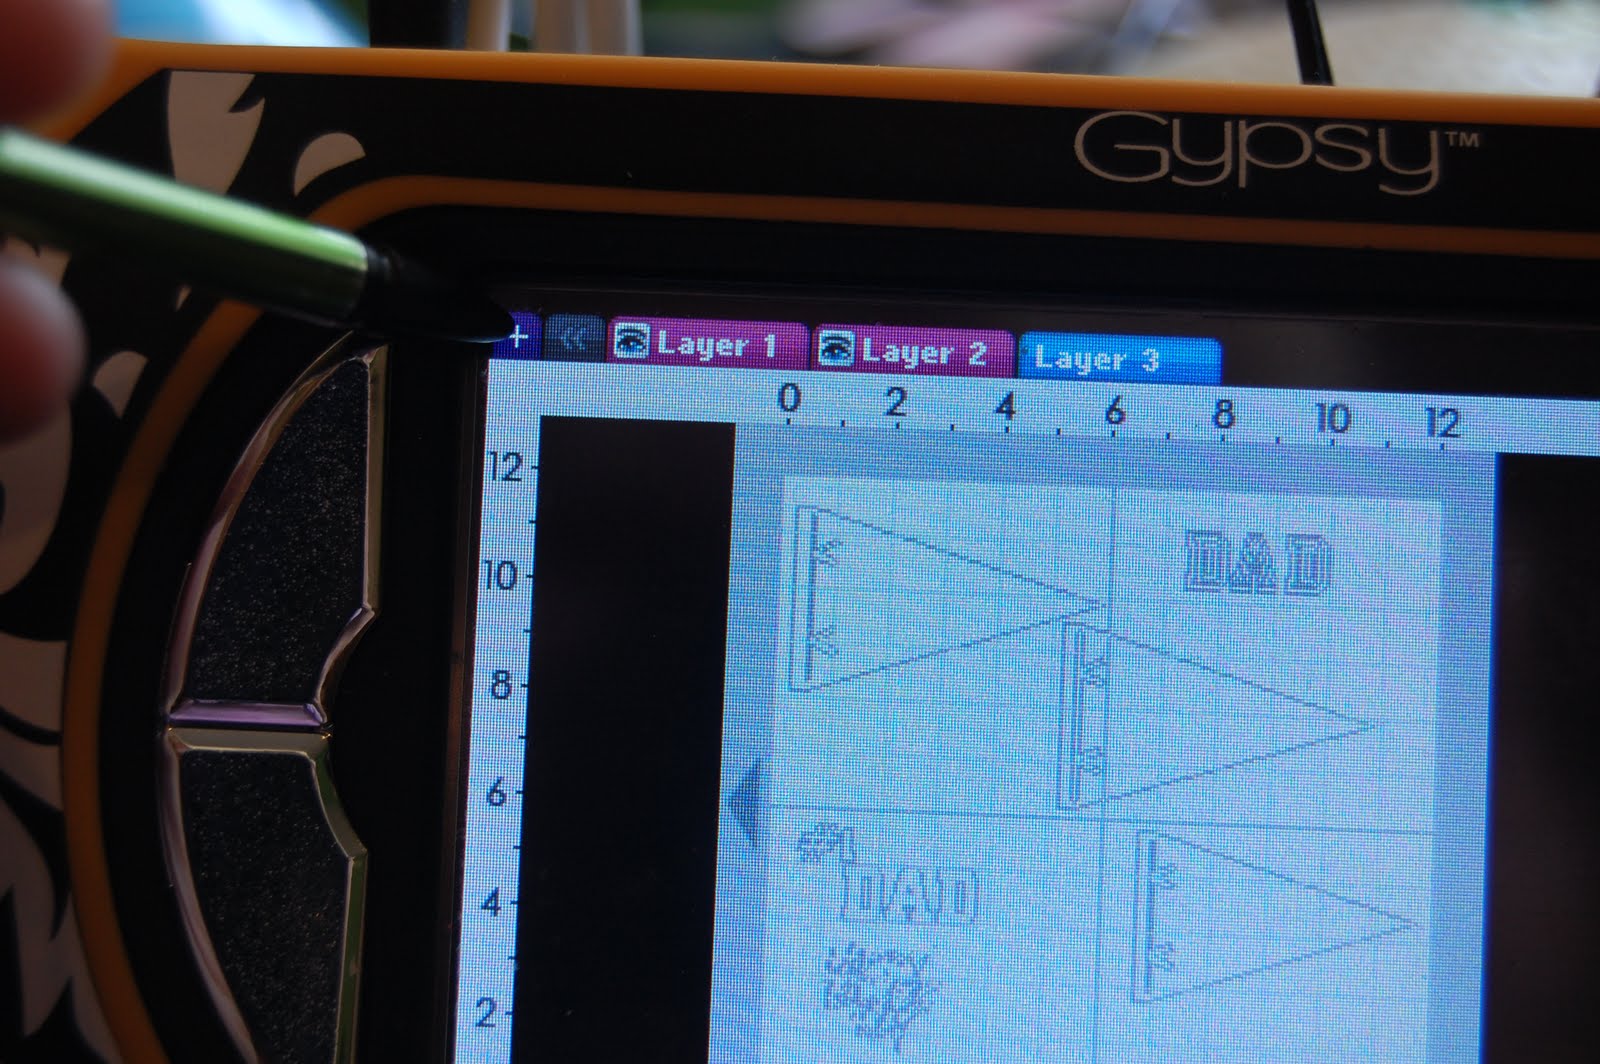
In our family, everything revolves around sports.  I am the only girl in the group and the only non-athlete!!  Thank goodness for my craft room!  I decided not to fight the sports theme and make my husband a Penant Card for Father's Day.


I used the penant from Baseball and #1 DAD from Varsity Letter.


This is what happens sometimes when I use cheap, thin paper and Calligraphy Collection cartridge.

I opened a new layer by tapping on the + in the top left corner.

I highlighted the #1 DAD and sentiment (turned them blue).

Went back to my new Layer and tapped on Copy/Paste from the Advanced Menu.  This way I only will cut out the parts I need to and not waste paper.

I load my paper back into the cricut.

This time the #1 DAD cuts fine, but the sentiment is chewed up again.  Time for a different font!!

I erased the cuts I just made and added a new sentiment from Wild Card.

I used the same paper, so I just made sure the new sentiment was moved over a bit.

I adhered the sentiment inside the card.  I scored the back half of the card 1/4 inch from the top.  I punched two holes in the side and ran baker's twine through them.


Here is another look at my Father's Day card.  Of course, I have blog candy here in addition to the Blog Hop Candy cricut cartridge (see below).

In order to qualify for this Tim Holtz Grungeboard, you need to #1 be or become a follower, #2 leave me a way to contact you if you are my winner, and #3 tell me one thing you love about your dad, father fiugure or grandpa.  I have so many memories of my Dad and his boat....I love that he used to let me drive it when I was little (sitting in his lap of course)!

Your next stop on our hop is DDs Crafts.


Don't forget to visit all of the stops to be eligible for the Cricut Cartridge A Child's Year.
Here is a list of the participants in our hop in case you get lost:
 Sher
Kathy
Lori **YOU ARE HERE**

Tuesday, April 19, 2011

Baseball Bat Gift Tag (Chomas Creations)

I won a pen holder and pen set from Chomas Creations in the Disney blog hop and wanted to try them out.  I needed a gift tag for a baby gift for my son's baseball coach so I gave them a whirl!!

I sized the baseball bat from the Baseball Cartridge.  I entered Kyler's name and used the rotate button to line it up on the "sweet spot" of the bat.  The font is Doodletype.  I opened a Layer 2 and copied the bat onto it.  I only wanted to cut the bat, not the name.  I drew on Layer 1 and cut out Layer .

Here you can see the pen holder and pen in action!

And here is the finished bat tag ~ super cute and easy!
I wrapped the bat handle with blue ribbon (to match the team) and tied on a little cord to attach it to the gift bag.

This is my first of many Chomas Creations projects I think!!!

Thursday, April 7, 2011

Bat Boy Onesie

One of Tyler's baseball coaches just had a baby boy.  I made him a onesie shirt to wear to the games this spring and summer.

I took the shadow of a batter from Baseball and the words BAT BOY from Varsity Letter.  I sized them to fit the onesie and flipped them.

I took Freezer Paper (shiny side up) and cut out my designs.  I spaced them far apart from each other because I am using them as a stencil.

It is hard to see here because it is white on white, but I ironed the shiny side down on the shirt.  I put the batter on the front and the words on the back.  I put a piece of cardboard inside the shirt.

I used Tulip fabric paint and a foam brush to paint inside my stencil.  Don't forget to iron on the little pieces that go inside the Bs and A!

Once the paint dried, I just peeled off the freezer paper to reveal my design!

Here is the back of the shirt!

I love making these kind of shirts for my son as well as for gifts!!