Copyright Information

Thank you for stopping by my blog! I hope you enjoy the things that I create and share! I do have a copyright on my original creations (see logo on my sidebar below).
If you create and post a creations based off of mine, please refer (with a link) back to my blog. Please do not use my ideas for files, profit or for contests. Thank you!


My Craft Goals for 2015

My Goals for 2015:

1. Update my goals for 2016 in January of 2016 :)
2. Maximize my crafting time!
3. Keep plugging away at scrapbooking photos!!
4. Learn how to Heat Press!!
5. Have fun!


Showing posts with label Wrap It Up. Show all posts

Tuesday, December 27, 2011

Crafting With Natasha 1st Blogiversary


Welcome to the celebration. If you've arrived here from Janet then you are in the right place. If you just happened upon this post, please start at the beginning over at Crafting with Natasha to join in. Each stop along the way has a "secret word" that you will need for a chance to win the prize. After you've hop to each stop, you will need to email Natasha (natashacrafts@gmail.com) the answer to the "secret phrase". You have until 11:59PM EST on January 6th to enter to win. Winner will be announced on January 7th.


Lorraine: http://www.glittergluepaperart.com  ***NEXT***

For my "NEW" project, I created a 2-page layout showcasing our New Year's Eve Family Game Night Tradition.
In order to lay out my 2 page design, I opened a 12x24 mat on my Gypsy.  This is one feature that I wish worked with Cricut Craft Room!!  I typically scrap 2 pages at a time and this helps me size my cuts.  I put GAME ON on the left side from Hello Kitty Font sized at 2.08 inches.  I put a circle from George sized at 4 inches for my spinner base.  From Hannah Montana I put New Year's Eve at 1 inch and the shadow Tradition also at 1 inch.


In order to make the spinner, I wanted 6 sections so I needed 6 circles in different colors.  I opened Layer 2 and grabbed a circle from George sized to 3.75 inches and copied it 5 times.
I put the cardstock colors on my mat and cut out the circles.
This part was a little tricky for me, I folded the circle in half and then thirds to get 1/6 of the circle.  I then traced the piece onto the other circles.
I adhered them to the black base and used a Tim Holtz game spinner brad in the center.
I cut out the words of our games that we play (Hannah Montana sized .42 - .54 inches to fit the triangles) out of dark blue cardstock.
I adhered the words to the triangles using the negative paper piece as a stencil.
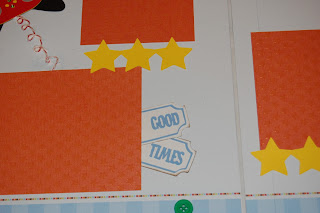
I needed some additional embellishments, so I went back to my Gypsy and found some tickets, the banner and star borders from Carousel, and I found the dice from Indie Art.
I cut everything out of cardstock using colors that matched the colors in the spinner.
I wanted some game controllers and found these from Wrap It Up and Boys Will Be Boys.

I cut these out of cardstock also.  Instead of traditional colors, I used colors to match the layout.
I found some papers from this paper pack for my background papers.  I bought this at Michaels.
I added some twine cord and on the side of my layout.
I tucked the tickets behind one of the photo mats.
I picked this background paper because it resembled a game board and I glued button "game pieces" around the board.
On the banner I put the date for this upcoming New Year's Eve.  I used twine to attach the banner to my title.
I trimmed the ends of the paper and put them together to create the game board look.  I trimmed 2 inches of the orange paper to make up for the part I trimmed off and also provided a background for Game On!  I adhered the background papers to white 12x12 cardstock.

Now for the Blog Candy ~ you could win this Smash Book!!
In order to be eligible to win this prize, you need to add the word "CELEBRATING" to the list of words you are collecting.

Please leave me a comment with your favorite game to play on Game Night for a chance to win some Mystery Blog Candy from me as well!

Your next stop in the hop is the Lovely Lorraine!!

Friday, October 14, 2011

Memories In Tyme Halloween Hop


If you are looking for the Fall Decor Hop, please go to DECOR.

If you are looking for the Fall Favorites Hop, please go to FALL FAVES.


Memories In Tyme


Welcome to the "Trick or Treat" Halloween Blog Hop!!

We're so happy you could join us for this super-fun hop showcasing cards, layouts and projects that feature everything fun about Halloween!! You'll find an array of ideas throughout the hop -- From decorations to gift ideas and more, we hope you'll enjoy each and every project along the way!! This is a TWO-DAY hop, so be sure to catch both days for maximum ideas (you'll find the entire line-up below my post)!!

We can guarantee LOTS of treats on this hop (and maybe a few TRICKS too)... So let's get hopping!! If you've hopped over from RHONDA, then you are in the right place!! If you've just popped in to visit my blog or are reading this via email and you'd like to join our Trick-or-Treat FUN, then please CLICK HERE to start at the beginning with Lynda's blog because... It's always a TREAT to start at the start!! :) We have a WONDERFUL Grand Prize for one lucky hopper today -- A Gift Certificate for Sweet Stamping Treats!! To be eligible, please visit each "Blog Hop Stop" and leave a comment!! One random winner will be chosen on Friday, October 21st (giving you plenty of time to finish the hop)... For more details on what you could choose if YOU are the winner, please be sure to visit our sponsor:


Sweet Stamping Treats


To make my project today, I started with an orange charger plate:

A charger plate is a plastic plate that you can put under your everyday plates to dress them up.  If you are craft-minded, you might use a charger plate for a blank canvas.  I bought my plate at Michaels for $1.99.

I started with this witch from Wrap It Up sized at 7 inches.  I measured the center of the plate (where it is flat) and it is 8 inches in diameter.  I cut the witch out in black vinyl.  When cutting vinyl, I set my cricut to 3-3-3.  Speed, Pressure and Blade depth all at 3 will "kiss cut" the vinyl (won't cut through the paper backing).

I take my dental tool and pull away (or weed) the extra vinyl.  It is helpful to roll it up as you pull it off so it doesn't stick to your project pieces.

I trimmed a piece of clear contact paper to fit my image.  I dirtied it up by sticking it to my jeans to de-stick it a bit before smoothing it on top of my witch.  I burnished the witch onto my clear contact paper with my scraper tool.

I started at the top corner and pulled the vinyl off the backing paper.

I placed the witch in the center of my plate and burnished it.  Again, I started at a top corner and peeled off the clear contact paper.  Vinyl is very forgiving and if it is not staying on your plate, smooth the contact paper back down and burnish some more.

Here is the witch on the plate.

I used Blackletter for the font to spell out Happy Halloween in all caps at 1.75 inches.

I repeated the process to cut the vinyl on my cricut.

I cut individual pieces of clear contact paper for each letter.
I used small pieces of post-it-notes to space out my letters.

I peeled the letters off and stuck them to the plate one at a time.

Here is "Happy" all lined up.

I spaced out Halloween next.

Here is all of the letters.  I peeled the clear contact paper off one piece at a time.

Here is my plate all ready to go.  You can purchase an inexpensive easel to display your plate.  I am thinking of what to make for a Christmas plate next!!

I have a little "treat" today!  You can qualify to win by #1 being or becoming a follower or subscriber, #2 leaving me a comment including your favorite thing about Halloween (or fall), and #3 leaving me a way to contact you!

Thank you again for checking out my project!!  Your next stop to Trick or Treat is the Awesome KACEE!  Remember to visit all the stops for more chances to WIN!!


Below are links to BOTH days of the hop so you'll be sure not to miss a THING!!


DAY ONE (October 15):


DAY TWO (October 16):


Saturday, November 13, 2010

Christmas With A Mickey Twist (Blog Hop)


Welcome to the Christmas With A Twist Blog Hop!  Here are my Mickey Snowflake Ornaments!  We have one tree that is all Disney ornaments and these will look great on it!

You should have arrived from CraftyScentiments, if not, please go to JennBcraftin to start at the beginning of the hop.  Your next stop is Scrappin NanaPuddin!

I used my Gypsy to weld Mickey heads onto the ornaments on the left.  These snowflakes were from DonJuan and Going Places.  I placed Mickey heads inside the ornaments on the right and grouped them together.  These snowflakes are from Speaking of Winter and Wrap It Up.

I cut them out of white paper with glitter dots.  I then opened up a second Layer on my Gypsy and copied all four snowflakes.  One at a time, I flipped the images over.  This way I could sandwich two together.


I glued the ribbon to the back of one ornament...

ran the second piece through the Xyron....

and stuck them together with the ribbon inside.

I inked the inside Mickey Head cuts with a red stamp pad and added silver gems all over.  You can't have enough sparkle on a snowflake!!

Once again, here they are.  Now the fun part.....I will be giving this set of Mickey ornaments away.  All you need to do is be or become a follower or subscriber and leave me a comment with your favorite Christmas memory and a way to contact you!  I will draw a winner using Random Number and post by Monday!

Thank you so much for your comments ~ that really keeps me going!!!