Copyright Information

Thank you for stopping by my blog! I hope you enjoy the things that I create and share! I do have a copyright on my original creations (see logo on my sidebar below).
If you create and post a creations based off of mine, please refer (with a link) back to my blog. Please do not use my ideas for files, profit or for contests. Thank you!


My Craft Goals for 2015

My Goals for 2015:

1. Update my goals for 2016 in January of 2016 :)
2. Maximize my crafting time!
3. Keep plugging away at scrapbooking photos!!
4. Learn how to Heat Press!!
5. Have fun!


Showing posts with label Nursery Rhyme. Show all posts

Monday, November 4, 2013

Baby Gift (Vinyl)


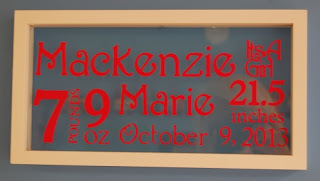
A friend of mine just had a baby girl.  She is one of my daycare moms and I am so excited to have a girl coming!!!  We are boy heavy over here!  I have been wanting to make one of these Baby Subway Art Frames for a while now.


I found this float frame at Michaels on sale.  I removed the pictures and used goo gone to get rid of the sticky residue from the tape that held the pictures on the glass as well as the price tag.  I never understood why they put sticky labels on glass!!!

The dimension of this frame is 6" x 12", but the inner glass measures 5.5" x 11.5".


I put a rectangle on my mat sized to 5.5" x 11.5".

I opened a new Layer (while leaving the rectangle visible) and started putting some words and numbers on my mat.  I typically try out a couple of different fonts before I find what I want.

I ended up using Nursery Rhyme for: Mackenzie, Marie, and It's a Girl.

I used Plantin' Schoolbook for:  7pounds 9 oz and 21.5 inches.

I used Martha Stewart Elegant Cake Art for:  October 9, 2013.

I used the settings 3-3-3 for a kiss cut for my vinyl (Speed 3, Pressure 3 and Blade Depth 3).


Here are my tips for creating you own Subway Art:

Play with several types and sizes of fonts
Look at Pinterest for different ideas
If you need a comma or period, sometimes you need to use the semi colan and hide the piece you don't need
If you don't have a float frame, hot glue the glass to the back of the frame
Cut with paper first - especially if you only have one piece of vinyl to work with!


I used Cricut Transfer Tape to transfer the vinyl onto the glass then assembled the frame.

I sometimes use clear contact paper from the dollar store instead of transfer tape as it is not as sticky as the regular contact paper.  If I used regular contact paper, I "dirty" it up first by sticking it on my jeans so it is not super sticky.


Thursday, June 27, 2013

Friends Photo Board (FD)

Welcome to the Girls Just Wanna Have Fun blog hop!!  


Mums, daughters, girlfriends, sisters, mother in laws, could be any photo you've had with any other lady in your life, a photo you have with mum on your wedding day, or you and your daughter on a holiday,even a party with the girlfriends, the list goes on. If it's a card or OTP project, it just has to be girly, the more girly the better.  Stay tuned for information on how to link up your project!


If you found me first, please go to the BEGINNING of the hop so you don't miss anything.

We also have two sponsors for this hop:


First we have one of our own Traci Penrod with her business Artsy Albums


Welcome to Artsy Albums -- where you'll find custom designed scrapbooks and do-it-yourself mini album kits by Traci Penrod.  Artsy Albums kits are fun and easy, and include pre-cut papers and full instructions for making wonderful mini scrapbook albums. I only use the highest quality archival products on the market and take pride in every single handmade album I create.  Most of my kits are also available pre-made. If you are interested in an album, but you only see a kit for it, please send me a convo and let me know!  I hope you enjoy looking through my shop -- there are always more pictures on my website at http://www.artsyalbums.com.  You can also find me here:  www.facebook.com/artsyalbums

And secondly we have Cheryl from Scraptownlady.


Welcome to Scraptown Lady - Scrapbooking Supplies from The Ozarks!  Scrapbook supplies at prices you can afford. Scraptown Lady is located in the Branson, MO area near Forsyth, Missouri in The Ozarks. Cheryl has been a scrapbooking enthusiast for several years and not only offers great deals on scrapbooking supplies, but also holds classes where you can hone your art.  We offer such products and services as EVENTS AND CLASSES, ADHESIVES, EMBELLISHMENTS, TOOLS, INKS, CHALKS & MIST, PAPERS, READY FOR ART ALBUMS, TAGS, CHIPBOARD AND WOOD, DIES, STORAGE, RUBBER, CLING, SILICONE & CLEAR STAMPS, EMBOSSING INK, POWDERS & FOLDERS, GLITTER, RIBBON, LACE & FIBERS, PAPER AND FABRIC FLOWERS, DECOR ITEMS, PAPER TAPES, BLANK CARDS AND ENVELOPES. All of these supplies can be purchased here on our site. If you aren't able to find that special something, let us know and we will be happy to special order something for you.  What makes our store extra special is the fact that we do not charge your credit card until we have found the very best possible shipping option for your purchase. Often times with other sites, you end up spending more on shipping costs than you do on the actual product. We take pride in had processing each and every order to keep your costs down. Tell a friend or neighbor about us.


How can you win?  Easy!!!  Just create a "girlie" project - the girlier the better!!  Then link it up at Frosted Designs.  You have until July 3rd to enter!!!


Here is a complete list of blogs in case you get lost along the way.  Let us help inspire you:

3.Lori - HERE


And no onto my project:


 I am not really a girly girl, but I do have some great friends and love to use a bit of bling in my life.  I wanted to make something practical (as I am afraid I am very practical) so I struggled a bit before deciding on my project.

What better way to celebrate having fun with your friends, than to place their photos right where you can see them everyday!!

I bought a framed picture at a garage sale....for the frame.  I discarded the glass and back but kept the print for another project.


I painted the frame blue.  After it was dry, I used sandpaper to sand off some of the paint for a shabby chic look.

I taped jute to the back to see if it would look like the design in my head!


It did, so off to the garage I went for my husband's staple gun.  I tied a knot on one end and stapled the jute to the back of the frame.  I pulled the jute tight with each staple.

I tied a loop and stapled it to the top of the frame so it could be hung up easily.


Here is the frame - not very girly at this point!!


I cut out the word FRIENDS from Nursery Rhyme and cut it out in black vinyl.


I put some of my son's senior pics (from HIS friends) on the clips to check for size.


I added some bling to my mini clothes pins.


I hot glued these silk flowers to the corners.

Now I just need to add some current photos of my friends and hang this by my desk!!

Girls just wanna have fun - but we all have fun in different ways!  We need to celebrate our friendships and cherish the times we spend together!!  As a busy baseball mom, I spend lots of time at the ball field!  When I have extra time, I like to shop and craft with my girl friends.  What do you like to do with your girl friends?

Don't forget to link up your project at Frosted Designs for a chance to win one of two prizes!!

Your next stop is MANDA!


Thursday, March 21, 2013

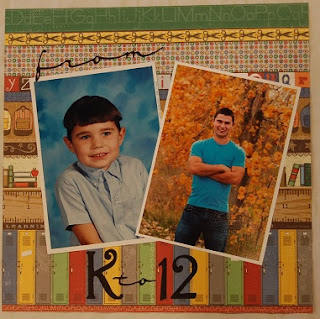
K-12 Layout


My middle son Tyler is graduating from high school this year.  I have been going through his photos to create a High School Graduation video.  I found a 5x7 of his kindergarten photo and knew I wanted to make this layout!!

I found this paper from a local scrapbook store (cut off the tag at a retreat so I don't know who made it) and loved it!


I opened my Gypsy and put two 5x7 rectangles on one layer to represent the pictures.

I welded "from" from Opposite Attracts sized to 1.24 inches.

I welded "to" also from Opposite Attracts sized to 1 inch.

K and 12 are from Nursery Rhyme and are sized to 2.06 inches.

I cut them all out of black cardstock.


I adhered "from" to the top of his Kindergarten photo.

The Kindergarten photo was trimmed in white fresh from the school packet.  I wanted to mimic that look with his senior picture, so I trimmed 1/8 inche off each edge and matted it with a 5x7 piece of white cardstock.


I adhered the K to 12 below the pictures.


I just love this!  I chose this senior picture because he is wearing a blue shirt that almost matches the background of the kindergarten picture!

Tyler sure has grown!

I am entering this in Link Up Tuesday at Sarah Hamer Designs!!

Friday, January 4, 2013

Snow Day (Recipe Challenge at FD)

It is winter and Tanner had his very first Snow Day!!  He is in 1st Grade and we did not have any snow days last year.  Unfortunately, his snow day was the last day before winter break and also the day of the winter party at school.  I don't think he minded too much!!
This week, our challenge at Frosted Designs is a Recipe Challenge.  You need to use 4 of the following on your project:
Brads
Rub-ons
Transparency
Eyelets
Mist/Mask
Punches 
Stamping
Stickers

I used a transparency as a photo mat and also used a snowflake punch to make transparency snowflakes.  I used brads to attach the snowflakes.  I used blue mist on my white snow swirl border.

I started out with my title from Nursery Rhymes sized to 1.82 inches.

The mittens and snow swirl come from Holiday Cakes.  The mittens are 2.50 inches and the swirl border is 3.24 inches.

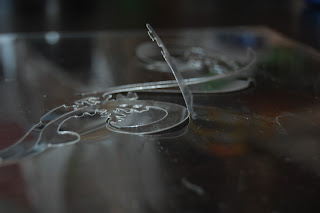
I had a piece of 12x12 transparency with some hearts on the corners.  I wanted to cut it out using my cricut, but cricut had other ideas....he must have been hungry since he pretty much chewed it up!!!

I tried using my deep cut blade and multi-cut 3 times, but I think the design was too intricate.


I tried next in white cardstock....

This is white cardstock from Michaels and it works great for the Imagine, but not so much for the Expression.

Third time is a charm!!  I used cardstock from Walmart (which is a bit thicker than the white cardstock from Michaels).  You can't see it here, but my blade dragged through the letters (UGHH).  I put Cricut in a time out once I finished my cuts today!!!

I used Perfect Pearls blue mist to add a little sparkle and color.

Since the paper curls a bit, I wanted a blue border to go underneath the white one.  I also decided on the same blue for my title and photo mats.

I cut out the mittens in yellow to match Tanner's coat.  This gave me a journaling spot.

Cricut must have like the colored cardstock because he cut them out perfectly!

I used my throw-away paper as a template for my title.  I can easily center and size my title on the 
Gypsy, but getting it on my page is not as easy for me - until I realized I have a built in template!!!

I run my letters through my Xyron and stick them in the openings.  Then gently pull the template off.

Here you can see the acetate snowflake and the layer between the photo and blue mat.  It is nearly impossible to see the blue sparkle on my white snow swirl in a photo :(

I journaled on the mittens.  I inked them with Tim Holtz Distress Marker.  I also inked the edges of the blue paper and trimmed it to allow a yellow border.

The twine is Doodle Twine boy assortment - I found this at Archivers.

Here is one of the snowflakes.  I also tied the twine under the title.

I recently learned how to upload my cricut cartridge booklets to my Kindle Fire (Christmas gift from my husband) and was actually looking through them!!!  I found this swirl and thought about how many other great cuts I have that I don't even know I have.

I spend this time of year catching up Tanner and Tyler's scrapbook albums.  You will see a lot of fall and winter layouts from me!!

Don't forget to join in the challenge at Frosted Designs - we have great prizes weekly!!!

Monday, February 6, 2012

All Because Two People Fell In Love LO


Hi! Today is my day to Guest Design over at She's A Sassy Lady!!

I am so happy that my mojo came back!!!  January was a rough month for me.  We made the decision not to go on our annual family vacation with my two brothers and their families.  My brother has a work conflict.  We have been going for 13 years and this year was going to be our last one.  Not meant to be.  

Then my Uncle passed away.  He lives alone and was home by himself when he passed.  His good friends went looking for him a few days later.  Uncle Howie was the black sheep of our family ~ different from us.  He lived by himself on the river.  He had a simple life and as we went through his things it seemed to me that he had a great life.  I never really felt that way when he was alive because I kept comparing him to his siblings.

My mom (his oldest sister) died 23 years ago next month.  I was 20.  It was awful and I was angry for a long time.  She would have been an awesome grandma, but it was not meant to be.....  I grieved for over 5 years before it seemed to get better.  That scab was ripped open a bit when we went through Uncle Howie's photos and momentos.  I put together a board for his memorial which was held Saturday at his favorite watering hole ~ perfect place if you ask me!  

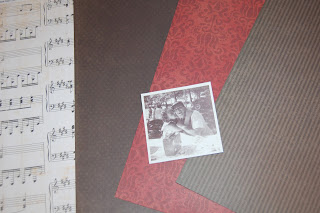
As I went through the photos, I came across one of a young couple and thought the man was my Uncle Mark (mom's other brother).  It was my grandpa and grandma.  They were sitting at a picnic table with a music box (their version of an ipod with speakers) and it looks like my grandma is playfully biting my grandpa's ear.  Not at all how she acted when I was around!!!  This got me thinking that if they had never met at the cafe where she worked as a waitress, I would not be here!!!  And just like that my mojo came back and the scab started to heal once again!

I started with the photo and some paper.


I saw a card on Pinterest that had the word LOVE on a mini banner and liked that idea.  I made a 2 Layer banner from Birthday Bash sized at 1.77 inches.  I got the font for "all because" from Art Philosophy and sized the letters to .85 inches.  I got the font for "two people fell in" from Nursery Rhyme and sized it to 1.15 inches.  I got the font for "Love" from Calligraphy Collection and sized it to 1.35 inches.

I cut out the scalloped flag in burgundy patterned cardstock, the top flag layer and "all because" in gold metallic paper, and the rest in black cardstock.


I used this shape from Lacy Labels at 10.38 inches.  I cut this out with sheet music paper that I found at Michaels.  This shape can also be found on many other cartridges.


I cut out a lacy mat for my photo that I found on Sophie (my grandma's name) at 4 inches.  The lace border is from Sophisticated.  I welded two together and sized them to .88 inches.  The swirls are from Heritage sized at .88.

Here is one of the mats with the cuts on it.

In order to make my title look straight and evenly spaced, I use the negative piece from my cuts as a template.

I adhere the letters and then slowly peel back the template ~ perfect every time!

Here is a close up of the burgundy patterned cardstock.  I punched out three circles, crinkled and inked them up and created a flower.  

I stuck a pearl to the center and used some black glittered chipboard flowers to accent it.

Here is my Love Banner all put together.

I curved the "all because" around the burgundy circle I added to the background.

Here is my completed layout of my Grandparents when they were young and first in love.  I am grateful they were!!  I am also grateful they jump started my mojo!!