Copyright Information

Thank you for stopping by my blog! I hope you enjoy the things that I create and share! I do have a copyright on my original creations (see logo on my sidebar below).
If you create and post a creations based off of mine, please refer (with a link) back to my blog. Please do not use my ideas for files, profit or for contests. Thank you!


My Craft Goals for 2015

My Goals for 2015:

1. Update my goals for 2016 in January of 2016 :)
2. Maximize my crafting time!
3. Keep plugging away at scrapbooking photos!!
4. Learn how to Heat Press!!
5. Have fun!


Showing posts with label Recess. Show all posts

Monday, April 15, 2013

Baseball Pennant


Hi!!!  I am so excited to share my very first CricutDIVA post with you today!!  It is official - I am a DIVA!!!


My middle son is graduating from High School in just over a month (sniff, sniff).  He is also a baseball player (catcher) and I have been working very hard at making his graduation party decorations.

I was inspired by a post on Pinterest to create my centerpiece.


I started with my Gypsy Girl and opened a 12x24 mat.


I used the shadow of this pennant from Locker Talk sized to width 15.24 x height 7.12.

Once I sized the shadow layer to 7.12 inches, I put all of the pieces for the banner on layers of my Gyspy all sized to 7.12 inches.


I used watercolor paper to cut out the base of my pennant.  Watercolor paper is very sturdy and it cuts well on the cricut.  I use it for banner flags and mini album pages too.


I used multi-cut of 2 and the blade depth at 5 (which is the depth I use for cardstock). 


I put the pennant in the next layer of my Gypsy, sized the same.  I wanted the pennant to be white and the tassles to be blue, so I hung the tassles off the mats.


I cut out two in white cardstock, one for each side.  I trimmed off the edges and adhered one piece to each side of the watercolor paper layer.


In Gypsy Layer 3, I put the tassels, borders and the numbers from Varsity Letter sized to 2.28 inches.


I cut them out in blue paper (I call this shade Titan Blue for my son's high school).


In Gypsy Layer 4, I put the baseball layer from Boys Will Be Boys sized to 6.15 inches.  

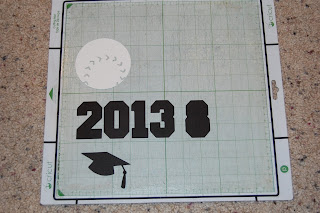
On the bottom half of the mat, I put the numbers from Varsity Letter sized to 2.28 inches.

I also put the graduation cap from Recess sized to 1.82 inches.


I cut out the baseball in white cardstock and the rest in black cardstock.


I decided later I wanted a second graduation cap so I copied and pasted one to the next Gypsy layer along with the base of the baseball.  I cut them out in black cadstock.


I opened a final Gypsy layer and kept the eyeball open on the tab so I could see the baseball base (shown in grey).  I copied the baseball onto this layer and sized it to 6.74 inches to create a shadow.  I cut the layer out in blue cardstock.


I adhered the blue tassels on the pennant.  I cut several strands of twine and tied a knot in the center.  I used my ATG gun to adhere them to the blue tassels.  Once adhered, I trimmed the edges of the twine.


I used my Sew Easy to punch holes in the border piece.  I used the red and white twine to stitch around the edges. 

I pop-dotted the border piece to the pennant.


I adhered the baseball layers and pop-dotted the number 8 (Tyler's jersey number) and the graduation cap to the pennant.

I used a liquid glue pen to adhere blue and white twine to the edges of the pennant.


Here you can see the dimension.


On the other side of the pendant, I adhered the numbers and pop-dotted the second graduation cap.

Before I adhered the border to the pennant, I used ATG to adhere a wilton cookie/cake pop stick to the pennant.  I reinforced the stick with some tape.  

I pop-dotted the border on with an extra layer of pop dots to account for the height of the stick.


Here is the reverse side of the pennant.


This will be a center piece for one of the food tables at Tyler's graduation party.

Thanks for joining me today!!


Thursday, January 10, 2013

Teresa's First Blogaversary Blog Hop


Welcome to Teresa's First Blogaversary Blog Hop!


If you are looking for the All About Penguins Hop, please go HERE.


A little over a year ago, Teresa began her new blog to celebrate the fact that she wanted a change in her life.  And for that change to be permanent came lots of prayer and leaning on God to give the right answers.  The answers He needed to give, not the answers Teresa desired.  Well, here she is 1 year later and Teresa is a stay at home wife loving life and doing all she needs to do to create a warm, loving atmosphere for her family!

Teresa invited us to celebrate with her.  Here is a list of blogs in this hop.  If you found me first, please hop on over to Teresa so you don't miss anything!!

Here is a complete list of blogs in today's hop:


We are so glad you are here celebrating and hopping with us today.  Teresa asked us all to create something that represents a change in our life.  A big change happening in our family this year is our son Tyler will be graduating from high school and heading off to college.  Unlike his brother who went to college 45 minutes away, Tyler is likely going 3 1/2 hours away.  I am not looking forward to that part, but I am excited for the next chapter in his life to begin.

I have been scouring Pinterest for ideas for Graduation Party Decorations and I combined two subway art projects into one.
I started out with my Gypsy and several fonts to create this project.  On Layer 2, I put a rectangle sized to 8 1/2 x 11 so I knew how big to size the letters.

I used:
 Base Camp (Graduation sized to 1.35 inches)
Opposites Attract (Turn the Tassel sized to 1.24 inches)
Making the Grade (diploma sized to .92 inches)
Nate's ABCs (Success sized to .88 inches)
George (Cap and Gown sized to 1 inch)
Sophisticated (new chapter sized to 1 inch)
Varsity Letter (You Did It sized to 1.08 inches)
Gypsy Font (Class of sized to .88 inches)
Hannah Montana (2013 sized to 1.94 inches)
Nate's ABCs (Hats off sized to .88 inches - rotated 90 degrees)

I put blue vinyl on my mat and changed my settings on the cricut to 3-3-3 (speed, pressure and blade depth) for a kiss cut.

I have a flat canvas sized 9 x 12.  It is hard to see, but the vinyl is cut.  Now to get it onto the canvas. 

First, I use my cricut dental tool to weed off the extra vinyl.
Once I pulled off the extra vinyl, I went back to pull out the inside cuts.


I used transfer tape to pull the vinyl off of the paper backing.  I used my cricut scraper tool to burnish (rub) my vinyl. 

Oops - I was burnishing a little too hard and broke my cricut scraper tool!!  **Note - I have used the heck out of this tool for the past 6 years!!  Good thing I have a Pampered Chef scraper!!

I carefully pulled up the transfer tape.

I placed the transfer tape to my canvas and burnished the vinyl onto the canvas.

I carefully peeled the transfer tape off the canvas.


I had extra white space at the top, so I went back to the Gypsy....

I used the graduation cap from Martha Stewart Seasonal Art Cake cartridge and sized 7 of them to .80 inches.

This time I carefully pulled up the vinyl off the transfer tape so I could place the exactly where I wanted them.

I put a few caps on some of my letters.

Here is my canvas all ready to go for Graduation (sniff, sniff)!!!

Thank you so much for stopping by!!  Your next stop in the hop is the Amazing ANITA.


Tuesday, August 21, 2012

Back to School Goodie Bag

Hi!!  This is Lori from Scrappin'MyStressAway!!  This week at Sweet Sassy Diva's, our theme is Back to School projects.  I bought some extra school supplies and hand sanitizer to take to Tanner's Back to School night/Meet the Teacher night.

I started out by cutting a piece of red cardstock to fit the front of the bag (8x10 for this bag), then cutting the school book paper 1/4" smaller to layer on top.
Next, I grabbed my Gypsy and grabbed these books from the Recess Lite Cartridge sized to 2.41 inches.

I cut them out using red, blue, green and white cardstock.

I grabbed the Back to School image also from Recess sized to 3.10 inches.

I cut them out using red, blue and green cardstock.

I put the images on the bag using my ATG adhesive.

Here is a sneak peek to what I put inside (so far)....maybe I should have used a bigger bag!!
In our school, they can only require the basic school supplies for our children.  I know that the teachers provide most of the extras out of their own pockets.  I like to donate what I can...plus I just LOVE back to school supplies so it's a win-win!!!

Thank you for having me over today Bobbi Jo!!

Thursday, August 16, 2012

Author's Party LO

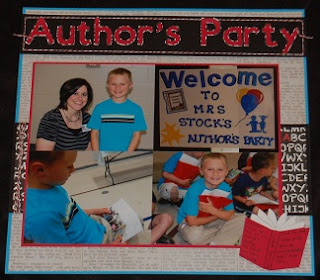
At the end of Kindergarten, Tanner's teacher Mrs. Stock hosted an Author's Party.  At first, I thought they were bringing in a famous author to the school....then I learned that the "famous" authors were the children!!!  We were invited to hear our children read their story they worked on for about 3 weeks as well as Guided Reading books from the classroom.

It was so awesome listening to Tanner read his stories!!

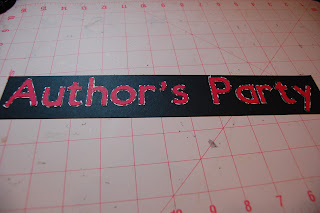
I used San Serif for the title and sized the letters to 1.47 inches.

I used Recess for the book.  I sized it to 2.53 inches and hid the word Math.

I added my cardstock scraps to the mat and cut them out.

I used the negative piece as a template for my letters.  This spaces them out perfectly!

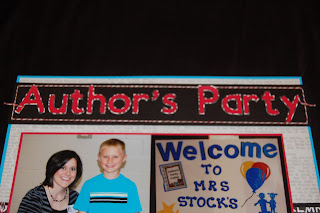
Here is my title.  It is a little plain, so I added a twine border.

I loved Tanner's teacher!!!  

I added a little twine on the background paper too.

On the book, I wrote my journaling and pop-dotted it to the bottom of the page.

What a fun layout for a fun day!!