Copyright Information

Thank you for stopping by my blog! I hope you enjoy the things that I create and share! I do have a copyright on my original creations (see logo on my sidebar below).
If you create and post a creations based off of mine, please refer (with a link) back to my blog. Please do not use my ideas for files, profit or for contests. Thank you!


My Craft Goals for 2015

My Goals for 2015:

1. Update my goals for 2016 in January of 2016 :)
2. Maximize my crafting time!
3. Keep plugging away at scrapbooking photos!!
4. Learn how to Heat Press!!
5. Have fun!


Showing posts with label Cuttin' Up. Show all posts

Wednesday, June 13, 2012

Cricut in the Daycare

Many of you know I have an in-home daycare in my basement.  I love using my Gypsy and Cricut in my daycare and here are some of my most-used (or still hanging up) projects.

This first one is a clock face from My Quiet Book.  I cut out the pieces at 10 inches.  I adhered the numbers to the circles and the circles to the clock face.  I poked a hole in the center with my dental tool (cricut tool kit).  Then I used my 9" Xyron to laminate it.  I punched a hole in the clock hands and laminated them too.  I used a brad to connect them together.

This will hang in the Kitchen Area but can also be used during Table Time.


I painted a piece of canvas red and cut out different letters from Cuttin' Up! in yellow and white cardstock to make my Alphabet Soup!  This was a PG project (Pre-Gypsy) so I was just cutting random sizes using capital and lowercase letters.  My son was the first to tell me which letters I missed!

We are teaching the children the months of the year.  I took 6 pieces of white cardstock (8 1/2 x 11) and cut them in half.  I took the months from Designer's Calendar and saw that November was the widest word.  I sized November to 11" wide.  I sized the other months to the same HEIGHT as November and cut them out.

For now, we use them in this pocket chart, but they could easily be made into a book.

Birthday Train!

This is another PG project!  I cut all of these pieces from Going Places and laminated them.  I used my computer to label the months.  I have had this train in my daycare for over 5 years!  I trim a photo of each child and place them in the proper car.

I am re-doing my Family board.  I have a lot of teacher kids who are gone over the summer, so I take the time to freshen things up.  I cut out 2" letters from 3 Birds on Parade for my title.  I used a piece of black foam core board and we hang photos of family members on the board.  This is good for the children to see mommy or daddy as well as their friends.

I use my cricut a lot with my daycare and will be better at sharing those projects with you in the future!!!

Please come back on Friday to see what my crafty space looks like clean AND dirty, as well as some of my organizational tips!!


Wednesday, December 21, 2011

Bowling Raffle Items

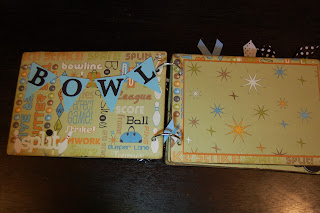
 It's that time of year again ~ my son's team is hosting a Bowling Tournament for High School Bowling.  I usually make an item or two for the raffle.   This year, I made these bowling projects.  The bowling mini album is paired up with the scrapbook page (in a 12x12 frame).  I used a rectangle chipboard mini album found at Michaels in the dollar bin.


I used George for the rectangles and circles, Varsity Letter for the font, and Paper Doll for the juggling pin (aka bowling pin).  I save a file on my gypsy with the rectangles so I can easily add a title and some images.  This is set for two horizontal 4x6 photos.
I also created this tile with images from:
Base Camp ~ Strike at 2.06 inches rotated at 90 degrees
Sports Mania ~ Discipline Strength Honor at 2.88 inches.  I hid the inner cuts on the "o" and added three circles to mimic the bowling ball
Hello Kitty Greetings ~ suitcase (aka bowling bag) at 4.06 inches
Nifty Fifties ~ Bowling pin and ball at 7.24 inches and "bowl" at 3 inches and welded together
Create A Critter ~ turkey shadow layer at 2.18 inches (I hid the beak)
Cherry Limeaid ~ gutter ball at 1 inch welded together
Cuttin' Up ~ spare at 1.47 inches and welded together
Nifty Fifties ~ Split at 2.18 inches
George ~ bowling ball (4 circles grouped)
Lyrical Letters ~ it's all about the shoes .76 and 1.38 inches
Graphically Speaking ~ Trophy 2.25 inches

I cut it out of black vinyl and put it on a 12x12 tile.
You can see a link to one of my vinyl tutorials HERE!

Monday, November 8, 2010

Happy Birthday Tanner!!

At noon today, Tanner will be 5 years old!!  He was our surprise blessing and has kept us on our toes!  I made this card for the Gypsy Challenge that ended 11-5.  The Challenge was:
Theme: Birthday, Thanksgiving or Christmas ~ Birthday
1 Weld ~ Balloon, 5, words
1 Word ~ You Are
1 Stretch ~ Balloon
1 Flip or rotate ~ You
2 Pieces of art ~ balloon & 5

I used Fabulous Finds for the shape of the card.  I sized and copied the square and hid the cut out on the second square.  I used Celebrations for the balloon.  I did not want the stars so I hid them with Hide Contour.  I used Don Juan for the 5 and Cuttin' Up for the words.

When making a window card, I put the pieces where I need them in order to weld in the frame ~ but before I weld, I make a copy.  This way the size is exact for the top layer.

Here is the paper I used.  Tanner wanted blue and purple on his card as these are his current favorite colors!

Here he is playing on the computer while I am crafting!

And here is the card all put together!

Tuesday, May 11, 2010

15 Border ~ Gyspy Challenge


This week's challenge on the Gypsy Chit Chat forum of the Cricut MB is Mix Em Up. You use 4 carts, 4 welds and at least of of the images is a shape.

I designed this border for my son who just turned 15 and is learning to drive. I welded letters, numbers and shapes from Designer's Calendar, Base Camp, Lyrical Letters, Cuttin' Up, Locker Talk, Street Sign, Doodletype, Going Places and Just Because Cards.

I wanted my border to be 2" x 12", so I put the images on a 12 x 24 mat on my gypsy. I started on the second inch in from the left edge and went to 13 inches from the left edge. I put my 3" x 12" paper on my 12 x 24 mat to cut. I learned this technique from Alicia Garcia's BLOG.

I used this blue paper to test cut my design. I will use red or dark blue on a layout (I am behind in his scrapbook since becoming a "girlie" designer lately ~ LOL)! I put the title on a piece of red paper so it would be easier to see.


A while ago I made a mesh of the number 15 and the word "fifteen" that was 9" x 12". I have not yet cut it out, but I think I like this border much better!!