Copyright Information

Thank you for stopping by my blog! I hope you enjoy the things that I create and share! I do have a copyright on my original creations (see logo on my sidebar below).
If you create and post a creations based off of mine, please refer (with a link) back to my blog. Please do not use my ideas for files, profit or for contests. Thank you!


My Craft Goals for 2015

My Goals for 2015:

1. Update my goals for 2016 in January of 2016 :)
2. Maximize my crafting time!
3. Keep plugging away at scrapbooking photos!!
4. Learn how to Heat Press!!
5. Have fun!


Showing posts with label Imagine More. Show all posts

Saturday, March 30, 2013

Hippo Gift Bag


Happy Easter and Welcome to the Little Prince Blog Hop Day 1 of 3!


We are celebrating the birthday of a sweet little prince Mason.  Mason is turning 3 and we all made Birthday Boy projects.

 If you arrived from Cancace's blog you are in the right place.  If you found me first, you should hop over to Jessica's BLOG so you don't miss a thing!  There are lots of goodies to qualify to win along the way!

Here is a complete list of today's blogs in case you get lost along the way:


Day 1 (Sunday, March 31st)

  1. Starts at: www.homespunelegance.blogspot.com
  2. Candace www.scrappin2littleprincesses.blogspot.com
  3. Lori A http://scrappinmystressaway.blogspot.com/ ****HERE
  4. Claire S http://www.scrapmyway.blogspot.com ****NEXT
  5. Debbie http://www.papersweeties.com/category/blog
  6. Lisa http://prettypaperprettyribbons.blogspot.com/
  7. Betty Dudley www.justabitofpaper.blogspot.com
  8. Heather Flaherty www.papercrafteranonymous.com


Now on to my project:

I wanted to make a cute gift bag.  I did not have the exact paper I wanted to use, so I used my Cricut Imagine to create a piece.

I used Imagine More to print this light blue paper.  Instead of polka dots, this paper had flowers on it.  I figured I could alter the paper and make it work for my project so I printed it out.


I found this adorable hippo on Birthday Bash.  I sized it to 8.5 inches.

I added the little hippo layer to the card sized to 2.06 inches to my mat.

I cut them both out of the blue paper.


I inked the edges of both hippos with Vintage Photo ink and a fantastyx.

I dabbed Close To My Heart dutch blue ink to the front of the hippos.


I put the rest of the pieces I needed to cut out on another Gypsy layer.  

I sized the ice cream cone and ice cream to 8.50 inches.  

The hippo toes, eyes, nostrils and belly button are also sized at 8.50 inches.

The card base is cut out at 2.06 inches.

The phrase is also cut out at 2.06 inches.

I cut out the cherry and leaf at 8.50 inches, but decided to use stickles instead.


I used white, brown (chocolate ice cream) and patterned paper to cut out my pieces.


Here is the little hippo gift card.  I added some stickle toes to him!


Here is a peek inside the card.


 I assembled the hippo and decided I needed some grass for him to stand in.


I used grass from Paper Doll Dress Up sized to 2 inches.

I cut out the clouds from Create A Critter sized to 1.35 inches, 1.47 inches and 1.94 inches.


I inked the grass and trimmed the bottom off and adhered it to the bag.  I tucked the hippo's toes behind the grass.  

I inked and stickled the clouds.  

I stickled the ice cream cone.

Finally, I tied the tag to the handle of the bag - now I just need to tuck in the gift!!!


Before you hop on, I have a little Blog Candy for you from Unity Stamp!!
***US residents only!

To be entered to win this adorable stamp set, you need to leave me a comment including a way to contact you.


Your next stop is Claire!


Monday, March 19, 2012

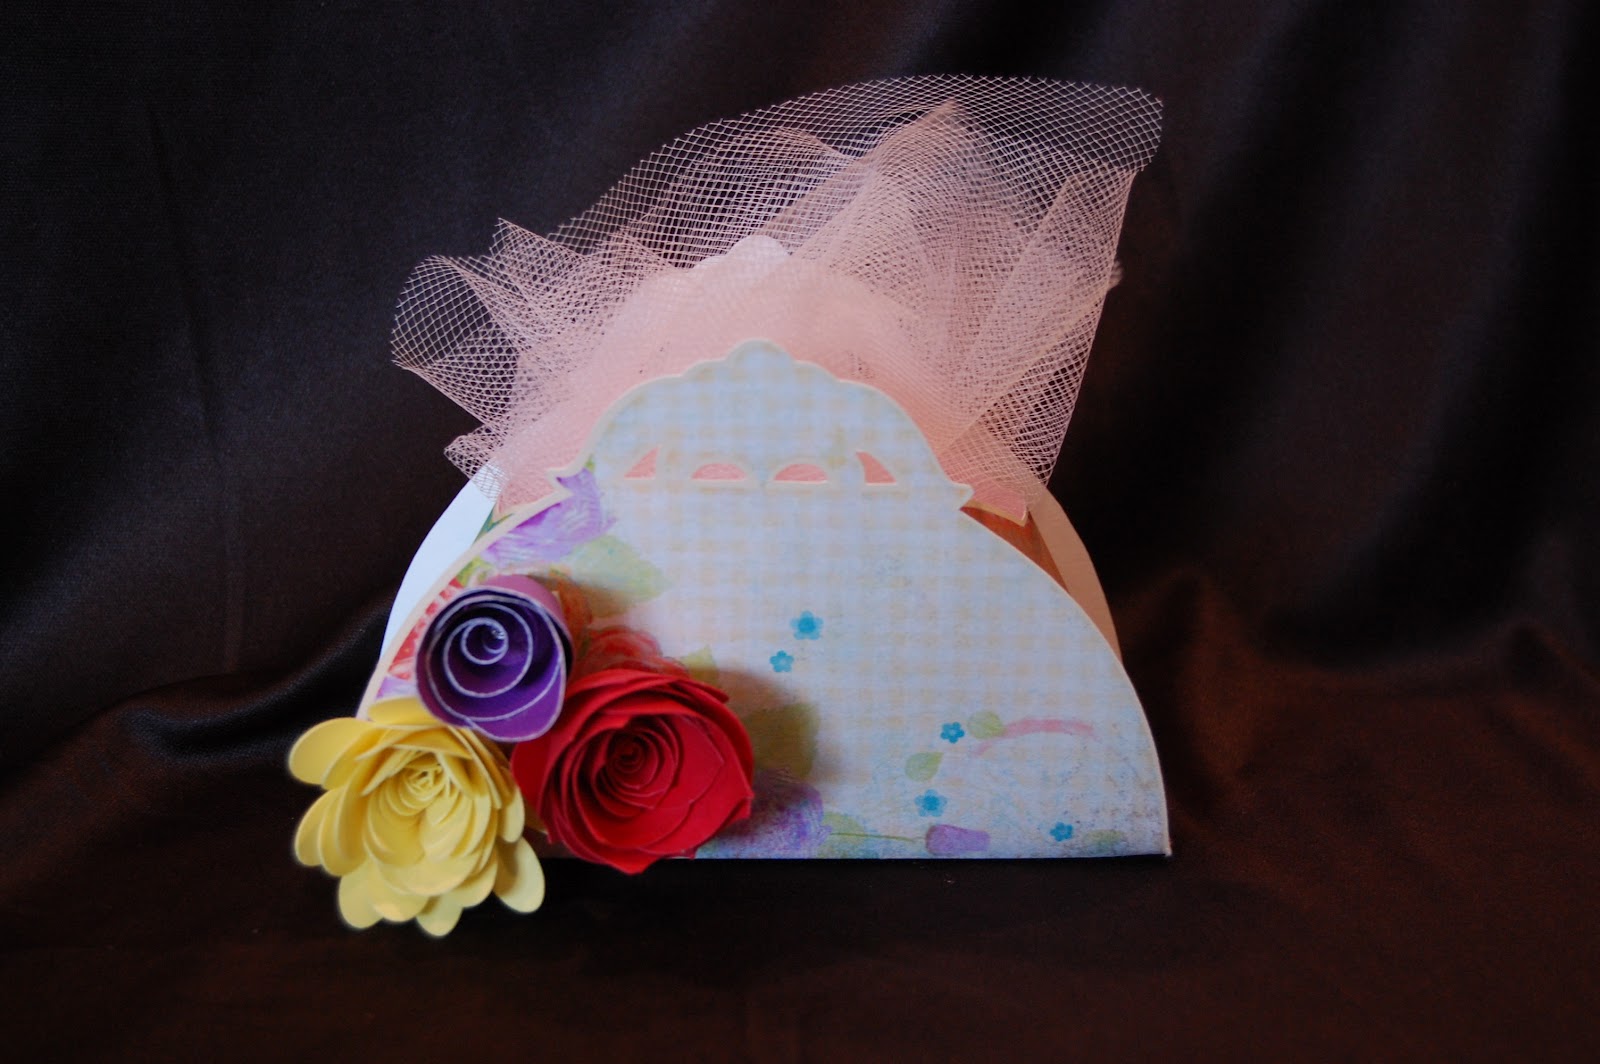
Spring Blooms Box

Happy Almost Spring!!  This week at SweetSassyDiva, the theme is Spring Blooms.  I just cleaned out my flower beds today and my bulbs are coming up!!!  I absolutely love spring flowers!

My Gypsy girl has been cutting wonky so I turned to my Imagine for this project.  I started with this pretty box from Imagine More Cards.  I cut it out at 8.5 inches.

I scored and folded the box and adhered it together.

I cut out these flowers from Art Philosophy at 5 inches.  I had a different spring bloom project in mind originally so I cut out flowers and leaves that I ended up not using.


I rolled up the flowers with my quilling tool and glued them together with Scotch liquid glue.  I ended up trimming a little bit from the red and yellow flowers and a lot from the purple flower to fit on the front of my box.

I am going to stick a gift card inside and give this as a gift.  I really need to use my Imagine more often!!!  Thanks for having me over today Bobbi Jo!!

Friday, March 16, 2012

Things With Wings ~ Butterfly Card

This week's Fabulous Friday challenge at Frosted Design is Things With Wings.  If you haven't already heard, my Gypsy got very sick.  I have a replacement in process, but had to find a way to create my projects without her for a while.  I dusted off my Cricut Imagine and made this card.

I even tried Cricut Craft Room!!  I do like that I can put the images where I want them on my mat.  I also like that I can separate an image into layers and delete the pieces I don't need.

I don't really know why the brown ink stained the top of my paper or why the butterflies did not cut out.

I trimmed the butterflies.  I trimmed the border off of one of them.  I inked both of them with Tim Holtz Vintage Photo.  

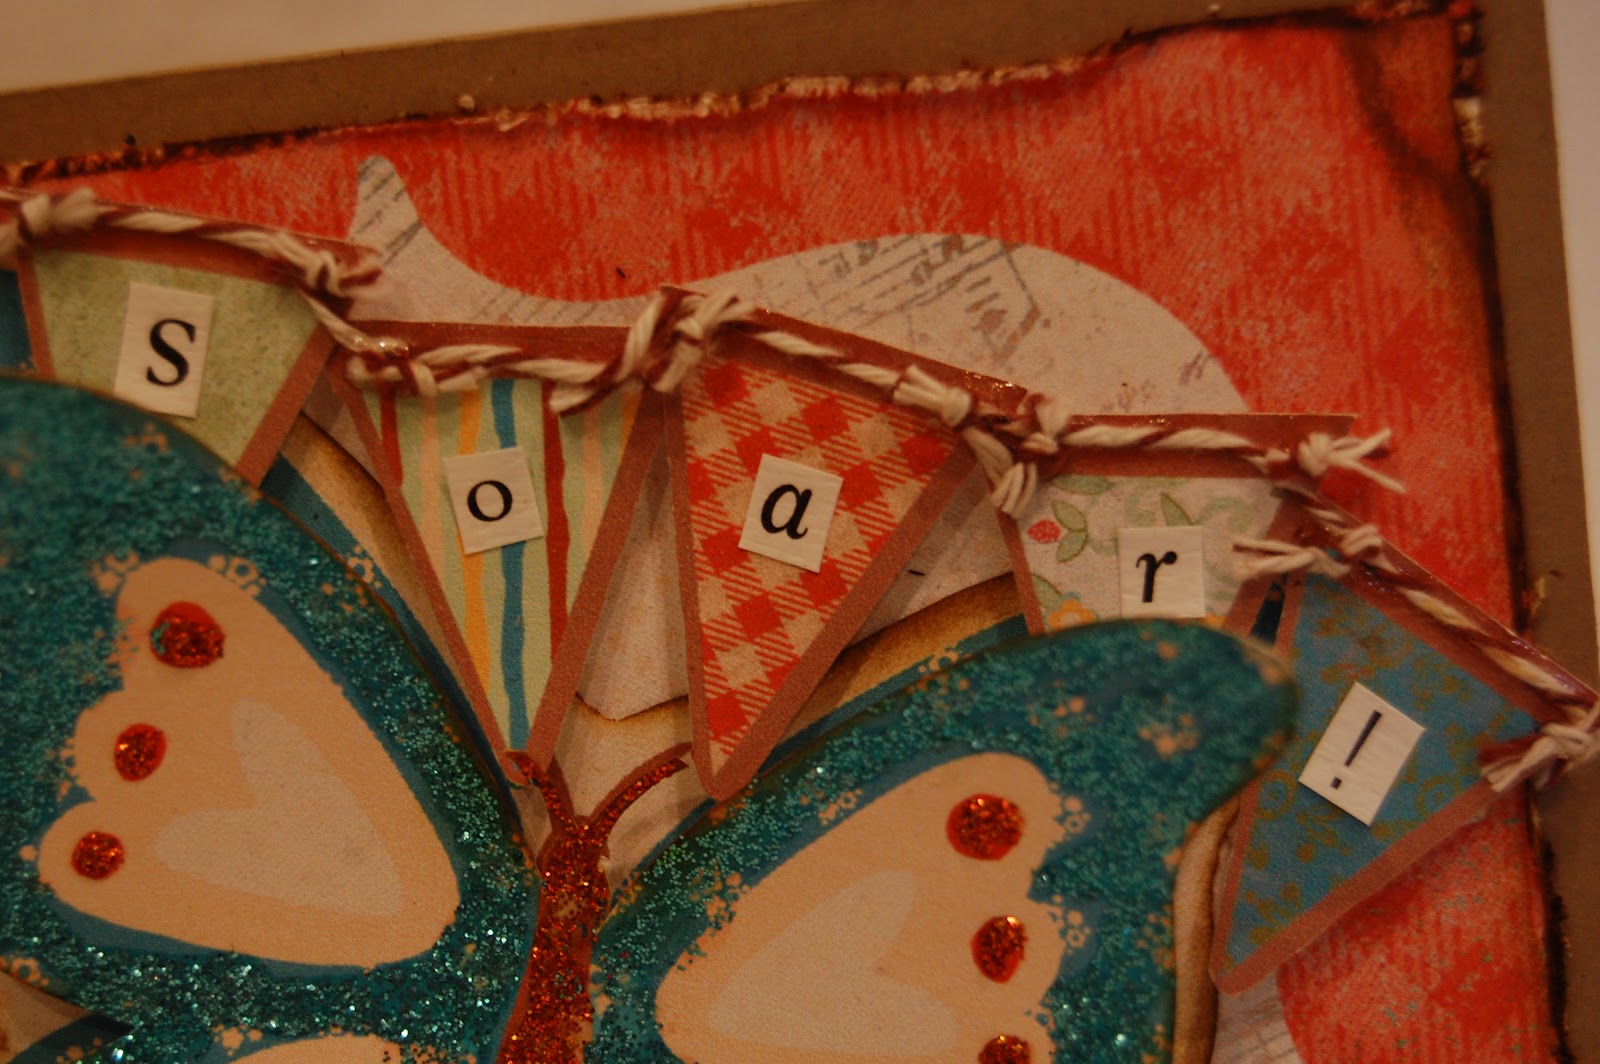
I cut the card in half and adhered the first butterfly to the front.  I cut apart the banner and pop-dotted them across the top corner.  I bent up the wings of the butterfly and pop-dotted the body on top of the first butterfly.  


I used turquoise Martha Stewart glitter glue on the butterfly wings and fire opal on the body and for the spots.  I stamped "flutter" on the bottom corner of the card.

I added "soar!" in tiny alphabet stickers to the banner flags.  I adhered twine across the top of the banner and glued twine knots to the corners of the banner flags.

Here is a side view of the butterfly layers.


Thank you for stopping by today!  I hope you create a project with wings and link up with us at Frosted Designs this week!!

Wednesday, August 17, 2011

Bucket List Birthday Blog Hop Day 1 ~ Segway Layout

If you are looking for my Apple Card featured on SweetSassyDiva's Blog, please go HERE!

Welcome to the Bucket List Birthday Hop!!!  This hop is our way of celebrating our Bucket List Accomplishments, Documenting our List, or Showing how we are funding our Adventures!!  You should have arrived From Wendy's BLOG.  If you found me first, please go to the BEGINNING of the hop so you don't miss anything!


Michelle - http://craftychelle.blogspot.com/-----Happy Birthday on the 18th
Justina http://justmycrafts.blogspot.com-----happy/ Birthday on the 28th
Anita - http://anitaandbugs.blogspot.com/
Ashley - http://scrappinpinkpiglet.blogspot.com/
Amy - http://www.lovetocrop.com/
Maria - http://www.mdcraftcorner.blogspot.com/
Tami - http://tamboscreations.blogspot.com/
Sher http://www.patternsbysher.blogspot.com/
Scrappingmamma~ http://www.scrappingmamma.net/
Gina - http://californiascrappin-gcinderella21.blogspot.com/
Gill - http://scrappincreationsbygillm.blogspot.com-----happy/ Anniv on the 11th
Linda T - http://www.lindascreativity.blogspot.com/
Inga - http://mommahobbit.blogspot.com/
Corrine- http://celebratingordinarymoments.blogspot.com/
Deborah- http://www.scrappingmamma.net/
Brynn- http://flairandfrillscreativity.blogspot.com/
Lori- http://scrappinmystressaway.blogspot.com/  ***HERE
Nancy - http://blog.fancywithnancy.com/
Monica - http://scraps2treasure.blogspot.com/
Lisa - http://handmadewithlove-lisa.blogspot.com/
Wendy -http://wleitel.blogspot.com/-----Happy Birthday on the 31st
Jamie - http://myamusinglife.blogspot.com/-----Happy Birthday on the 18th


My Bucket List has evolved over the years.  I recently lost 77lbs and I have a ton of energy and am ready to "live" again, not just observe.  One thing that I wanted to do was ride a segway.  While we were on vacation I had the chance.  I almost offered to stay back with our youngest (who was too young to ride) but my husband must have known I really wanted to.  He encouraged me to ride when it would have been so easy to just take photos!!!

I am a 2-page scrapper, but this time I did not use my Gyspy at all to create my layout ~ very weird for me!!  I did use my Imagine for the title.


From the Imagine More cartridge, I found a "Spread Your Wings" image that I liked!  I cut it out with some other projects to save paper!

I pop dotted it to the top of my layout, but it needed a little sparkle!

I added some stickles!  This is fun for me as I am usually scrapping for my boys!
The butterfly really sparkled when it was dry!

This lady was so patient with me as my boys zipped by me!!

Here is my journaling.

I finally relaxed enough to smile!

I added some Tim Holtz flowers and ric rac on the bottom of my layout!

Now for the Blog Candy.......


In order to qualify, you need to be or become a follower or subscriber.  I would also love to hear an item from your Bucket List and whether you have done it or not yet!

Thanks for stopping by today, be sure to go see NANCY next!!

Friday, August 5, 2011

Birthday Card (FD Coloring Challenge)

This week's challenge at Frosted Designs is to use "Coloring" on your project.  I decided to uncover my Imagine (normally it is buried under paper and photos) and get to coloring!  I can count on 2 hands how many times I have used my Imagine.  I am a Gypsy Girl and until the two can play nice, my Imagine gets the cold shoulder!

I found this image of a bird on a branch on the Imagine More cartridge and wanted to use it to make my Step-Mom a birthday card.

I selected the image and clicked on the pencil to put it in the que.

Since I will be using a 12 x 12 piece of white paper, I wanted to add some other images to color and cut so as to cut down on wasted paper.

I loaded my paper.

It printed my images first...

then cut them all out.

I cut some Kraft colored cardstock to fit my card with just a little border around my image  I tied a little twine on and stamped "Happy Birthday" in Vintage Photo ink.

Here is my simple, yet whimsical card ~ just like my wonderful Step-Mom!!  Happy Birthday Karen!!

Thursday, December 9, 2010

A Wreath of Stars

I am double posting today because I am doubly blessed!!!  I am a Guest Designer on two blogs today!  For my Sketches in Thyme post, click HERE.

My Wreath of Stars!

I am delighted to Guest Deisgn for Pam over at thebugbytes today!  My project today is my first Imagine project.  I have not taken the time to get to know my Imagine like I should (darn J O B)!  I found this paper from the Imagine More cartridge and was dying to use it!

I started out by loading George and Basic Shapes in my Imagine.  Once the I finished thinking, I loaded the Imagine More cartridge.  I selected the cricut cartridge symbol in the bottom left hand corner and selected the star from George.

I just tapped it with the stylus (loving the new stylus by the way!) and it appears in the Que.

Then, I tapped the Imagine cartridge shape.

I tapped the star and then tapped the pencil to edit my design.

My color choices appear below (this part is way fun)!

I selected the Sheet Music paper pattern by tapping on it.  I love how it fills in the space according to the size of the image.  The smaller the shape, the smaller the details on the paper.

I changed the size to 3 inches.

Then I selected Apply.


Now I am at the Project Preview screen and I can see my star on the mat.

Since I need a lot of stars, I select the Auto Fill option and get 9 stars per page.

I loaded white paper on my mat and here are my stars ready to go.  I made 27 stars (3 sheets of paper) for my wreath.

Here you can see how small the music notes are ~ they are soooo cute!!

Next, I inked the edges of my stars.  This took a while!


I cut out a circle frame from Lyrical Letters at 10" so I could glue my stars on and actually keep a circular shape!  I left a little space between the stars on the first layer, then overlapped the second layer.

For the last 5 stars, I used pop dots to attach them around the wreath.  I did not pop dot any stars where my bow is going to be.

Here is a close up of the layers.

I found this bow from Celebrate with Flourish.

Here is the bow on the wreath.  It seemed a little flat, so I cut out a second bow and pop dotted it on top.

I added a picture of my 3 stars (I mean sons) to the center.  This is one of the photos on our Christmas cards this year.

I cut out Christmas from the Christmas cartridge and the 2010 from Lyrical Letters.

And here it is all together.  I will make a coordinating "highlight" page with 2" pictures cut from the holiday cards and photos we receive this year!

Have a Wonderful Christmas season and a special thanks to Pam for showcasing my work!!!

Don't forget to check out my {2 cute} post that is featured on Sketches in Thyme today also!!