Copyright Information

Thank you for stopping by my blog! I hope you enjoy the things that I create and share! I do have a copyright on my original creations (see logo on my sidebar below).
If you create and post a creations based off of mine, please refer (with a link) back to my blog. Please do not use my ideas for files, profit or for contests. Thank you!


My Craft Goals for 2015

My Goals for 2015:

1. Update my goals for 2016 in January of 2016 :)
2. Maximize my crafting time!
3. Keep plugging away at scrapbooking photos!!
4. Learn how to Heat Press!!
5. Have fun!


Showing posts with label October 31. Show all posts

Thursday, October 24, 2013

Halloween Charger Plate with The Buckle Boutique


I made this fun Halloween Charger Plate using Dazzling Diamonds from The Buckle Boutique and some vinyl.

I had orange Dazzling Diamonds and I really love Halloween - so it was natural for me to make a pumpkin!!

I grabbed my Gypsy and MyCutSearch.com and found a pumpkin I liked.


I put a circle on my mat to represent the inside of the charger plate.  This pumpkin is from Gypsy Wandering and is sized to 5 inches.  I cut this out of my Dazzling Diamonds orange sheet!!


The spider web is from October 31 and is sized to 5.82 inches.  I cut this out of white vinyl.


I used this flourish from Home Decor sized to 1.69 inches for my pumpkin vine.

I used this leaf border from Wall Decor and More.  I hid the inside cuts with Hide Contour and sized them to 1.59 inches.

I cut both borders out of green viny.


Here you can see how I layered the leaves and vine.


I grabbed the spider and the font Frightmares (from dafont.com) from my Cameo and cut them out in purple vinyl.


You put it all together and have a fun Halloween home decor item!


For more information on the Dazzling Diamond Sheets, check out:
The Buckle Boutique's Website . . . click HERE
The Buckle Boutique Blog . . . . clickHERE
Facebook Page . . . click HERE
Twitter Page . . . click HERE
Pinterest Page . . . clickHERE


Tuesday, September 25, 2012

I love Candy Layout

I am finally getting around to scrapbooking last year Halloween photos!!!

Tanner was a Police Officer and his best bud Jadon was Batman.  One of our neighbors dressed up as Cruella DeVille.  My husband dressed up as Santa.  It was a fun night and the longest Tanner trick-or-treated so far!!

I used Hannah Montana for the font and sized the shadow layer to 1.5 inches.  The heart is from George and is also 1.5 inches.

I added the normal font (Hannah Montana at 1.5 inches) on another Layer.  I also added some hearts (from George) at 1.5 inches and 1.35 inches.

Here are the letters and hearts cut out.  I used orange, black and yellow cardstock.

I wanted some candy, and I found these suckers on October 31.  I used Hide Contour to erase the other pieces of candy.  The sucker is sized to 5.46 inches.  It looks super busy on this screen shot.

Once I hit the cut button, this screen looks so much better!

The round pieces of candy are from Simply Charmed and are sized to 3 inches.  The long pieces of candy are from Slumber Party and are sized to 3.92 inches.

I cut out the suckers in white, yellow and purple cardstock.  I trimmed off the stick part of the yellow and purple ones and glued the circle on.  I assembled the candy and then added stickles to the cardstock.

I wrapped celophane around the candy and tied the ends with twine.

It looks like candy!

I also tied celophane on the suckers.

I ended up using the yellow heart on top of the orange one.

Don't these look good enough to eat?


Making these pages is putting me into a Halloween kind of mood!!!  Halloween is my favorite holiday!!!

Sunday, October 2, 2011

Art Philosophy Boo Banner (Sweet Sassy Diva)

I created this banner for the Art Philosophy theme at Sweet Sassy Diva's today.  Today is my Guest Designer Day!!  I made this banner for my friend to put on her front door.   She wanted more cute than scary.
I started with paper from this K&Co. Halloween paper pad.  It is double sided paper ~ love this!!
I opened up my Art Philosophy Cartridge on my gyspy and put three banner triangles and borders on my mat sized to 5.42 inches tall.  Since the paper is double sided, I just crammed all six pieces onto the mat and flipped one triangle and one banner.
I cut them out and adhered the borders to the top of each banner piece.
I sized the word BOO from Art Philosophy at 2.54 inches tall.
I cut out the shadow layer in black cardstock and the top layer with black glitter paper from the paper pad.  I used orange stickles in the cut outs.
I put four roses on my mat at 4.76 inches tall and cut them out.
This is how these 3D flowers cut out.
You wind them up from the outside in.  It works great if you have a quilling tool.  If not, you can use a skewer or rattail comb.  Once you wind the flower up, slide out your tool and let the center unwind just a bit.  Use some liquid glue to adhere the flower to the circle (base) in the center.  Above you can see the difference in color depending on which way you roll up the double sided paper.
I took black stickles and painted the edges with a foam brush.
I adhered the letter and flower to each banner piece.
I cut out the spider from October 31st at 4.29 inches tall.
I cut out the witch shoe from Happy Hauntings at 4.01 inches tall.
The cat is from Happy Hauntings sized at 9.58 inches tall (4.25 inches when using Real Size) and the witch is also from Happy Hauntings sized at 8.82 inches tall (4.84 inches when using Real Size).
I used green glittery ribbon (found at Michaels) to string my banner together.  I love it and I hope you do too!!  Thanks for having me on your blog today Bobbi Jo!

Monday, October 11, 2010

Boo S-Fold Card


I made a Halloween S~Fold card after seeing some cute ones on the Cricut Message board.  I did not search out the instructions (I have a hard time following directions anyway) so I just played around a bit.

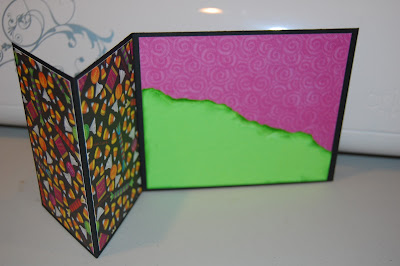
I ended up with a 5x12 piece of black cardstock.  I scored the paper at 3 inches and 6 inches.  I folded the card in half and then folded the top flap the opposite way.


With my Gypsy, I used George & Basic shapes to cut the purple paper 5 5/8 x 4 5/8.  Note:  you can use a paper cutter to make these cuts if you choose.  I cut two pieces of the candy paper 2 3/4 x 4 5/8.  I glued the paper onto the card.

I used papers from this mat stack from K&Co that I bought at Michaels.

I cut a piece of lime green cardstock 5 5/8 x 4 5/8 and tore it to create a hill.  I inked the edges with a green stamp pad.

I found the Haunted House on October 31 and the Ghost on Mini Monsters.  I decided to use stickles for the eyes and mouth on the ghost.

I do not have a huge collection of rubber stamps, but really needed a sentiment on this card.  I decided to make my own with my Cri-Kits gel pen.  I put a green rectangle on the card and then sized a smaller white rectangle on my Gypsy.  I opened another Layer and put the word BOO from Calligraphy Collection right in the center of the rectangle.

I put the black gel pen inside the Cri-Kits holder.  I took the blade housing out of my Cricut and replaced it with the Cri-Kits holder.

I selected the cut option for the Layer with the word Boo on it.  You can see here how the word printed.

When the Cricut is finished with BOO, select Return to Design.

Put a piece of scrap paper on your paper under the gel pen as you remove the Cri-Kits housing and replace the blade housing.  This prevents unwanted pen marks on your paper.

Once the blade is replaced, change the layer to the rectangle and cut.  Here is what it looks like.

I inked the edges with black.

And here is the card all put together.  I glued orange crystals on the Ghost's eyes.  I glued the Ghost half-way on the first fold.  This was my first S~Fold card, the first of many!!!