Copyright Information

Thank you for stopping by my blog! I hope you enjoy the things that I create and share! I do have a copyright on my original creations (see logo on my sidebar below).
If you create and post a creations based off of mine, please refer (with a link) back to my blog. Please do not use my ideas for files, profit or for contests. Thank you!


My Craft Goals for 2015

My Goals for 2015:

1. Update my goals for 2016 in January of 2016 :)
2. Maximize my crafting time!
3. Keep plugging away at scrapbooking photos!!
4. Learn how to Heat Press!!
5. Have fun!


Showing posts with label Straight From the Nest. Show all posts

Monday, June 17, 2013

Nest Mini Album


I am a Cricut DIVA today!!!


I took a chipboard/burlap mini album from Michaels, a 6x6 American Crafts Color Crush paper pad (also from Michaels) and added my Gypsy to create this fun mini album.  

I flipped every other page so I would have two pages with the same papers together, then two pages with burlap.  Doing this makes the pages more bulky, so I purchased bigger rings.

I made this album with my friend Robin in mind.  She just opened a shop in March called Robin's Nest where she sells re-purposed items.  She is quite talented and her shop is doing very well!!


I used a bird from Sophie for the cover.  I sized it to 13.53 inches (2.42 inches using Real Size as this cuts with a bird cage).

I used Storybook for the font and sized NEST at 1.13 inches.


I used a piece of paper from the paper pad that was all different shades of green with a watercolor pattern.

I added the linen lace to the bottom and some gems.  It still needed a little something that I found a little later....


I found the sentiment "this nest is blessed" on 3 Birds on Parade for the first page of the album.
I sized it to 1.59 inches and cut it out of pink (light and bright) cardstock.


I pop-dotted it to the bottom of the photo mat so you can slide a photo behind it.


I added a bird from Sophie (shown two photos below) and I also pop-dotted it on the corner.


The next pages showcase birdies from Straight From the Nest sized to 1.25 inches.

I made a pocket using my ATG gun to put tags for journaling.  You can also tuck in extra photos and momentos.


I found the leaf wreath with bird on Lacy Labels and sized it to 6.35 inches.  I cut the wreath out of green patterned paper and the birds out of hot pink and dark blue-green papers to match the patterned papers in the album.

The word "Family" is from Letter Envy and I sized one for the cover at 1 inch and one for the inside page at 1.47 inches.


I like how the wreath frames the photo mat.


This tree came from the Heritage cartridge.  I sized it to 5 inches and cut it out of the dark blue-green cardstock.


The tree was perfect for the back cover!


Here you can see the bird is pop-dotted on the cover.


I added the word Family to the cover.  I have a theme with each mini album I make.  Even though many people get that a Nest is like a House for a family, I did not want people to assume I lived with all birds!!

I tied some ribbon to the rings to finish it off.

Thanks for being a DIVA with me today!!


Sunday, August 21, 2011

Vacation Inspiration Smash Book ~ SweetSassyDiva GD

Hi there, Lori from ScrappinMyStressAway here with my Summer Vacation project.  I created a smash book!  We take the same vacation every summer to the Ozarks in Missouri.  My two brothers and their families go too.  We went to this same resort when we were kids. 

We take down food, towels, ping pong balls, tennis raquets, pool toys and a bunch of other things.  I am a list maker, so this book helped with the planning of our trip.  I also used it to sketch and write down all of my scrappy ideas while we were there, as well as journal what we did each day.

I started with a $1 journal from Michaels and some of my favorite supplies.  Most of these are scraps! 
I cut out a title for my Smash Book from Nursery Rhyme at 1 inch out of purple cardstock.  I used my Gypsy to line up my letters so they were right side justified.

I saved the negative piece and used it as a template for my letters.  I used my 1" Xyron to adhere the letters to my cover.  Note to self ~ next time use Mod Podge over the letters to prevent them from sliding around!

I also added some twine and (later) a butterfly charm.  The cover was pretty so I did not want to alter it anymore.
I printed out this tag from my Imagine along with a few other pieces.  I adhered it to this tag and then adhered the pocket to the inside cover.

For the first inside page, I cut this 8x8 decorative page in half and adhered each half to the outer edge of the page.

I had some of these Tim Holtz dies cut out already and finally found a purpose for one of them!  I also added a flower I cut out from a Tim Holtz/Sizzix die.  Sometimes at a crop, I will cut out things for future use even if I have no idea what I will use them for!

Here was another piece of 8x8 paper that I liked, so I cut it down for 3 pages.


On the left page, I wrote down my grocery list.  In this envelope pocket I put my coupons that I would use.  I have been having fun trying to be an extreme couponer lately!!

On this page, I use a couple cuts from Straight From the Nest.

Here is where I sketched an idea for an upcoming Disney Hop.

Below are some of my highlights from our vacation:

We took a helicoptor tour over the lake.

I rode a segway for the first time ever!!!  Here is a link to the post about my Segway Layout if you are interested.

Tubing with my niece!  All three things I would not have done before losing 77 lbs!  I had a blast on vacation this year!!!  I hope you had a great summer vacation too!

Here is one last shot of my Smash Book!  This was a fun and inexpensive project as I used mostly scraps and extra pieces!!

Friday, July 8, 2011

Celebrate Banner (Frosted Design Blog Hop)


Welcome to the Frosted Designs Blog Hop!!  We are celebrating our one year blog~versary so the theme is three fold.  Our weekly challenge (to use ribbon/fancy trim, a charm, and rhinestone or pearl) and/or Ice cream on the beach, or celebrating or some of each.  Well, I was a little stumped at first, but then came up with an idea that had most of these elements.....an ice cream celebrate banner with ribbon, charms and rhinestones.

You should have arrived from the talented Diana.  If this is your first stop, please go to the beginning of the hop HERE as we are having a fun game with a giveaway (hint ~ you need to get information from each stop along the way to be eligible to win)!!

Let me show you how I made my project:

I found this ice cream cone from Straight From The Nest and cut them out at 3.27w x 5.47h.

I cut them out six at a time in cream colored card stock.

I put the ice cream layer 3 per half mat so I could easily cut three of the same color at a time. 

I cut out green (mint chip), pink (strawberry), brown (chocolate) and white (vanilla) ice cream tops.

I found this scalloped circle on Accent Essentials and hid the inner cut.  I sized it to 2.45w x 2.25h and copy and pasted until I had 12.


I used Ashlyn's Alphabet for the letters sized at 2.06 height.

In order to make the pattern on the ice cream cone, I used a stitch stamp from Hot Off The Press.  I masked off the top of the cone with a post-it-note.

Here is the cone with the ice creme on top, but the top of the cone looked plain.

I have this barcode stamp set from Close to My Heart, and I stamped "Life Celebration" on the cone low enough that you can read it under the ice cream.

I adhered the ice cream to the cone.  As an instructor, people ask me all the time what my favorite adhesive is for papercrafting. I use a lot of different types, but my go-to adhesive is my Tombow tape runner (HINT HINT).  I used black stickles to add the mint to the mint chip ice cream!
 
I used red stickles for the cherry on top.

I punched the ice cream behind the scalloped circle to string the ribbon through.  I added some heart and circle charms to the ribbon and some rhinestones to the letters.  I pop-dotted the scalloped circles to the ice cream.

Here you can see the cone!

I put a flower on the end cones and hung the banner.  This can be used to celebrate a birthday, anniversary or any other special event!

I have a little blog candy.  In order to be eligible to win, you need to #1 be or become a follower and #2 leave me a message with your favorite birthday or anniversary memory!

Your next stop is the fabulous Andrea!  Thanks for hopping with us!

Monday, May 9, 2011

Circle Album {BugBytes Designer}

Today I am the Guest Designer at TheBugBytes and I am going to show you how I made this circle album for my Mother-in-Law for Mother's Day.  I hope all of you Mothers out there had a wonderful day yesterday ~ I sure did!!  I saw a circle album during the Disney Pixar Blog Hop #2 last week HERE at Tami's Craft Connection, but she did not show instructions.  So, I decided to create my own.

My first attempt was to use 5.5inch circles, but they were way too small once I folded them.  I made 4 circles at 11.50w x 11.07h out of blue paper  I made 5 circles at 11.0w x 10.59h out of coordinating paper.  I used a paper pad since I did not have 5 matching papers at home.  I used Plantin Schoolbook, but any circle will do.

Then I folded the circles in half, then in quarters (half again).

I used the bone folder from my score board to score the folds.

Here are my four blue circle pages all folded together.

Then I folded four of the patterned papers the same way and glued them to the inside of the blue circles.  This way when you fold the blue circle up, you see blue on the outside, not the patterned paper.

Then I used my ATG gun to glue the pages together into a book.

Here is the cover of the book.  Before I covered it with paper....

I glued a ribbon to the cover.  In hindsight, I should have glued the ribbon a little higher up the spine.

Here is the book covered.

Each page of the book folds out.

Now, I need to decorate the pages and cover!

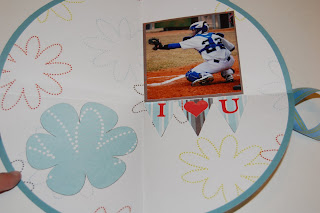
I designed several things on my Gypsy, but ended up using only a couple.  My Mother-in-Law is very practical so flowery pretty things weren't necessary for her.  I opted for small banners from Straight From the Nest cut at 4.00w x 1.76h.  I cut out I heart U and the flower from Plantin Schoolbook to put on the flags.

I used this title from Mother's Day 2010 cut at 4.04w x 3.82h.  The flower is from Plantin Schoolbook at4.15w x 6.36h.

I inked the edges with Vintage Photo from Tim Holtz.

Here are Tanner's pages.


Here are Tyler's pages.


Here are Kramer's pages.


And here is the last page with the three of them all together.

I cut my photo down the center so the page would fold back together.

Here is a top view of the album.

Another top view with a paged opened up.

I love trying out new things!   I am glad I found this project to tackle!!

Thanks, Pam, for hosting me on your blog!  You are a constant source of inspiration to so many of us!!