Copyright Information

Thank you for stopping by my blog! I hope you enjoy the things that I create and share! I do have a copyright on my original creations (see logo on my sidebar below).
If you create and post a creations based off of mine, please refer (with a link) back to my blog. Please do not use my ideas for files, profit or for contests. Thank you!


My Craft Goals for 2015

My Goals for 2015:

1. Update my goals for 2016 in January of 2016 :)
2. Maximize my crafting time!
3. Keep plugging away at scrapbooking photos!!
4. Learn how to Heat Press!!
5. Have fun!


Showing posts with label gypsy font. Show all posts

Thursday, January 10, 2013

Teresa's First Blogaversary Blog Hop


Welcome to Teresa's First Blogaversary Blog Hop!


If you are looking for the All About Penguins Hop, please go HERE.


A little over a year ago, Teresa began her new blog to celebrate the fact that she wanted a change in her life.  And for that change to be permanent came lots of prayer and leaning on God to give the right answers.  The answers He needed to give, not the answers Teresa desired.  Well, here she is 1 year later and Teresa is a stay at home wife loving life and doing all she needs to do to create a warm, loving atmosphere for her family!

Teresa invited us to celebrate with her.  Here is a list of blogs in this hop.  If you found me first, please hop on over to Teresa so you don't miss anything!!

Here is a complete list of blogs in today's hop:


We are so glad you are here celebrating and hopping with us today.  Teresa asked us all to create something that represents a change in our life.  A big change happening in our family this year is our son Tyler will be graduating from high school and heading off to college.  Unlike his brother who went to college 45 minutes away, Tyler is likely going 3 1/2 hours away.  I am not looking forward to that part, but I am excited for the next chapter in his life to begin.

I have been scouring Pinterest for ideas for Graduation Party Decorations and I combined two subway art projects into one.
I started out with my Gypsy and several fonts to create this project.  On Layer 2, I put a rectangle sized to 8 1/2 x 11 so I knew how big to size the letters.

I used:
 Base Camp (Graduation sized to 1.35 inches)
Opposites Attract (Turn the Tassel sized to 1.24 inches)
Making the Grade (diploma sized to .92 inches)
Nate's ABCs (Success sized to .88 inches)
George (Cap and Gown sized to 1 inch)
Sophisticated (new chapter sized to 1 inch)
Varsity Letter (You Did It sized to 1.08 inches)
Gypsy Font (Class of sized to .88 inches)
Hannah Montana (2013 sized to 1.94 inches)
Nate's ABCs (Hats off sized to .88 inches - rotated 90 degrees)

I put blue vinyl on my mat and changed my settings on the cricut to 3-3-3 (speed, pressure and blade depth) for a kiss cut.

I have a flat canvas sized 9 x 12.  It is hard to see, but the vinyl is cut.  Now to get it onto the canvas. 

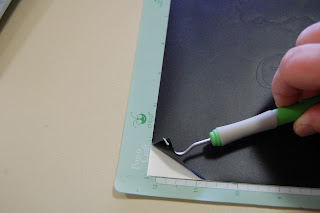
First, I use my cricut dental tool to weed off the extra vinyl.
Once I pulled off the extra vinyl, I went back to pull out the inside cuts.


I used transfer tape to pull the vinyl off of the paper backing.  I used my cricut scraper tool to burnish (rub) my vinyl. 

Oops - I was burnishing a little too hard and broke my cricut scraper tool!!  **Note - I have used the heck out of this tool for the past 6 years!!  Good thing I have a Pampered Chef scraper!!

I carefully pulled up the transfer tape.

I placed the transfer tape to my canvas and burnished the vinyl onto the canvas.

I carefully peeled the transfer tape off the canvas.


I had extra white space at the top, so I went back to the Gypsy....

I used the graduation cap from Martha Stewart Seasonal Art Cake cartridge and sized 7 of them to .80 inches.

This time I carefully pulled up the vinyl off the transfer tape so I could place the exactly where I wanted them.

I put a few caps on some of my letters.

Here is my canvas all ready to go for Graduation (sniff, sniff)!!!

Thank you so much for stopping by!!  Your next stop in the hop is the Amazing ANITA.


Sunday, February 6, 2011

Frosted Designs Tutorial: Vinyl on Tile

I made this tile for a friend's wedding gift.  I am debuting my tutorial today at Frosted Designs!  This is an elegent, yet expensive gift.  I have been know to spend more on the easel than the rest of the supplies!

Here is what I used for my project:  My Gypsy, Cricut, a 12x12 mat, a 12x12 piece of vinyl, a 12x12 tile, a piece of clear contact paper, a dental tool, spatula & scraper from my cricut tool box.

I created my design on my gypsy.  It is not required that you have a gypsy (or design studio) but when I use my gyspy, the project is placed perfectly in the 12x12 space.  I used Gypsy Font for the fancy C, and Songbird for the names and date.

In order to get a "kiss cut" you want to set your speed and pressure to 3.  A "kiss cut" is when the blade cuts the vinyl only, not the paper backing.

You also need to set your blade dial to 3.  Just remember 3, 3 & 3 for vinyl!!

You place the vinyl still on the backing to the mat.

Hook up your Gypsy to the Cricut and cut.

You can see the vinyl is cut here...now comes the fun part!

I use the dental tool to poke the vinyl in the corner and peel slowly away.

I roll the vinyl as I peel so it doesn't stick to my project (learned that one the hard way).

Keep peeling....

I use the dental tool to weed out the little pieces I don't need.

Here is the vinyl.  Note that it is still attached to the mat.

Trim a piece of clear contact paper to 12x12.  Note: you can use transfer film but it is more expensive!  Contact paper is super sticky, so be sure to unstick it a bit on your jeans or pants a bit.

Place the contact paper over your mat...

and use the scraper to smooth (or burnish) the design.

I start in the corner and slowly peel the contact paper away from the paper backing.  It is not unusual to have to continue to burnish as you go.  On one of the 1's the paper backing stuck so I used the razor blade tool to peel it off.

Still slowly peeling.

Almost done!

In order to center my design on the tile, I put the mat next to the tile so I could use the arrow on the mat as my center point.

Smooth it on with your hands first...

then burnish it with the scraper.

Then you repeat the process of weeding by peeling slowly from the corner and rolling the contact paper.

I was having some issues with this part....one issue was I did not unstick enough of the contact paper and my contact paper was too sticky.  Another issue is my 5 year old was yelling at me to hurry up so I could join him upstairs.  And finally, I realized when I was at this stage that my letters were not welded together like I thought they were.  I was trying to be super careful!

Vinyl is very forgiving.  If you work slowly and are patient your mistakes will be easily hidden.
Here is the completed tile.  I will pick up a fancy easel and wrap it up.  You can put vinyl on tile, glass, walls, paper, plastic.....they sky is the limit!!

Friday, June 25, 2010

A Gypsy Box

Many of you know I have been a little lost without my Gypsy girl!  She went to the "spa" for a facelift.  There was a mixup and she got on the wrong flight home (switching places with a look-alike) and I am still all alone here.  Well, kind of...

My friend and student loaned me her Gypsy.  She does not have very many carts and has a couple that I don't have.  I am grateful for the chance to play, but I seriously lost my mojo.  It took a little nudge from my good friend Sassy to get creating again!  She is having a box challenge on her blog ~ go check it out!

I decided to make a box with the carts that Crysta has on her G.  I used Gypsy Font and Sentimentals to create this box. 


I had some trouble with my welds.  I originally wanted to create my own scallops on the box lid, but after welding one piece at a time (per Mya Magoo's recomendations) I got almost done and the preview showed all grey lines.  This means that nothing was going to cut!!  I started over and scrapped the scallops!


I went to test cut the box, and one of the sides was not welded.  I re-welded it and then accidentally un-grouped the boxes and had to start all over welding ~ UNTIL I remembered to just close the file, not save the changes, then re-open the file.

I wanted to quit about 10 times, but I am a little stubborn at times so I kept going!

I used my MS Score Board to score my box and lid.  I used double sided tape to adhere the box flaps.

This is not the paper I wanted to use, I ended up cutting the box 4 times before it was all welded properly.  My lid did not match the paper I ended up using, so I re-cut the lid in green.  I did not use the flower border for the flaps since the box was busy enough with the polka dots.  Good thing I am flexible!

I cut 5 flowers each one a little bigger than the first.  I inked the edges in red using my brand new Fantasticks (thanks MakeupGirl217).  I cut out 2 leaves and inked with the only green ink pads I had (wish I had a darker one) and this is how it turned out!!


It is not perfect (yet) but I am getting back on my horse ~ so to speak!!